How to Enable or Disable Single Window Mode in Snip & Sketch app in Windows 10
Starting with Windows 10 version 1809, also known as "October 2018 Update", Microsoft implemented a new option - screen snipping. A new Snip & Sketch app has been added to Windows 10 to quickly snip and share a screenshot. The recent update adds single window mode to the Snip & Sketch app in Windows 10. Here's how to enable or disable it.
Advertisеment
Using the new Screen Snip tool, you can capture a rectangle, snip a freeform area, or take a full screen capture, and copy it directly to the clipboard. Immediately after taking a snip you’ll now get a notification that will take you and your snip to the Screen & Sketch app where you can annotate and share away. Screenshots can be opened in the Screen & Sketch app, which adds extra options like Ink Color and Delay. It allows adding annotations using a pen, touch, or mouse. The images can be shared with other apps. The following article covers various methods you can use to launch the Screen Snip tool:
Take a Screenshot with Screen Snip in Windows 10
In short, you can Press the Win + Shift + S keys or use a special quick action button in the Action Center pane.
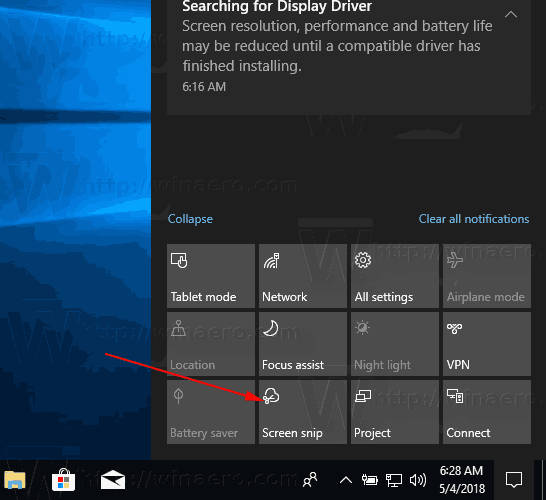
Also, for convenience, you can create a special Screen Snip taskbar button. See
Add Screen Snip To Taskbar in Windows 10
A new version of the app was shipped with the recently released Fast Ring build 18950 of Windows 10. Build 18950 includes Snip & Sketch version 10.1907.2064.0, which introduced a number of changes. The New button now opens new snips in your current app window, so you don’t end up with a ton of open snips that you then need to close. If you’d rather keep all snips open in separate windows, the option is now a toggle in settings, so you can decide which mode you prefer.
To Enable Single Window Mode For Snip & Sketch in Windows 10,
- Open the Snip & Sketch app. See How to navigate apps by alphabet in Windows 10 Start menu.
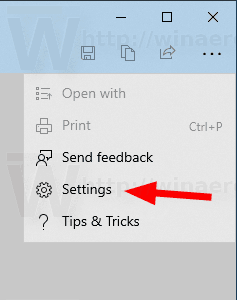
- Click on the menu button with three dots.
- Select the Settings item from the menu.
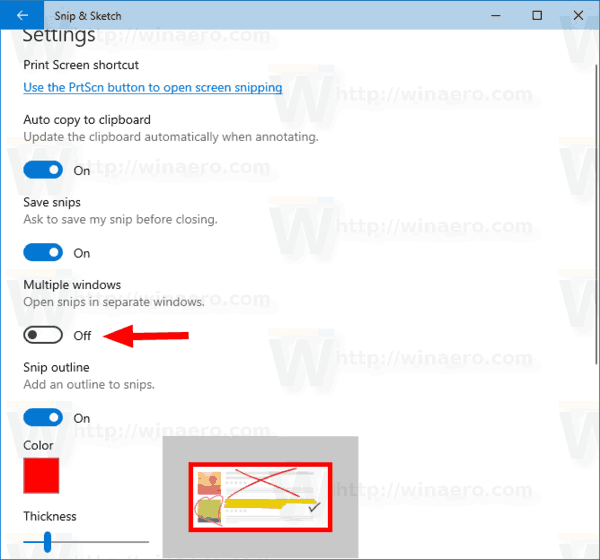
- In Settings, go to the Multiple windows section.
- Turn off the option Open snips in separate windows.
You are done.
The same way you can disable the new Single Windows mode feature, by turning off the mentioned option.
To Disable Single Window Mode For Snip & Sketch in Windows 10,
- Open the Snip & Sketch app.
- Navigate to Menu (three dot button) > Settings.
- Turn on the option Open snips in separate windows.

Related articles:
- Backup and Restore Snip & Sketch Settings in Windows 10
- Turn On or Off Ask to Save Changes in Snip & Sketch in Windows 10
- Disable Auto Copy to Clipboard in Snip & Sketch app in Windows 10
- Enable Snip Outline in Snip & Sketch app in Windows 10
- Add Screen Snip To Taskbar in Windows 10
- Screen Sketch Keyboard Shortcuts in Windows 10 (Hotkeys)
- Enable Print Screen Key to Launch Screen Snipping in Windows 10
- Take a Screenshot with Screen Snip in Windows 10
- Add Screen Snip Context Menu In Windows 10
- Create Screen Snip Shortcut in Windows 10
- Uninstall and Remove Screen Sketch In Windows 10
Support us
Winaero greatly relies on your support. You can help the site keep bringing you interesting and useful content and software by using these options:

single window mode is a disaster; very difficult to turn off
Every new and clever feature cause more damage than good/
Microsoft has way too many developers, and not enough QA
It appears this option to turn on/off multiple windows has been removed (August 2020)
It works very poorly on extended monitors. Frustrating.