In this article, we will see how to add a useful Screen Snip command to the context menu of the Desktop in Windows 10. This will allow you to launch the new screen clipping experience with one click. Let's see how it can be done.
Advertisеment
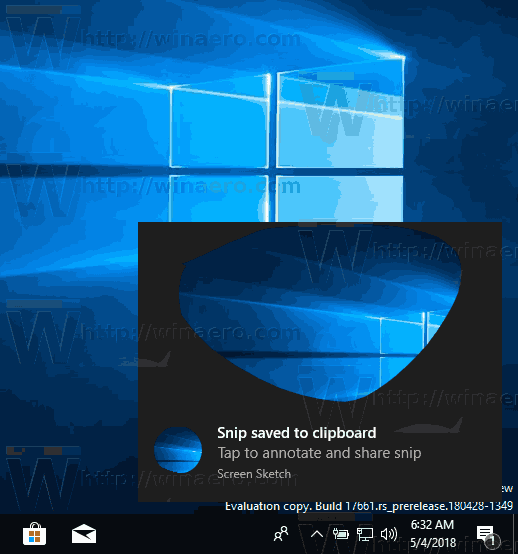
Starting with Windows 10 build 17661, currently referred to as "Redstone 5", Microsoft implemented a new option - screen snipping. A new Screen Snip feature has been added to Windows 10 to quickly snip and share a screenshot.
Using the new Screen Snip tool, you can capture a rectangle, snip a freeform area, or take a full screen capture, and copy it directly to the clipboard. Immediately after taking a snip you’ll now get a notification that will take you and your snip to the Screen Sketch app where you can annotate and share away. In the current implementation, other traditional tools available in the Snipping Tool (Delay, Window snip, and ink color, etc) are missing.
For reference, see the following article:
Take a Screenshot with Screen Snip in Windows 10
In our previous article, we learned that we can launch Screen Snip with a special ms-settings command:
explorer.exe ms-screenclip:
See the article Create Screen Snip Shortcut in Windows 10 for reference. Let's use this command to add the context menu.
In short, see the following example:
Windows Registry Editor Version 5.00

[HKEY_CLASSES_ROOT\DesktopBackground\Shell\ScreenSnip]
"MUIVerb"="Screen Snip"
"Icon"="%SystemRoot%\\System32\\shell32.dll,259"


[HKEY_CLASSES_ROOT\DesktopBackground\Shell\ScreenSnip\command]
""="explorer.exe ms-screenclip:"
The tweak above adds the following context menu:
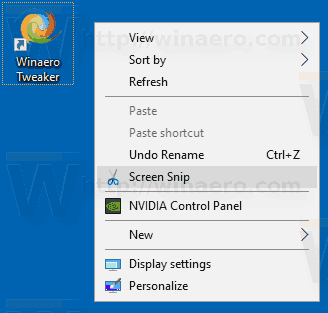
To add the Screen Snip context menu In Windows 10, do the following.
- Download the following Registry files in the zip archive: Download Registry Files.
- Extract them to any folder you like. You can place them right on the Desktop.
- Double click the "Add Screen Snip Context Menu.reg" file.
- The Screen Snip command is now available from the Desktop context menu.
The undo tweak is included for your convenience, so you can quickly remove the command when needed.
To save your time, you can use Winaero Tweaker. It comes with the following option:
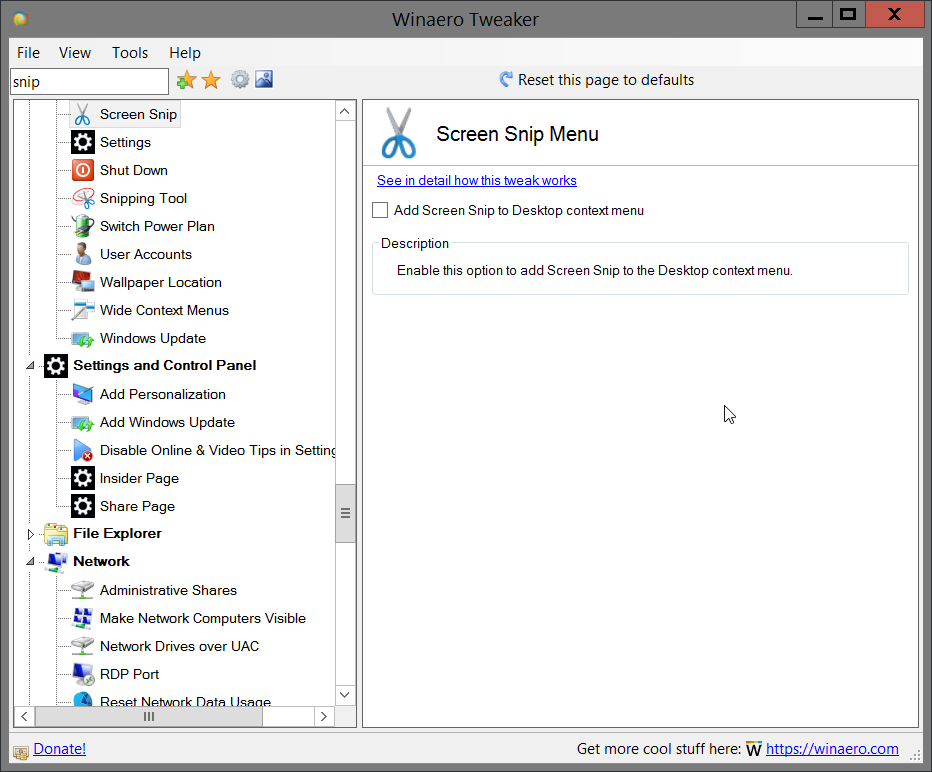
Turn on the option to add the context menu.
That's it.
Support us
Winaero greatly relies on your support. You can help the site keep bringing you interesting and useful content and software by using these options:

For some odd reason this stopped working, I can take the screenshot, but then nothing happens :(
This trick is working normally, what you should take into account is that the selected image is copied to the clipboard, so you must create a new image and paste the contents of the clipboard (crtl+V) and presto, your capture is saved, you are confused this functionality with the capture tool, it does show the captured image right after the selection.
A hug and stay well and healthy, both you and all yours too.
@JeepWillys58
I find the same issue Phil reported: I am able to select an area, but there is no editor afterward, and the clip is not stored in clipboard.