How to Change Windows Defender Max CPU Usage For a Scan in Windows 10
Windows Defender Antivirus uses security intelligence definitions to detect threats. Windows 10 automatically downloads the most recent intelligence available through Windows Update. In Windows 10, it is possible to limit the maximum CPU usage for a scan in order to prevent Windows Defender from consuming a lot of system resources. Here are the methods you can use.
Advertisеment
Windows Defender is the default antivirus app shipped with Windows 10. Earlier versions of Windows like Windows 8.1, Windows 8, Windows 7 and Vista also had it but it was less efficient previously as it only scanned spyware and adware. In Windows 8 and Windows 10, Defender is based on the Microsoft Security Essentials app which offers better protection by adding full blown protection against all kinds of malware. Microsoft is renaming the app Microsoft Defender.
Recent Windows 10 version come with is a new app called Windows Security. The application, formerly known as "Windows Defender Dashboard" and "Windows Defender Security Center", has been created to help the user control his security and privacy settings in a clear and useful way. It includes all the settings related to Windows Defender. The Security Center app is reviewed in the post Windows Defender Security Center in Windows 10 Creators Update.
You can launch Windows Security from the Start menu or with a special shortcut. Alternatively, you can access it using its tray icon.
![]()
Note: Windows 10 allows to only temporary disable Windows Defender with a special option in Windows Security. After some period of time, it will be re-enabled automatically. If you need to disable it permanently, see
Disable Windows Defender in Windows 10.
Microsoft continually updates security intelligence in antimalware products to cover the latest threats and to constantly tweak detection logic, enhancing the ability of Windows Defender Antivirus and other Microsoft antimalware solutions to accurately identify threats. This security intelligence works directly with cloud-based protection to deliver fast and powerful AI-enhanced, next-generation protection. Also, you can update definitions manually.
By default in Windows 10, Windows Defender is set to utilize maximum 50% CPU usage when performs an antivirus scan. It is possible to change a percentage of CPU usage the app must not exceed. Here's how it can be done.
To Change Windows Defender Max CPU Usage For Scan in Windows 10,
- Open PowerShell as Administrator. Tip: You can add "Open PowerShell As Administrator" context menu.
- Type or copy-paste the following command:
Get-MpPreference | select ScanAvgCPULoadFactor. This will display the current CPU usage percentage limit for Windows Defender.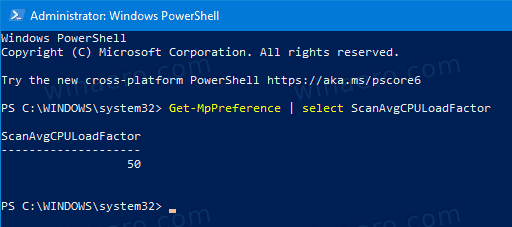
- To change it, issue the command
Set-MpPreference -ScanAvgCPULoadFactor <percentage>. The valid value for<percentage>must be in the range from 5 to 100.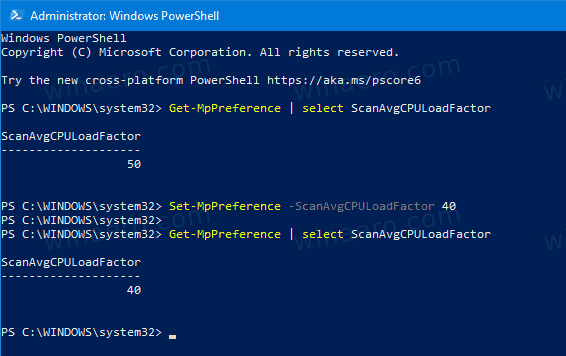
- Also, you can set
<percentage>to 0. This will remove the CPU limit and allow Windows Defender consume 100% of CPU if required. I do not recommend you to use this mode.
You are done!
Alternatively, you can use a Group Policy to specify the CPU percentage limit for a scan for Windows Defender. If you are running Windows 10 Pro, Enterprise, or Education edition, you can use the Local Group Policy Editor app to configure the options with a GUI. Otherwise, you can apply a Registry tweak (see below).
Change Windows Defender Max CPU Usage For Scan with Group Policy
- Press Win + R keys together on your keyboard and type:
gpedit.msc
Press Enter.

- Group Policy Editor will open.
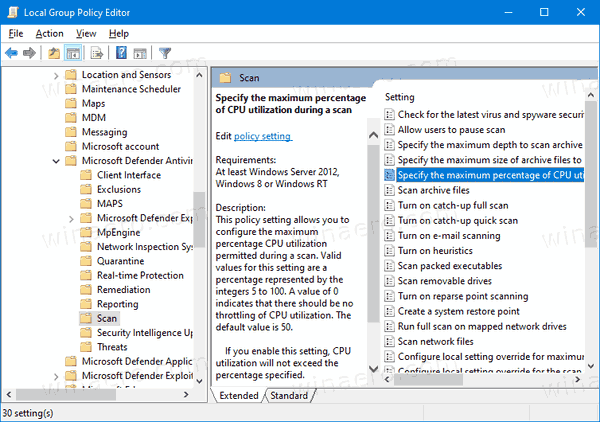
- Go to Computer Configuration/Administrative Templates/Windows Components/Microsoft Defender Antivirus/Scan.

- On the right, double-click on the Specify the maximum percentage of CPU utilization during a scan policy.
- Enable this policy.

- Under Options, enter the desired CPU percentage limit.
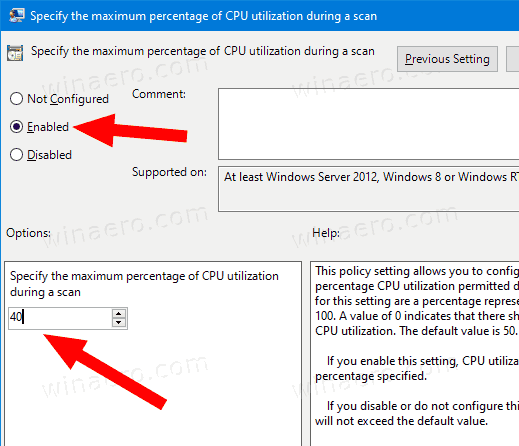
- Click Apply and OK.
Finally, if your Windows 10 doesn't include Local Group Policy Editor, you can apply a Registry tweak. Here is how.
Change Windows Defender Max CPU Usage For Scan in Registry
- Open Registry Editor.
- Go to the following Registry key:
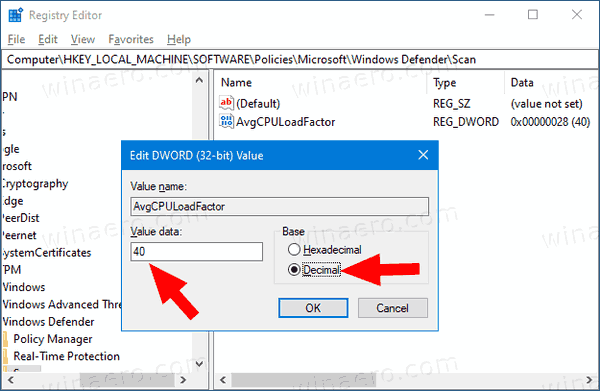
HKEY_LOCAL_MACHINE\SOFTWARE\Policies\Microsoft\Windows Defender\Scan
Tip: See how to jump to the desired Registry key with one click. If you do not have such a key, then just create it. - Here, modify or create a new 32-bit DWORD value AvgCPULoadFactor. Note: Even if you are running 64-bit Windows, you still need to use a 32-bit DWORD as the value type.
- Switch the value data editor to Decimal, and set the value data to a value of 5 to 100 for the maximum CPU usage.
Later, you can delete the AvgCPULoadFactor value to undo the change.
That's it!
Tip: If you find no use for Windows Security and want to get rid of it, you may find the following articles useful:
Finally, you may want to disable the Windows Defender anti-virus app.
Related articles:
- Enable or Disable Tamper Protection in Windows 10
- Windows 10: View Security Providers in Windows Security
- Enable Windows Security Block Suspicious Behaviors in Windows 10
- View Protection History of Windows Defender in Windows 10
- Enable Windows Defender Sandbox in Windows 10
- Schedule Scan in Windows Defender in Windows 10
- How to Enable Windows Defender Application Guard in Windows 10
- How To Add Exclusions for Windows Defender in Windows 10
Support us
Winaero greatly relies on your support. You can help the site keep bringing you interesting and useful content and software by using these options:
