Often, our tips mention the Windows Registry and Registry Editor. What exactly is the Registry and what is RegEdit? Those are who are familiar with Windows for many years need no explanation, but those who are new to Windows will find this post useful.
Today, I am going to explain the fundamentals of Registry Editor. I will also cover command line arguments, essential methods of working with this program and more. Read below if you are interested.
Advertisеment
Table of contents
- What is Registry Editor
- How to launch Registry Editor
- What Registry Editor shows you
- How to create a new key
- How to create a new value
- How to take ownership of a registry key
- How to restore the TrustedInstaller ownership
- How to change permissions on a registry key
- How to access the registry of another user or another OS
- Registry Editor command line arguments
- How to jump to the desired registry key with one click
- Switch Between HKCU and HKLM in Registry Editor in Windows 10
What is Registry Editor
Registry Editor was born as a tool for users who want to change Windows settings which are not exposed in the user interface. The main purpose of this tool is to view and change the settings in the system registry - a set of special files which contain configuration information about Windows and almost all software installed. Windows and many programs (except the ones which are "portable") use this information to read and write their own settings to the registry.
How to launch Registry Editor
Regardless of the Windows version you have installed, this method will work:
Press Win+R keys on your keyboard, the "Run" dialog will appear. Type regedit without quotes and press Enter. Continue with the UAC prompt.
The main executable file of Registry Editor is located in the C:\Windows directory. So you can navigate to that folder and run the regedit.exe file directly. Or you can create a shortcut to Regedit.exe and paste it in the Start Menu at %ProgramData%\Microsoft\Windows\Start Menu\Programs under the System Tools folder. This will make Registry Editor show up in Start Menu search as well.
Registry Editor looks like this: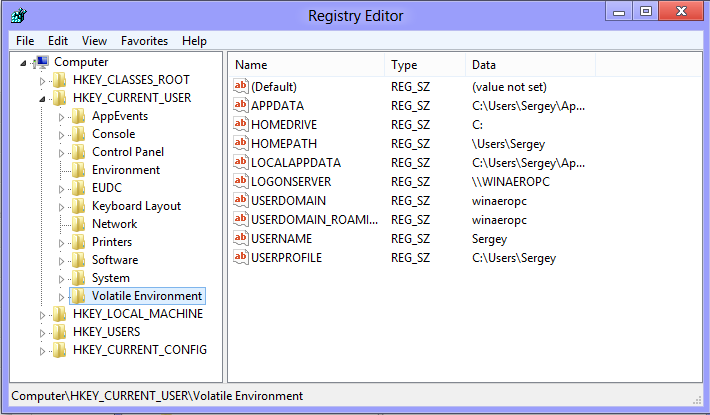
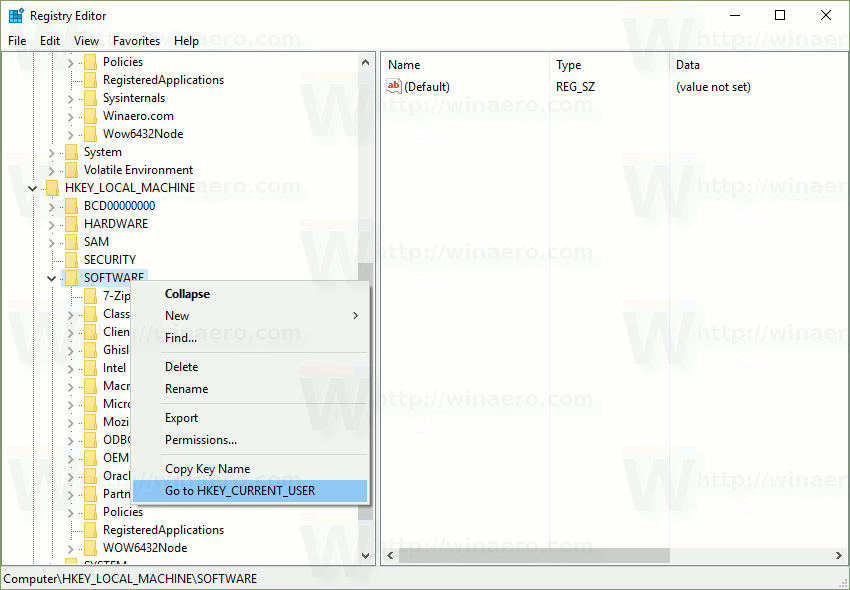
What Registry Editor shows you
As seen in the picture above, it consists of two panes - the left pane shows a hierarchical view of data structures, called keys, and right pane shows values - which are pairs of name/data stored within keys.
Keys are a virtual view of data from several files, which form the registry database. You can see which files represent your registry database if you open the following key:
HKEY_LOCAL_MACHINE\SYSTEM\CurrentControlSet\Control\hivelist
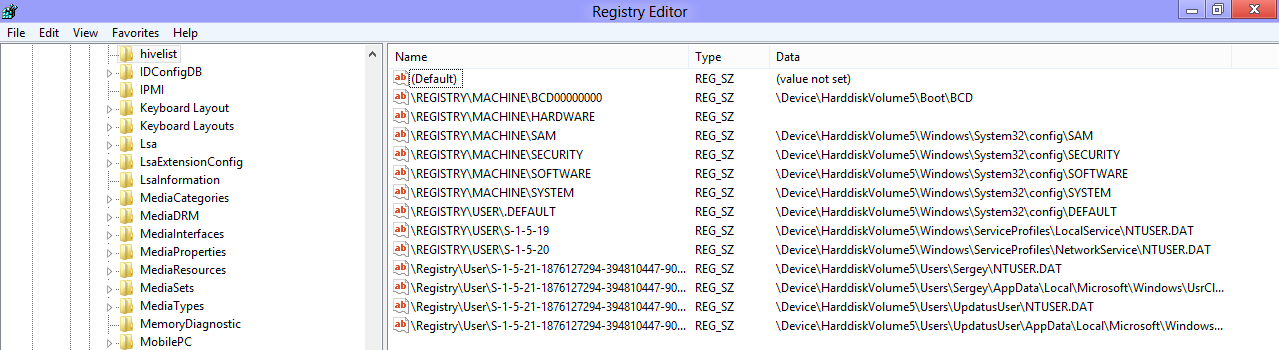 Here you can see the list of files on your hard drive where the registry files are stored. The data inside them, as mentioned above, has a hierarchical structure. Registry Editor shows it as a tree view: there are "root" (parent) keys, and several sub-keys (child objects). The root keys shown in Regedit for the most part, represent the specific file, or in other words, the registry files correspond to keys' hierarchy. However, there are also some virtual root keys shown in Regedit which exist for backward compatibility. For example, HKEY_CURRENT_CONFIG is a virtual view, and HKEY_CLASSES_ROOT is also a virtual view of the current user's key + system keys.
Note that some parts of the registry database are never shown in Registry editor. For example, you will never see SAM (Security Accounts Manager) inside Regedit.
The values are used by Windows and many applications to store various configuration parameters and their data. Values are of various types, but in the general case, there are string values, numeric values or binary values.
How to create a new key
To create a new key, you must right click on the parent key in the left pane and click the New -> Key context menu command.
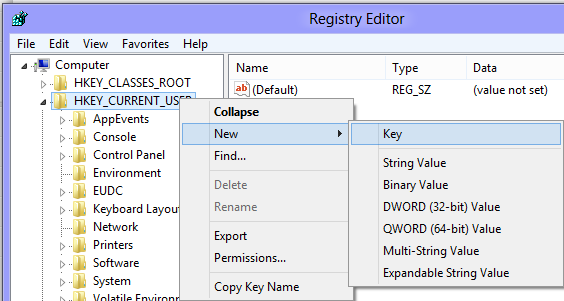
You must give the newly created key a proper name as required by the software for which you are creating it. You can export (save) the key into a *.reg file from the context menu. By exporting it to a file, you can later simply double click the .reg file to import its contents back into the Registry.
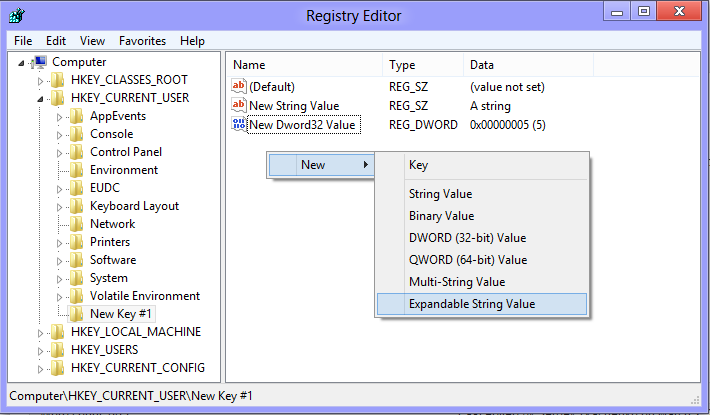
How to create a new value
To create a new value, you must right-click
- on the current key in the left pane or
- in the empty area in the right pane.
Select the appropriate type for the new value and enter its name. Double click the value you created to set its data as required.
How to take ownership of a registry key
Just like permissions and ownership concepts exist for objects in the NTFS file system, they exist for Registry keys as well. Starting with Windows Vista, in fact, a large number of OS-specific registry keys which store Windows settings as protected by Windows Resource Protection so that they can't be easily deleted or modified. You may need to modify these keys in certain situations. For that, you need to take ownership as well as set permissions (access rights) on them. For example, in order to tweak the Explorer command bar, Winaero's Explorer Toolbar Editor takes ownership of certain registry keys and changes their permissions as well. Taking ownership is quite simple and can be performed with the following steps.
1. After you open Registry Editor, go to the registry key you want to take ownership of, right-click on it and select the Permissions... option from the context menu.
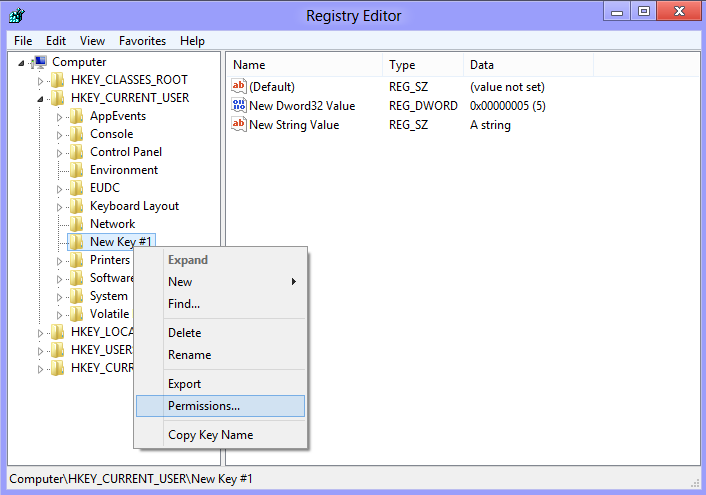
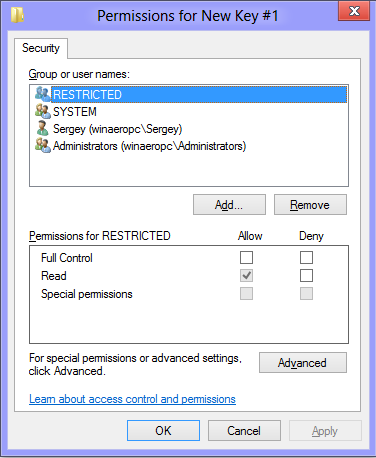
2. This will open the "Permissions" dialog for that key. Click the Advanced button.
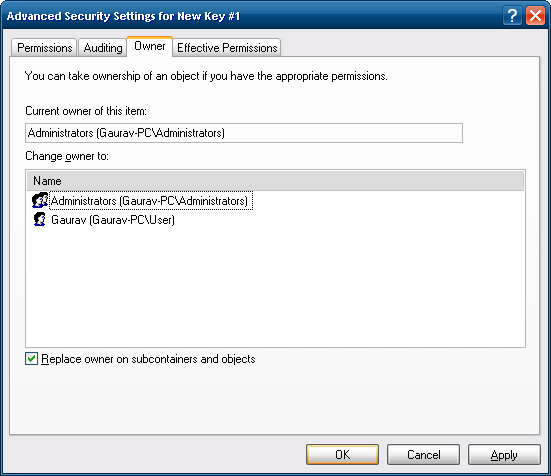
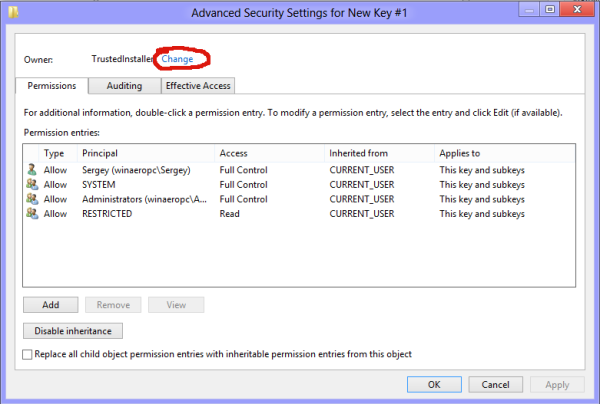
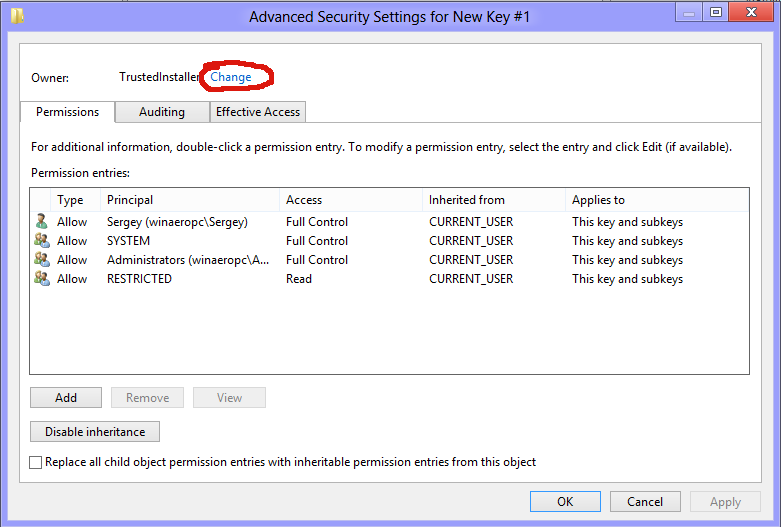
3. The "Advanced Security Settings" window will appear. Here you need to change the Owner of the key. Depending on the Windows version, this dialog may look different:
For Windows XP
Open the Owner tab.
 Select your user account and click the Apply button. If the ownership must be set on all subkeys too, then check the Replace owner on subcontainers and objects checkbox.
For Windows 7/Windows Vista
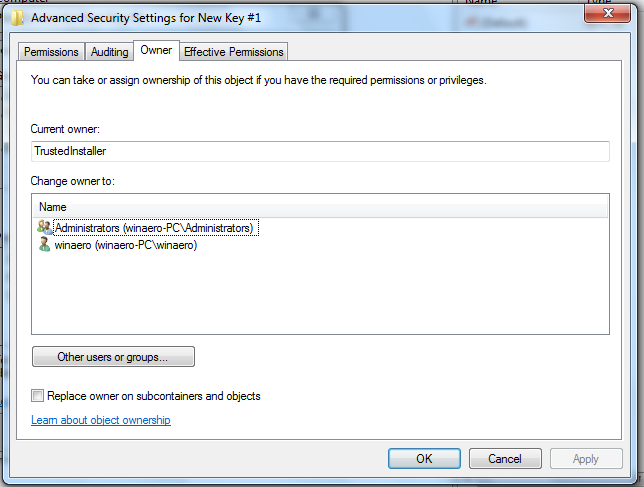
Open the Owner tab.
Click the Other users or groups... button.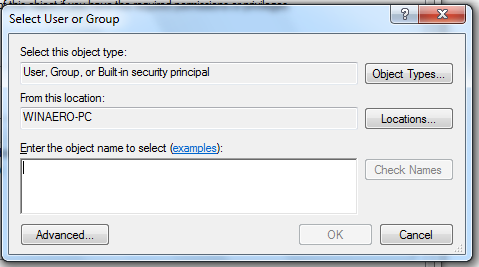
Select the user account via the Advanced button or just type your user account in the Enter the object name to select text area and click OK.
If the ownership must be set on all subkeys too (as is more often the case on Windows 7/Vista), then check the Replace owner on subcontainers and objects checkbox.For Windows 8
Click the Change link next to the "Owner:" label
 The Select User or Group window will appear.
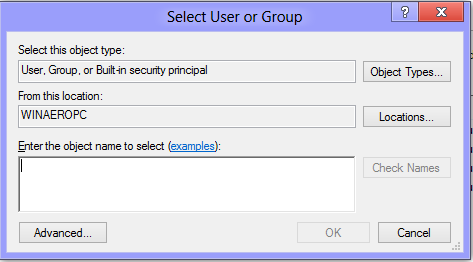
Select the user account via the Advanced button or just type your user account in the Enter the object name to select text area and click OK.
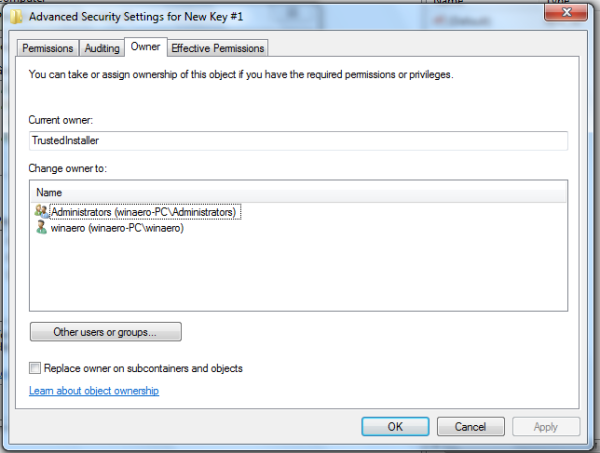
How to restore the TrustedInstaller ownership
To restore the TrustedInstaller ownership in Windows 7,8 and Vista, type "NT Service\TrustedInstaller" as new owner name.
How to change permissions on a registry key
After you change the owner of a registry key, you almost always need to change its permissions before you can actually modify the key. You have to switch to the Permissions tab in the Advanced Security Settings dialog to do so.
Subkeys can have inherited permissions from their parent key. Or, subkeys can also have explicit permissions, separate from the parent key. In the first case, that is, if the permissions are inherited from the parent key, you have to disable inheritance and copy permissions to the current key. In Windows 7, Windows Vista and Windows XP, you must uncheck the Include inheritable permissions from this object's parent check box to do so and click the Add button in the confirmation dialog.

After disabling inheritance, select the appropriate user account and click the Edit button to change the permissions.
In Windows 8, there is a button to disable inheritance.
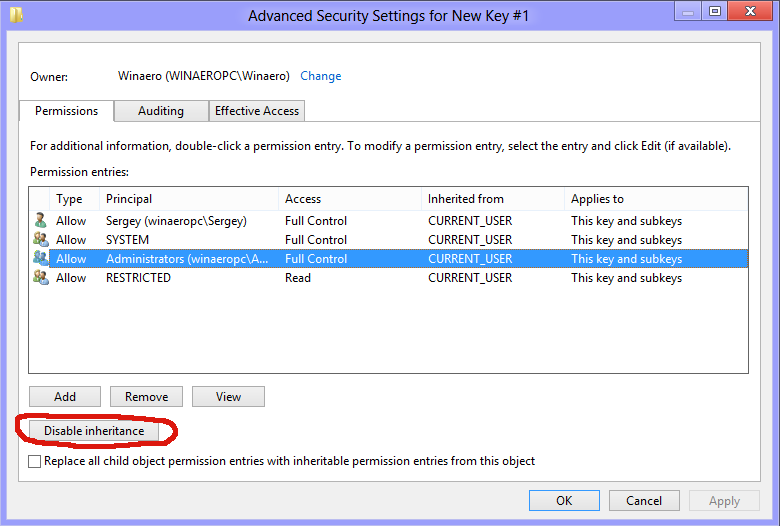
Permissions can be set both ways. You can set them only on the required sub key after disabling inheritance. Or you can set permissions on the parent key and all its subkeys. To do so, check the Replace all child object permissions with inheritable permissions from this object checkbox. This will push permissions down the keys hierarchy to all child objects.
How to access the registry of another user or another OS
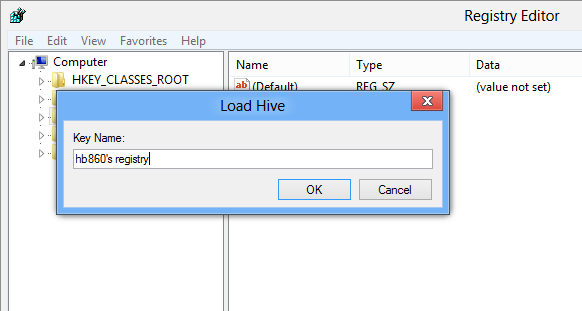
Registry Editor also allows you to access the keys and values of another user on the same Windows installation or another Windows installation on a different or same PC. As mentioned above, the Windows Registry is stored in several files. You can load these individually and mount them to the root of the HKEY_LOCAL_MACHINE key.
Here are step-by-step instructions:
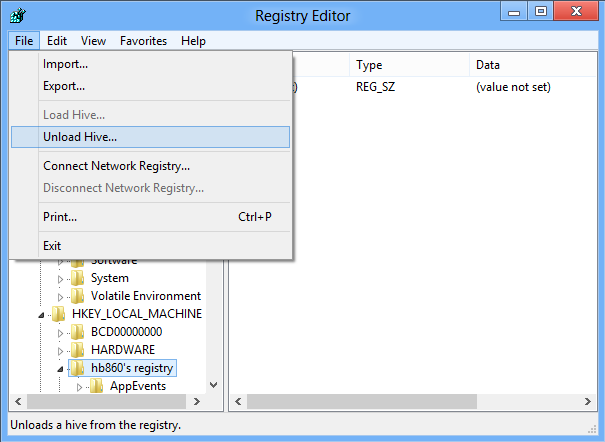
1. Select the HKEY_LOCAL_MACHINE key in Registry Editor.
2. Choose the "File -> Load Hive" menu command.
3. Browse for the registry file you want to open. In the example below, I will load the registry file of another user account on my Windows 8 installation.
4. In the next dialog you must enter a name for the registry file you loaded. This name will be displayed under the HKEY_LOCAL_MACHINE key.
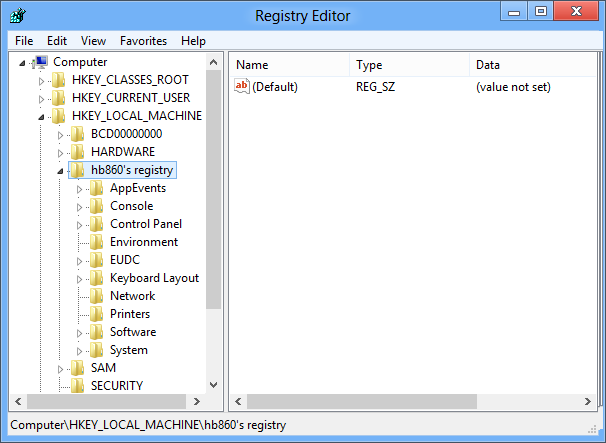
Note: Be sure to unload the loaded registry file after you are done working with it. This can be done from the "File menu -> Unload Hive" menu command after selecting the key you have loaded.
Registry Editor command line arguments
Finally, I would like to show you the most common command line arguments that can be used with Registry Editor. They can be used in your own scripts and batch files. They are as follows:
regedit.exe -mOpens another instance of Registry Editor even if one is already open. This is extremely handy if you want to compare two registry key locations. Will work on Windows XP and later.
regedit.exe path_to_file.reg
Merge a registry file with your current Registry. This is the default action that is performed when you double click on a *.reg file in Explorer.
regedit.exe /s path_to_file.reg
Same as above, but the file will be merged silently, without the confirmation dialog. Useful for scripts.
regedit.exe /e path_to_file.reg
Export all registry data into a single file
regedit /e path_to_file.reg "HKEY_CURRENT_USER\Control Panel\Desktop"
Exports the HKEY_CURRENT_USER\Control Panel\Desktop key and its subkeys into a single file
regedit /a path_to_file.reg "HKEY_CURRENT_USER\Control Panel\Desktop"
Same as above, but the registry file will be created with ANSI encoding instead of Unicode. Also the exported file will get the "REGEDIT4" line as a first line. Such files are compatible with older versions of Windows (prior to Windows 2000).
How to jump to the desired registry key with one click
See our appropriate article: How to jump to the desired registry key with one click.
Switch Between HKCU and HKLM in Registry Editor in Windows 10
 See the article: Switch Between HKCU and HKLM in Windows 10 Registry Editor
These Registry concepts I have covered are merely the tip of the iceberg. Feel free to share with us your feedback about this article.
Support us
Winaero greatly relies on your support. You can help the site keep bringing you interesting and useful content and software by using these options:

Does anyone have a mod for windows 8.1 which would restore the Start Screen behavior of Windows 8. I am specifically looking for a registry modification which would enable apps to automatically be added to the Start Menu. I do not like to add them after I install an application. I would like them to add automatically, then if I do not want them I can remove them from the Start Screen. I have spoken with several people who find it extremely annoying that upon installation they have to go to the View All Apps section to find what they have added. This wastes time and effort. It is MUCH easier to delete what I don’t want then to ADD what I do.
Well, we have not discovered such ability yet.
im aking a huge mistake
Thank you for a great article Sergey. I am hoping you might be able to help my situation… I made a few changes to the owner & permissions in the registry to a perfectly working machine. Now I am unable to perform a number of tasks which include; not able to “erase everything and reinstall windows; not able to refresh, restore; also not able to connect to internet. Is there a way to restore registry back to original or default?
I have an identical machine I can use to help fix my problem if need be. windows 8
Thank you!
Can you share a bit more details about changes you made?
It is important that you define your article to the basic topic…How do we change the setting from “FULL to BASIC” without our selected value being automatically switched or hijacked. You did not stay on point. The answer was lost in the extended detail. Please…stick to the point of the writing. Otherwise it was a great article!
HKEY_CURRENT_USER\Software\Microsoft\Windows\CurrentVersion\Explorer
I wanted to disable first letter capitalization. Could not find the place where I could do it.
Where? In which app?
When I tried to edit the permissions, it said “Access Denied” (that’s all it said).
run command prompt as admin and type regedit.exe and them try
the problem is where to get the full edition of windows 10 enterprise download, finally i had to get one from Keyingo, use the full edition iso to convert from eval edition to retail edition, everything is ok , and I don’tlose any data , files and settings !