Starting with Windows 10 build 17063, the OS has got a number of new options under Privacy. These include the ability to control usage permissions for your Library/data folders, microphone, calendar, user account info, file system, location, contacts, call history, email, and messaging. Windows 10 version 1903 'May 2019 Update' adds one more option to Privacy in Settings, 'Voice Activation'.
Advertisеment
When you disable app access for the Voice Activation feature, it will be automatically disabled for all apps as well. When enabled, it will allow you to disable Voice Activation access permissions for individual apps. Here is how it can be done.
To Disable App Access to Voice Activation in Windows 10,
- Open the Settings app.
- Go to Privacy - Voice Activation.
- On the right, turn off the option Allow apps to use voice activation.
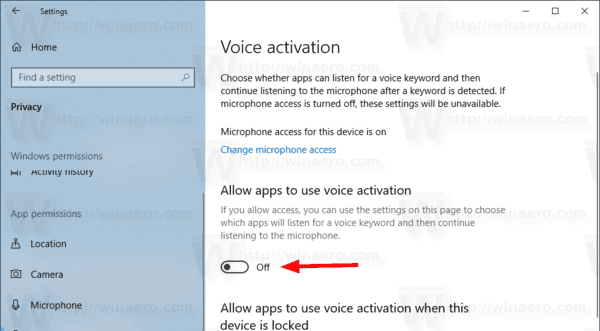
This will disable app access to the Voice Activation feature in Windows 10 for all apps. Windows 10 won't be able to use it any more. None of your installed apps will be able to access voice activation.
Additionally, you can prevent apps from using Voice Activation when your device is locked.
Prevent apps from using voice activation when the device is locked
- Open the Settings app.
- Go to Privacy - Voice Activation.
- On the right, turn off the option Allow apps to use voice activation when this device is locked.
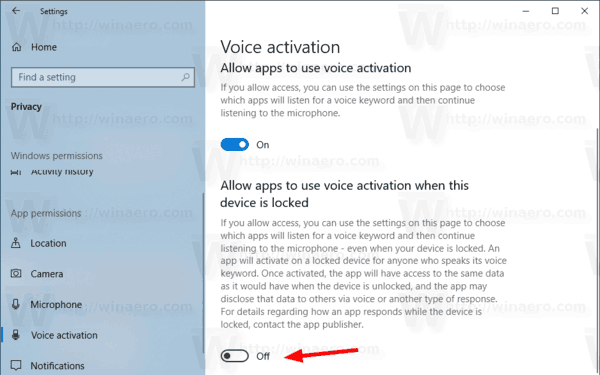
If this option is enabled, you can choose which apps will listen for a voice keyword and then continue listening to the microphone, even when the device is locked. An app will activate on a locked device for anyone who speaks its voice keyword. Once activated, the app will have access to the same data as it would have when the device is unlocked, and the app may disclose that data to others via voice or another type of response.
Disable individual app access to Voice Activation in Windows 10
- Open the Settings app.
- Go to Privacy - Voice Activation.
- Turn on or off the toggle option for apps you want under Choose which apps can use voice activation on the right side.
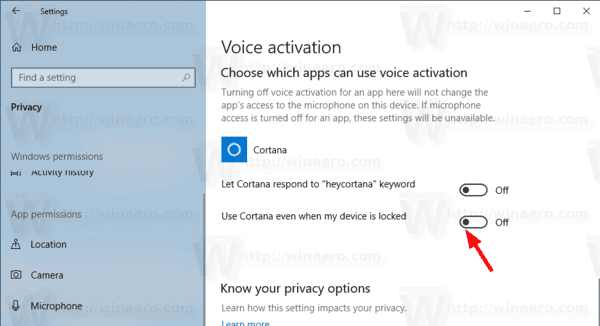
Note: This assumes that you've enabled access to Voice Activation using the options described above. So, users will be able to disable or enable Voice Activation access for the installed apps.
Registry Tweaks
You can enable or disable app access to Voice Activation with a Registry tweak. Here's how.
To disable app access to Voice Activation with a Registry tweak, do the following.
- Download the following ZIP archive: Download ZIP archive.
- Extract its contents to any folder. You can place the files directly to the Desktop.
- Unblock the files.
- Double click on the Disable App Access To Voice Activation.reg file to merge it. This will disable app access to Voice Activation for the current user.
- Also, you can use the file Disable App Access To Voice Activation When Device Is Locked.reg to disable app access to Voice Activation when your device is locked.
- The undo tweaks, Enable App Access To Voice Activation When Device Is Locked.reg and Enable App Access To Voice Activation.reg, are included.
You are done.
The Registry files modify the following values in the Registry:
[HKEY_CURRENT_USER\Software\Microsoft\Speech_OneCore\Settings\VoiceActivation\UserPreferenceForAllApps]

"AgentActivationEnabled"=dword:00000000
"AgentActivationOnLockScreenEnabled"=dword:00000000
The values of LetAppsActivateWithVoice are :
0 – User is in control
1 – Force Allow
2 – Force Deny
Finally, you can configure app access to Voice Activation feature with Group Policy.
Group Policy options
If you are running Windows 10 Pro, Enterprise, or Education edition, you can use the Local Group Policy Editor app to configure the app access option to Voice Activation with a GUI.
To disable app access to Voice Activation with Group Policy,
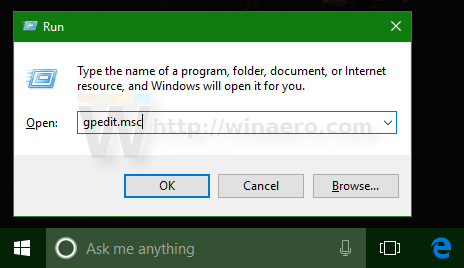
- Press Win + R keys together on your keyboard and type:
gpedit.msc
- Group Policy Editor will open. Go to Computer Configuration\Administrative Templates\Windows Components\App Privacy.
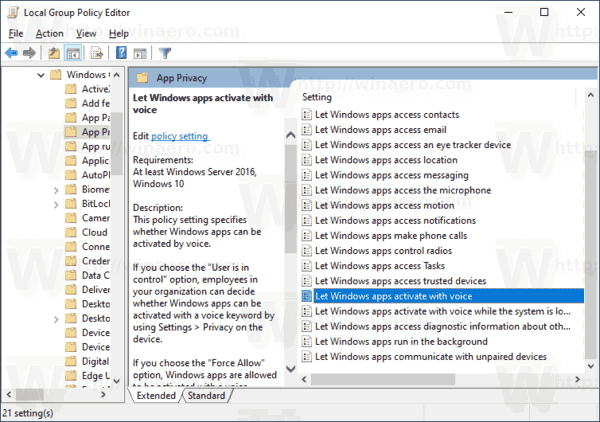
- Enable the policy option Let Windows apps activate with voice.
- In the Default for all apps, select the option Force Allow or Force Deny for to what you want.
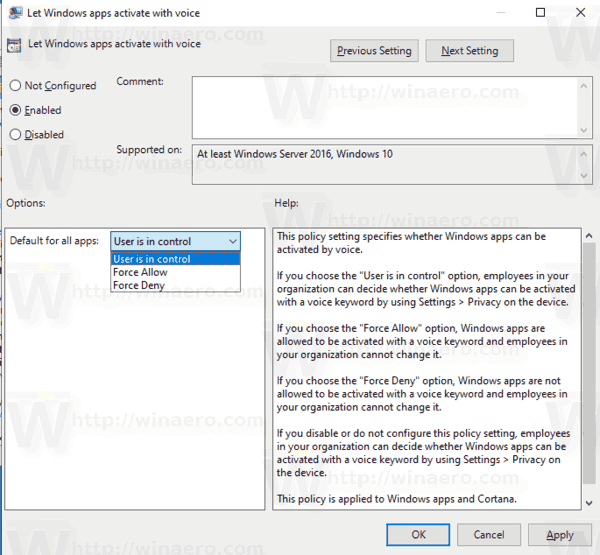
Note: The option value User is in control doesn't apply any restriction to the Settings app. The default value of the policy is Not Configured.
If your Windows 10 edition doesn't include the gpedit.msc tool, you can apply the following Registry tweak instead.
To disable app access to Voice Activation with a Group Policy Registry tweak,
- Open the Registry Editor app.
- Go to the following Registry key.
HKEY_LOCAL_MACHINE\SOFTWARE\Policies\Microsoft\Windows\AppPrivacy
See how to go to a Registry key with one click.
- On the right, modify or create a new 32-Bit DWORD value LetAppsActivateWithVoice.
Note: Even if you are running 64-bit Windows you must still create a 32-bit DWORD value. - Supported values:
LetAppsActivateWithVoice = 1 - Force Allow app access to voice activation
LetAppsActivateWithVoice = 0 - Force Deny app access to voice activation - Restart Windows 10.
Note: This change will affect all users of the Windows 10 device.
You can download the following ready-to-use Registry files:
The undo tweak is included.
Articles of interest:
- How to View App Permissions in Windows 10
- How to Reset the Mail App in Windows 10
- Change Mail App Background to Custom Color in Windows 10
- Add Email Context Menu in Windows 10
- How To Disable Sent from Mail for Windows 10 Signature
Support us
Winaero greatly relies on your support. You can help the site keep bringing you interesting and useful content and software by using these options:

The values of LetAppsActivateWithVoice are :
0 – User is in control
1 – Force Allow
2 – Force Deny
Thanks, added to the text.