Windows 10, Windows 8.1 and Windows 8 come with Client Hyper-V so you can run a supported guest operating system inside a Virtual Machine. Hyper-V is Microsoft's native hypervisor for Windows. It was originally developed for Windows Server 2008 and then ported to Windows client OS. It has improved over time and is present in the latest Windows 10 release as well. You can use the import-export feature to move a virtual machine between your Hyper-V host machines. Also, by importing a previously exported virtual machine, you can restore it from backup.
Advertisеment
Note: Only Windows 10 Pro, Enterprise, and Education editions include the Hyper-V virtualization technology.
What is Hyper-V
Hyper-V is Microsoft's very own virtualization solution that allows creating virtual machines on x86-64 systems running Windows. Hyper-V was first released alongside Windows Server 2008, and has been available without additional charge since Windows Server 2012 and Windows 8. Windows 8 was the first Windows client operating system to include hardware virtualization support natively. With Windows 8.1, Hyper-V has got a number of enhancements such as Enhanced Session Mode, enabling high fidelity graphics for connections to VMs using the RDP protocol, and USB redirection which is enabled from the host to VMs. Windows 10 brings further enhancements to the native hypervisor offering, including:
- Hot add and remove for memory and network adapters.
- Windows PowerShell Direct – the ability to run commands inside a virtual machine from the host operating system.
- Linux secure boot - Ubuntu 14.04 and later, and SUSE Linux Enterprise Server 12 OS offerings running on generation 2 virtual machines are now able to boot with the secure boot option enabled.
- Hyper-V Manager Down-level management - Hyper-V manager can manage computers running Hyper-V on Windows Server 2012, Windows Server 2012 R2 and Windows 8.1.
Import a Virtual Machine in Hyper-V
Importing a Hyper-V virtual machine in Windows 10 registers the VM with the Hyper-V host. You can import it back into the host, or to a new host. If you're importing to the same host, you don't need to export the virtual machine first, because Hyper-V tries to recreate the virtual machine from available files. Importing a virtual machine registers it so it can be used on the Hyper-V host.
The Import Virtual Machine wizard also helps you fix incompatibilities that can exist when moving from one host to another. This is commonly differences in physical hardware, such as memory, virtual switches, and virtual processors.
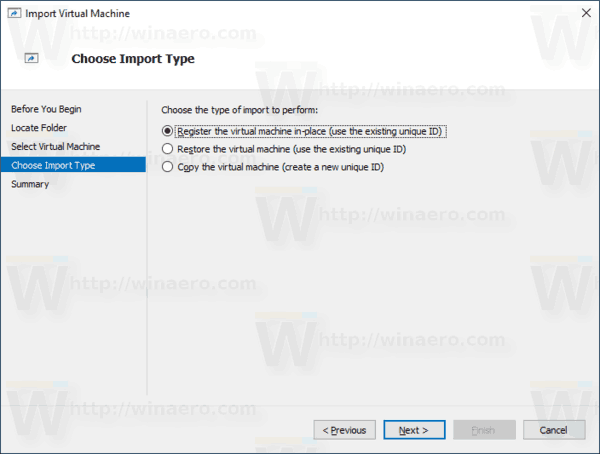
Hyper-V offers three import types:
- Register in-place – This type assumes export files are in the location where you'll store and run the virtual machine. The imported virtual machine has the same ID as it did at the time of export. Because of this, if the virtual machine is already registered with Hyper-V, it needs to be deleted before the import works. When the import has completed, the export files become the running state files and can't be removed.
- Restore the virtual machine – Restore the virtual machine to a location you choose, or use the default to Hyper-V. This import type creates a copy of the exported files and moves them to the selected location. When imported, the virtual machine has the same ID as it did at the time of export. Because of this, if the virtual machine is already running in Hyper-V, it needs to be deleted before the import can be completed. When the import has completed, the exported files remain intact and can be removed or imported again.
- Copy the virtual machine – This is similar to the Restore type in that you select a location for the files. The difference is that the imported virtual machine has a new unique ID, which means you can import the virtual machine to the same host multiple times.
It is possible to export a Hyper-V virtual machine with either Hyper-V Manager, or PowerShell. Let's review both methods.
To import a Hyper-V virtual machine in Windows 10
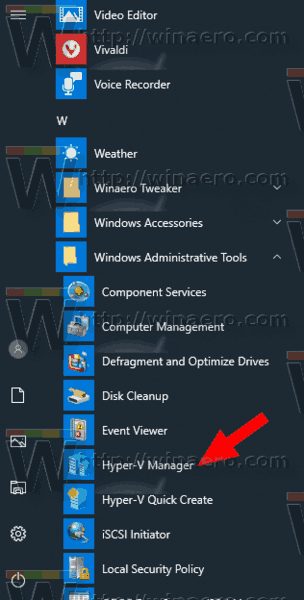
- Open the Hyper-V Manager from the Start menu. Tip: See How to navigate apps by alphabet in Windows 10 Start menu. It can be found under Windows Administrative Tools > Hyper - V manager.
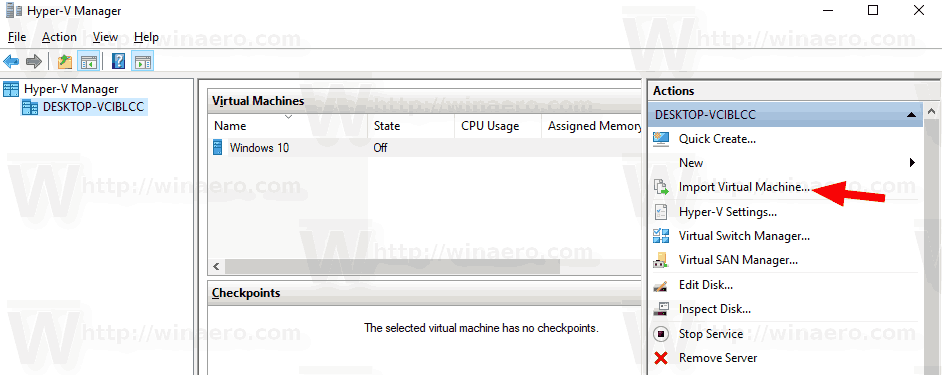
- Click on your host name on the left.
- On the right, click on Import Virtual Machine on the right (the Actions pane).
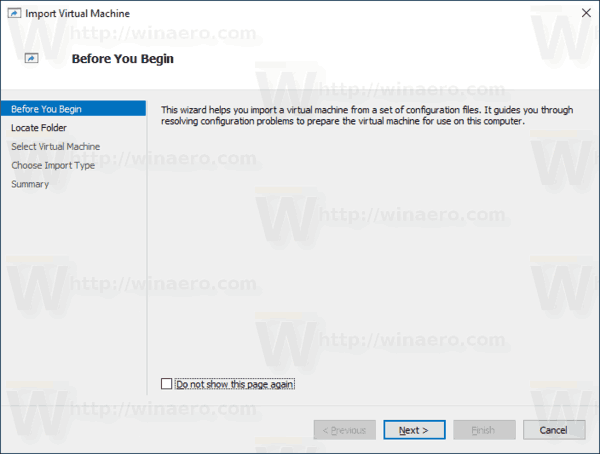
- Click Next on the Before You Begin screen.
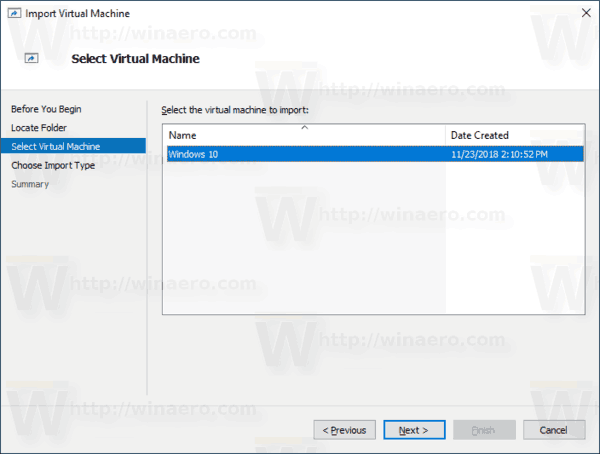
- On the next page, browse for a folder that contains files of a VM you want to import.

- Select the VM and click on the Next button.
- Choose the desired import type (see above).
- On the next page, click on the Finish button.
Note: If you selected the option "Restore the virtual machine" or "Copy the virtual machine", you will be able to customize the folders to store your VM.
You are done.
Import a Hyper-V virtual machine with PowerShell
Register in-place
- Open PowerShell as Administrator.Tip: You can add "Open PowerShell As Administrator" context menu.
- Execute the next command to register it in-place (The imported virtual machine has the same ID as it did at the time of export):
Import-VM -Path 'C:\<vm export path>\2B91FEB3-F1E0-4FFF-B8BE-29CED892A95A.vmcx'
- Substitute the name of the *.vmcx file with the the actual file name of your VM. Use the actual full path of where the virtual machine file you want to import is stored.
Restore
- Open PowerShell as Administrator.
- Execute the next command to import the virtual machine specifying your own path for the virtual machine files:
Import-VM -Path 'C:\<vm export path>\2B91FEB3-F1E0-4FFF-B8BE-29CED892A95A.vmcx' -Copy -VhdDestinationPath 'D:\hyper-v machines\Win10vm' -VirtualMachinePath 'D:\hyper-v machines\Win10vm'
- Substitute the example values with the correct paths and names.
Import as a copy
- Open PowerShell as Administrator.
- Execute the next command to import and move the virtual machine files to the default Hyper-V location.
Import-VM -Path 'C:\<vm export path>\2B91FEB3-F1E0-4FFF-B8BE-29CED892A95A.vmcx' -Copy -GenerateNewId
- Substitute the example values with the correct paths and names.
That's it.
Related articles:
- Export Hyper-V Virtual Machine in Windows 10
- Change Hyper-V Virtual Machine Default Folder in Windows 10
- Change Hyper-V Virtual Hard Disks Folder in Windows 10
- Remove Floppy Disk Drive in Windows Hyper-V Virtual Machine
- Change DPI of Hyper-V Virtual Machine (Display Scaling Zoom Level)
- Create Shortcut for Hyper-V Virtual Machine in Windows 10
- Enable or Disable Hyper-V Enhanced Session in Windows 10
- How to Enable and Use Hyper-V in Windows 10
- Create Ubuntu Virtual Machines with Hyper-V Quick Create
Support us
Winaero greatly relies on your support. You can help the site keep bringing you interesting and useful content and software by using these options:

This is only partially correct — it only applies if the Hyper-V Configuration version of the export source is equal or less than the version of the destination import system. This means, none of this works if exporting from, say Windows 10 (version 9) and trying to import on Windows Server 2016 (version 8).
Is there a way to get this to work?