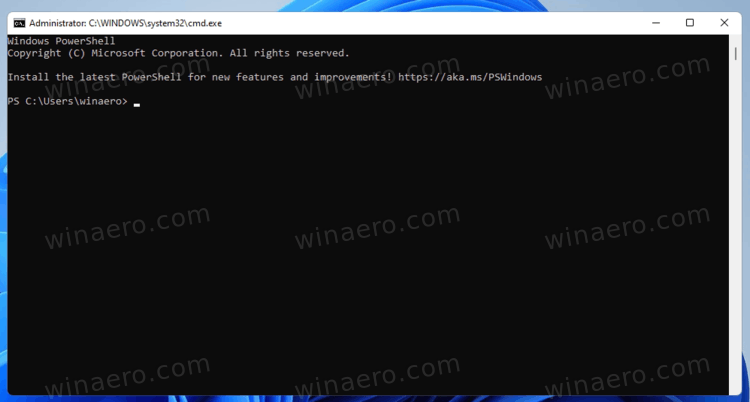
There are several ways to open PowerShell as Administrator in Windows 11. Users can run console applications in user mode or with elevated privileges, also known as "Run as Administrator." We have already covered in separate articles how to open Windows Terminal in Windows 11 and how to open PowerShell in Windows 11. Now it is time to show how to run PowerShell as Administrator in Windows 11.
Advertisеment
PowerShell is an advanced scripting language and engine that comes with a huge set of built-in commands called "cmdlets". Cmdlets allow performing a wide range of tasks, from simple file operation and text processing to programming and system administrative tasks. More than that, the user can create custom modules and utilize .NET functions and assemblies for creating powerful utils and services using just PowerShell.
Note: To open PowerShell as Administrator, you need to log in using a profile with Administrator privileges. Otherwise, Windows will ask you to enter the Administrator password on a UAC prompt.
Tip: Unless you have disabled User Account Control prompts in Windows 11, launching PowerShell as Administrator always ends up in Windows asking for your permission to run a program with elevated privileges. If the operating system launches PowerShell without a UAC prompt, it runs in user mode (or UAC prompts are off).
Open PowerShell as Administrator in Windows 11
Perhaps the fastest way to open PowerShell as Administrator in Windows 11 is to use a new console app from Microsoft called Windows Terminal. Windows Terminal supports different profiles and uses PowerShell by default. Note that you can change the default Terminal application. Besides the Windows Terminal, you launch it from the Start menu, Search, or directly start it from the Run dialog, from Task Manager. Also, you can create a special shortcut to start it elevated. Let's review these methods.
Using Windows Terminal
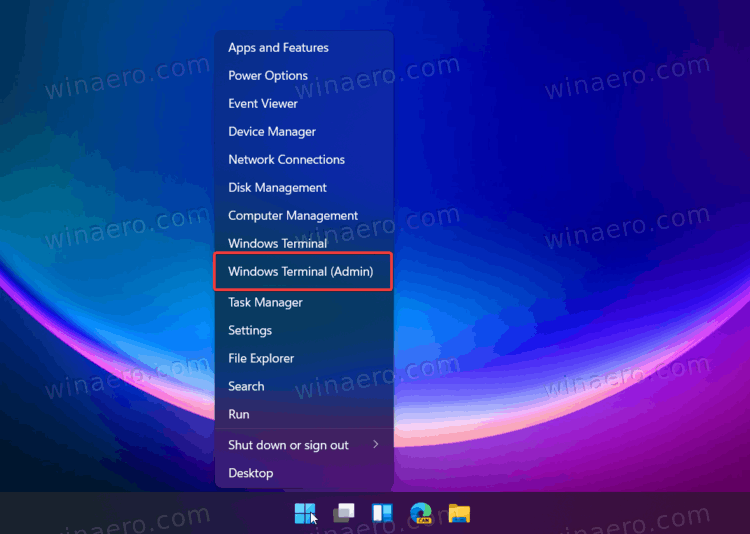
All that you need to do is press Win + X or right-click the Start menu button. Then, click Windows Terminal (Admin). After that, Windows 11 will open a new instance of Windows Terminal in the PowerShell mode with elevated privileges.
We have a dedicated article about how to open Windows Terminal as Administrator in Windows 11.
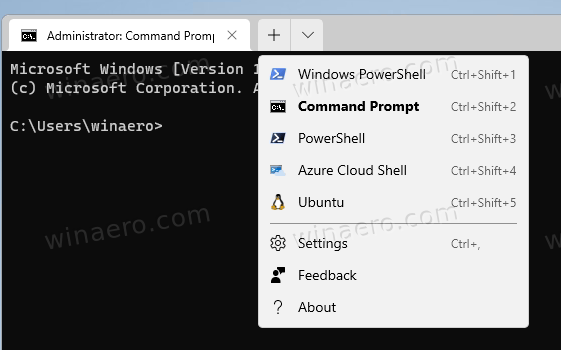
Note that If you changed the default profile in Windows Terminal, then you need to select PowerShell from the 'profiles' down arrow button.
Always Run PowerShell as Administrator from Windows Terminal
Starting in version 1.3, Windows Terminal allows you to run any of its profiles as Administrator. You can use this new feature and set the PowerShell start elevated, and then make it your default profile. To check your current Windows Terminal version, launch the app and enter wt -v. If you are running an older release, install the latest Windows Terminal version.
To always run PowerShell as Administrator from Windows Terminal, do the following.
- Open Terminal by right-clicking the Start button and selecting Windows Terminal (Admin).
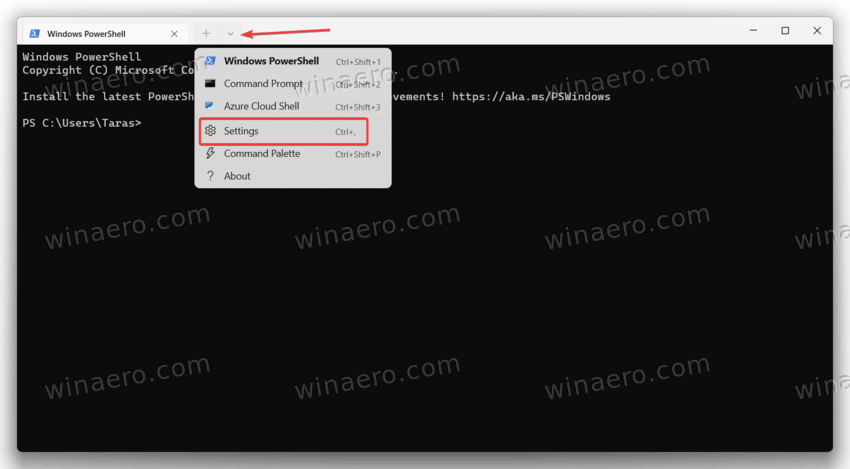
- Click its menu button on the tab strip and select Settings. Or simply press Ctrl + , (comma).
- Select PowerShell in the left panel.
- On the right, find the "Run this profile as Administrator" toggle option and enable it.

- Click Save to apply changes.
Now you need to set the modified PowerShell profile as your default Windows Terminal profile. This will make it start every time you open the Terminal app.
Set PowerShell as the default Windows Terminal profile
- Press Ctrl + , (comma) to go to Windows Terminal Settings.
- Click Startup.
- Find the Default profile option and change it to PowerShell.
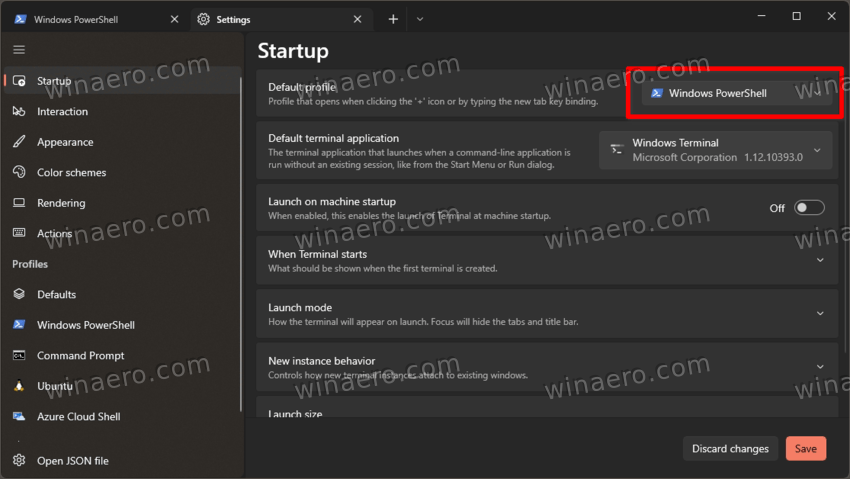
- Click Save to apply the changes.
Done!
Finally, you can make the PowerShell elevated by editing the JSON config file. If you prefer working with the JSON configuration, here is how to change it.
Edit the JSON file
- Open Windows Terminal and press Ctrl + , (comma) to open Settings.
- Click Open JSON file.
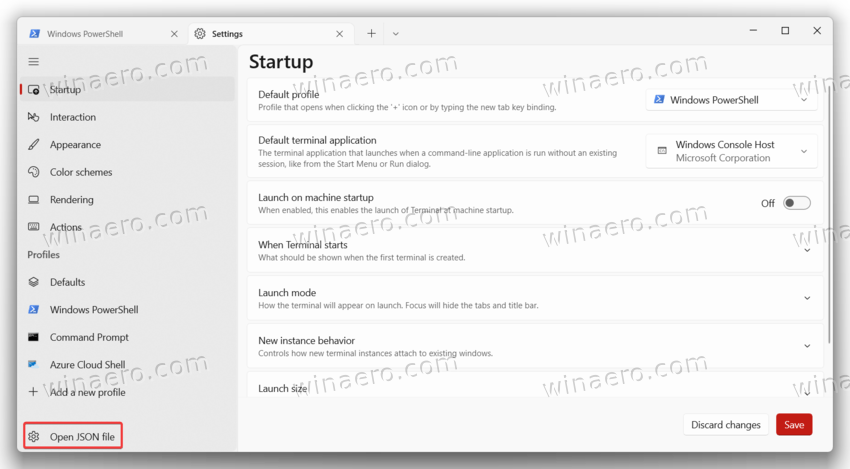
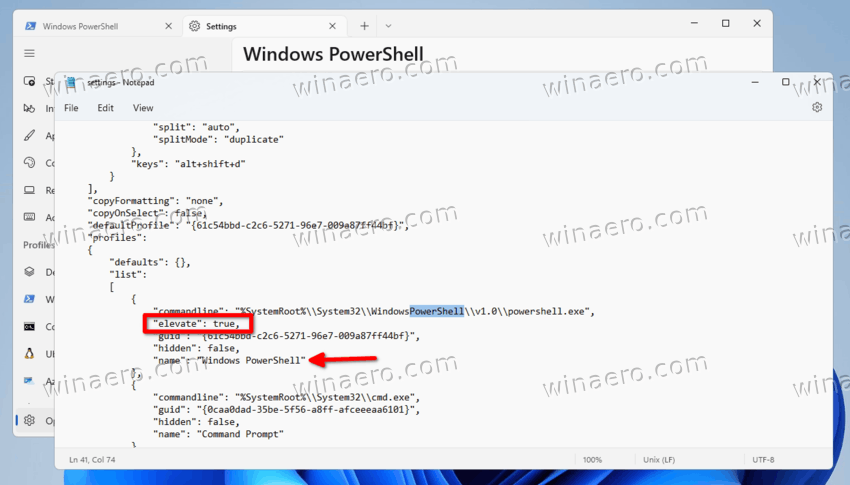
- Find PowerShell in profile JSON array.
- Add
"elevate": true,(don't forget to add comma). - Save the changes and close Notepad or whatever app you use to edit the file.
And that is how you make Windows Terminal always run PowerShell as Administrator. Now, every time you start the app, it will open to the elevated PowerShell tab. You will have to confirm the UAC prompt.
Open PowerShell as Administrator from Windows Tools
Unlike Windows 10, where PowerShell has a dedicated folder in the list of all apps, Windows 11 "stores" PowerShell alongside all system tools in a single folder called "Windows Tools." You can launch PowerShell from that folder.
To open PowerShell as Administrator in Windows 11, do the following.
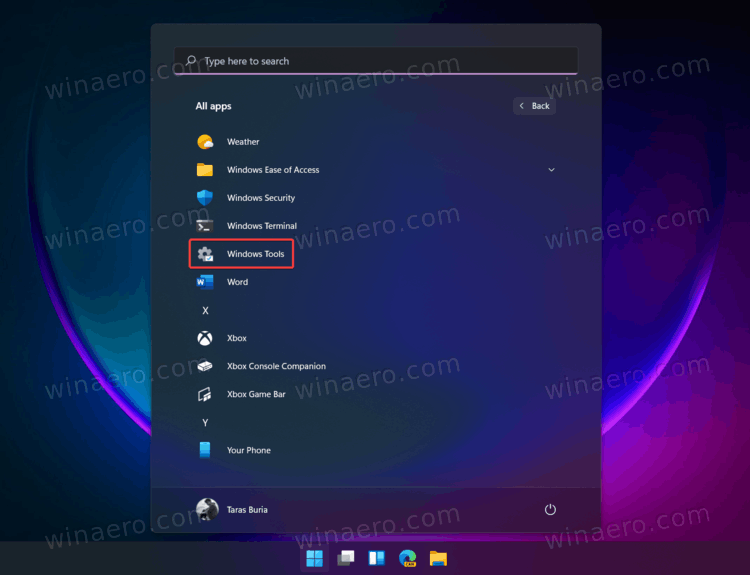
- Open the Start menu and click the "All Apps" button.
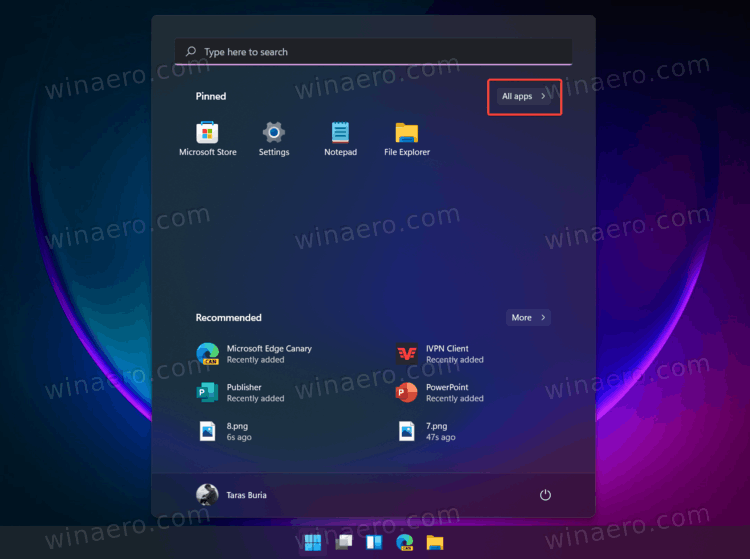
- Scroll down and find the "Windows Tools" icon. Open Windows Tools folder and find PowerShell.
- Right-click PowerShell and select Run as Administrator.
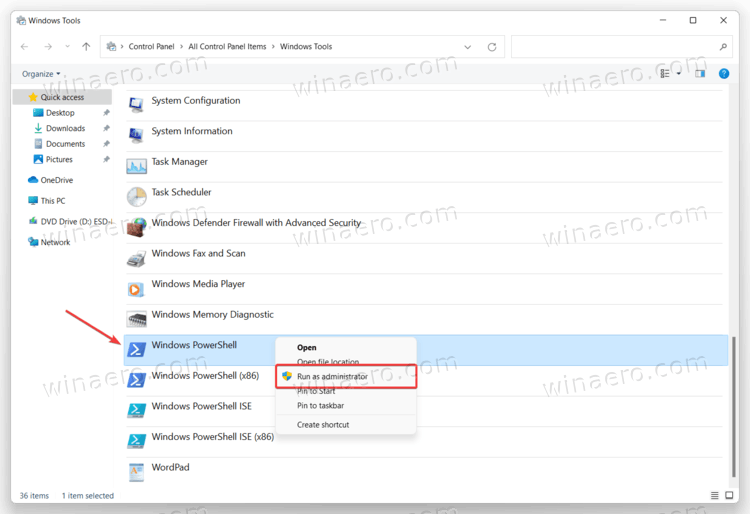
- Similarly, you can launch PowerShell ISE, or respective x86 versions of PowerShell.
Another quick and easy way to run PowerShell as Administrator is to use Windows Search.
How to open PowerShell in Windows 11 using Search
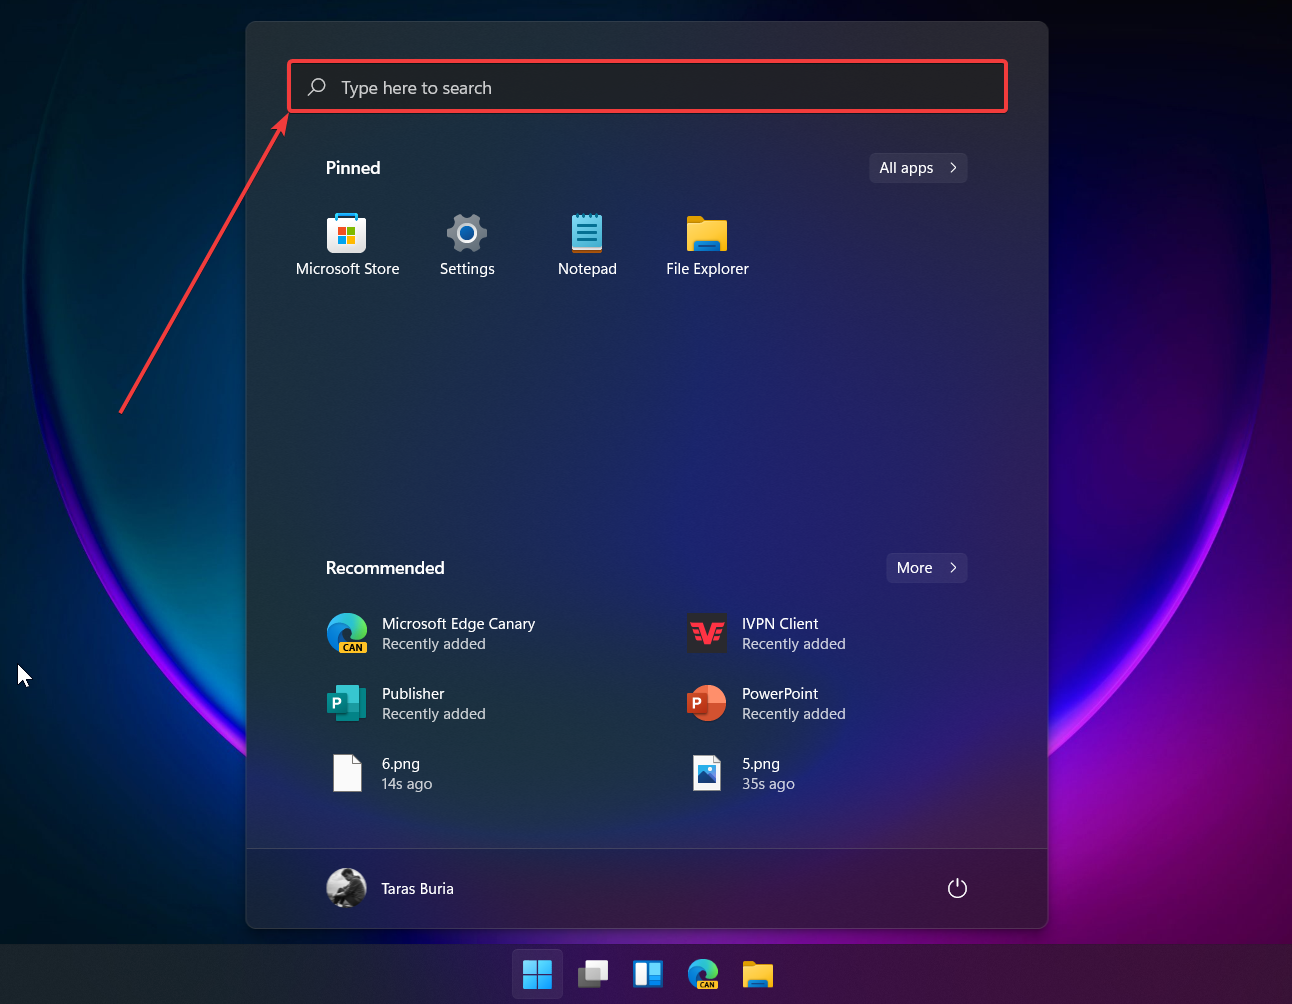
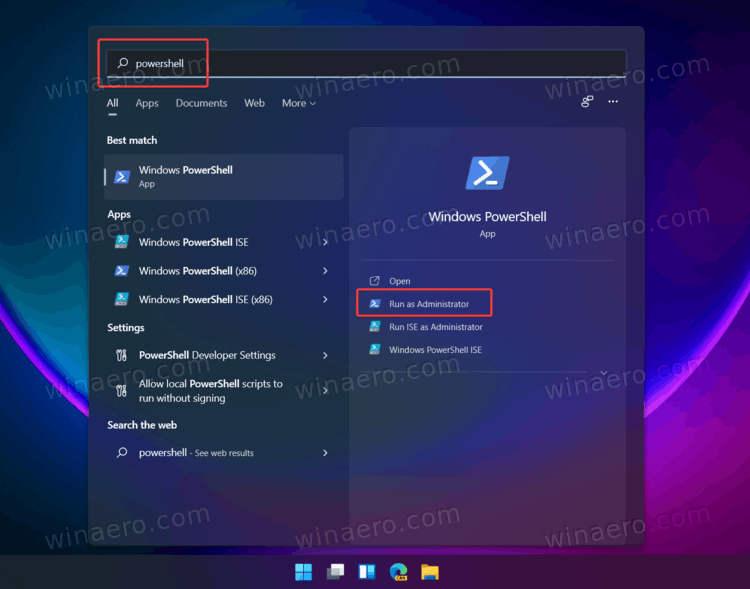
- Press the Start button and start typing PowerShell. You cal also press the search icon on the taskbar or use Win + S buttons.
- Enter PowerShell. Windows will show the app in the search results.
- Click Run as Administrator to open a new elevated PowerShell. Alternatively, you can press the Ctrl + Shift + Enter keys on the keyboard.
You can also open PowerShell in Windows 11 using the Run dialog box or Task Manager .
Open an Elevated PowerShell using the Powershell.exe command
- Press Win + R to open the Run dialog box, then enter
PowerShell.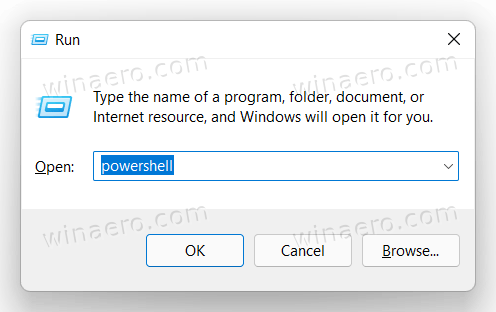
- Next, press Ctrl + Shift + Enter to execute the command. It is crucial to press exactly those buttons; otherwise, Windows will launch PowerShell in user mode.
- Similarly to Run, you can open PowerShell in Windows 11 from the Task Manager. Open Task Manager and click File > Run new task.
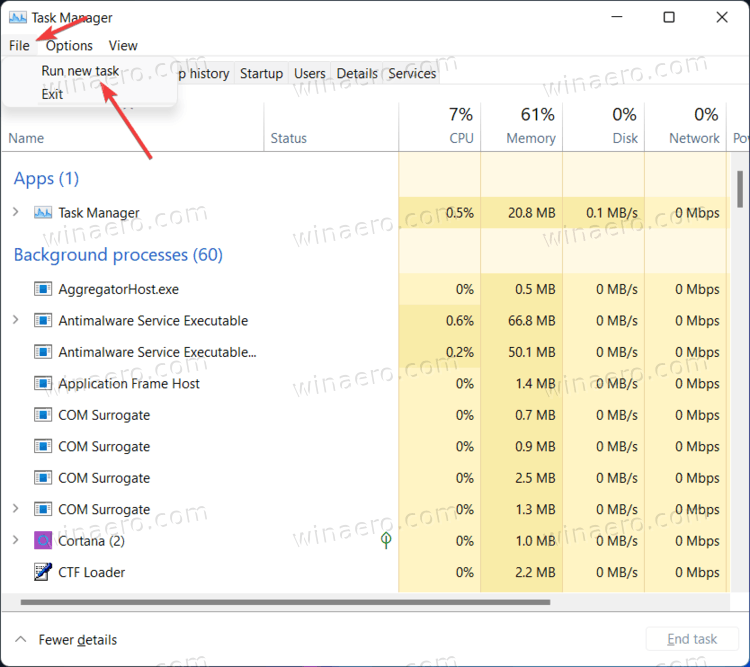
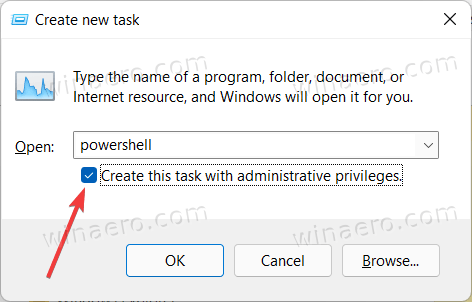
- Enter
powershellin the Run text box. - Place a checkmark next to "Create this task with administrative privileges".
That is how to access Windows 11 PowerShell with the command of the same name.
Open PowerShell as Administrator from the Windows 11 taskbar
If you have PowerShell running, you can press and hold the Ctrl and Shift keys on the keyboard, and click on the PowerShell icon in the taskbar. This will instantly open a new PowerShell window running as Administrator.
If you frequently use PowerShell in Windows 11, you could have it pinned to the taskbar to access the app with one click. If not, you can quickly get it done by opening PowerShell in Windows 11 using any method in this article, right-click the icon on the taskbar and click "Pin to taskbar."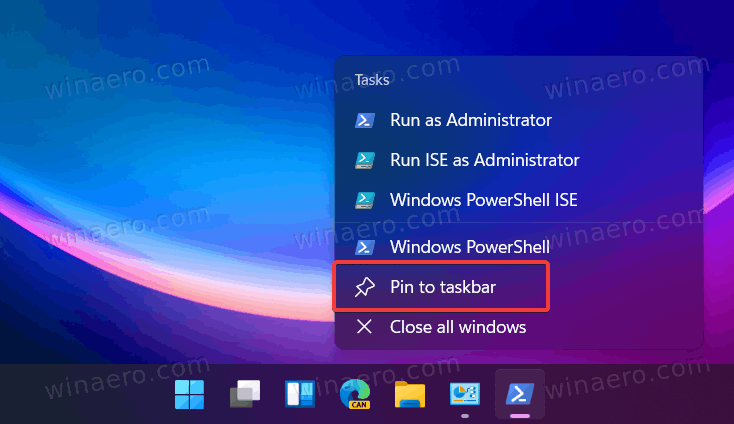
After that, you can use the pinned icon to launch PowerShell as Admin (elevated). Press and hold the Ctrl and Shift keys simultaneously, and click on the PowerShell icon in the taskbar. It will start elevated.
Create a shortcut to open PowerShell as Administrator on the Desktop
A shortcut on the desktop is one more way to open PowerShell as Administrator.
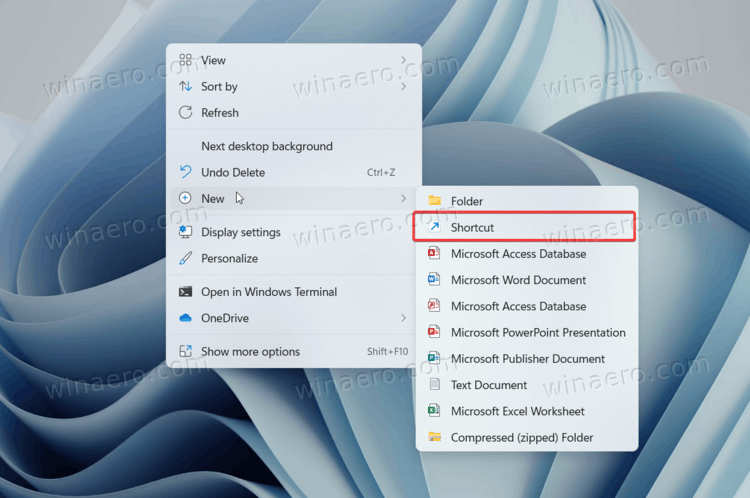
- Right-click anywhere on the desktop or inside a folder and select New > Shortcut.
- In a new window, enter
powershell.exein the "Type the location..." field. Click Next.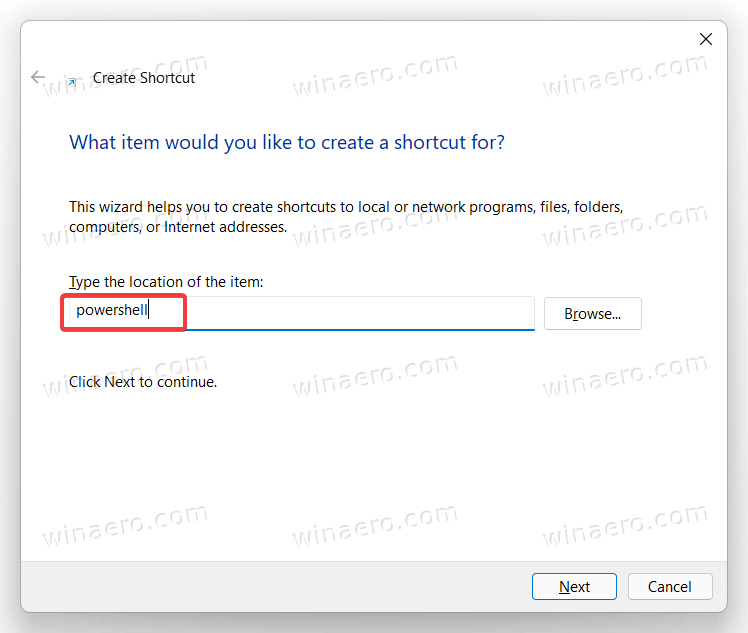
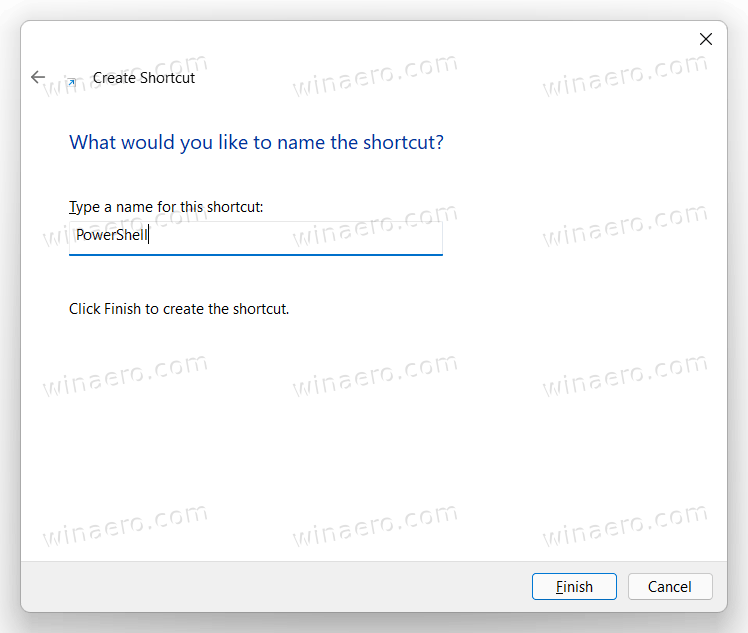
- Name your shortcut as "PowerShell (Administrator) and click Finish.
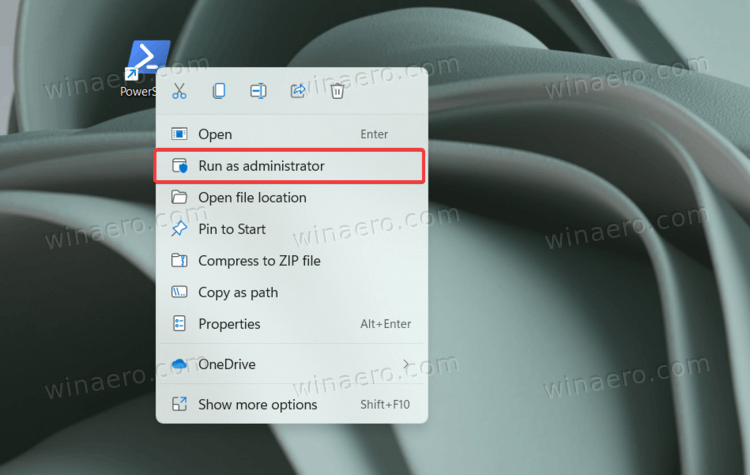
Now you can right-click your newly made shortcut and select Run as Administrator.
But there is one more thing you can do to avoid right-clicking the shortcut every time you need to open PowerShell as Administrator.
Modify the shortcut to always run it as Administrator
- Right-click the shortcut you have just made and select Properties.
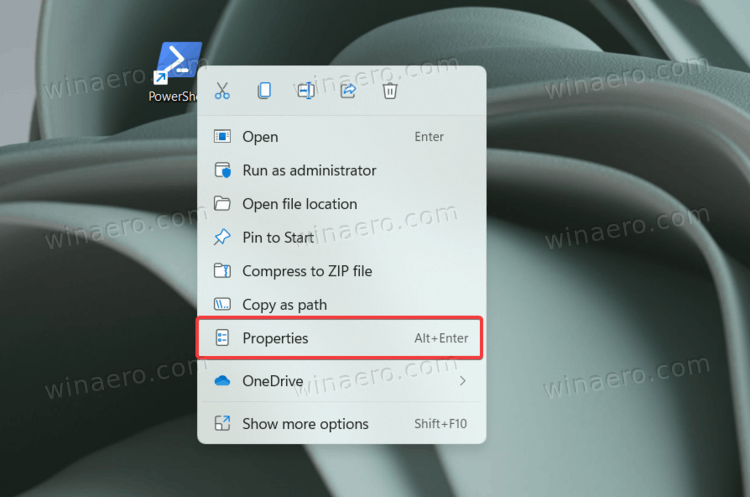
- On the Shortcut tab, click the Advanced button.
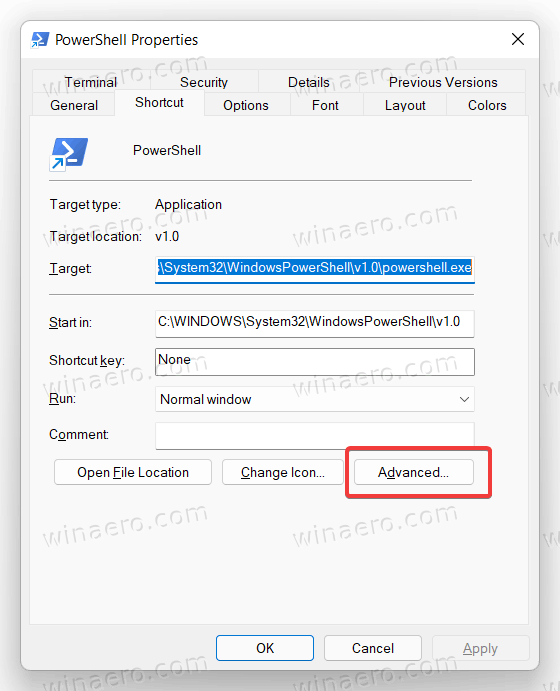
- On the next window, place a checkmark next to the "Run as Administrator" option.
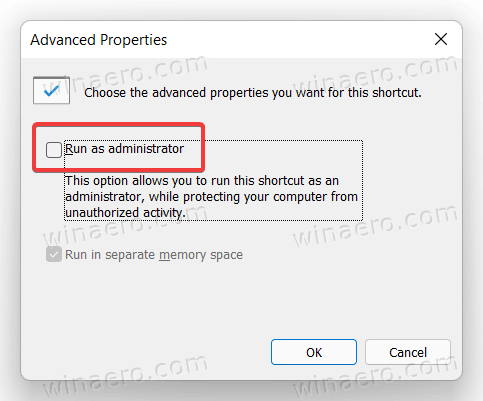
- Click OK to save the changes.
That is it. Now you can open PowerShell as Administrator in Windows 11 using the desktop shortcut.
Tip: If you want to pin elevated PowerShell to the taskbar, right-click your shortcut and select Show more options, then click Pin to taskbar.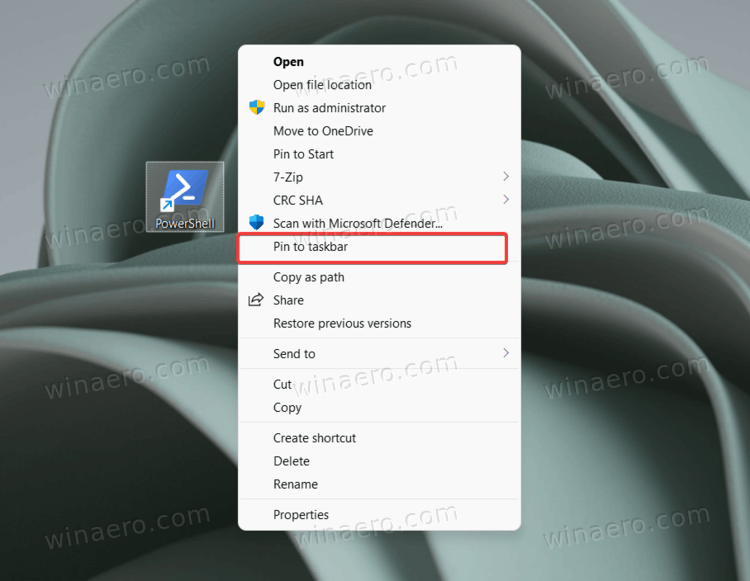
Pinning a shortcut to the taskbar is not the only quick way to open PowerShell as Administrator. You can add PowerShell to the context menu.
- Download the REG files using this link.
- Double-click the file
Add Open PowerShell here as administrator.reg.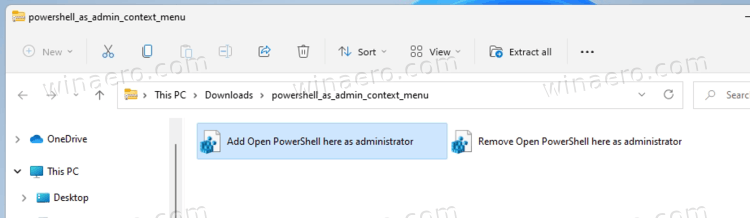
- Confirm the UAC prompt.
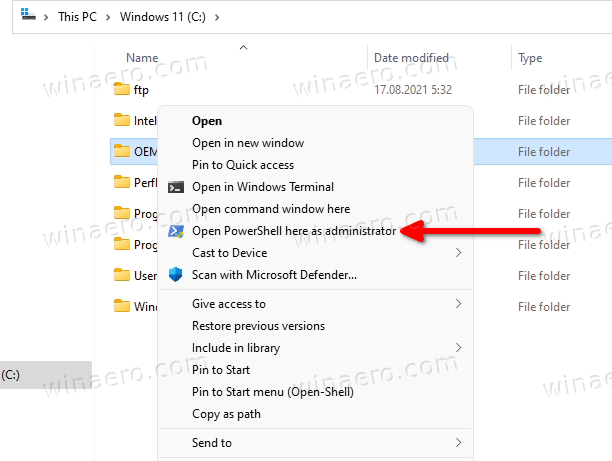
- Now, right-click any folder and select Show more options > Open PowerShell here as administrator.
The undo file is included into the archive. Double-click on the Remove Open PowerShell here as administrator.reg to delete the command from the context menu.
You can save your time using Winaero Tweaker. The app allows you to add the elevated PowerShell item to the context menu with a couple of clicks.
- Download Winaero Tweaker and launch it.
- Open the Context Menu section in the left panel of the window.
- Click PowerShell as Administrator.
- Place a checkmark next to the "Add elevated PowerShell to the context menu" option.
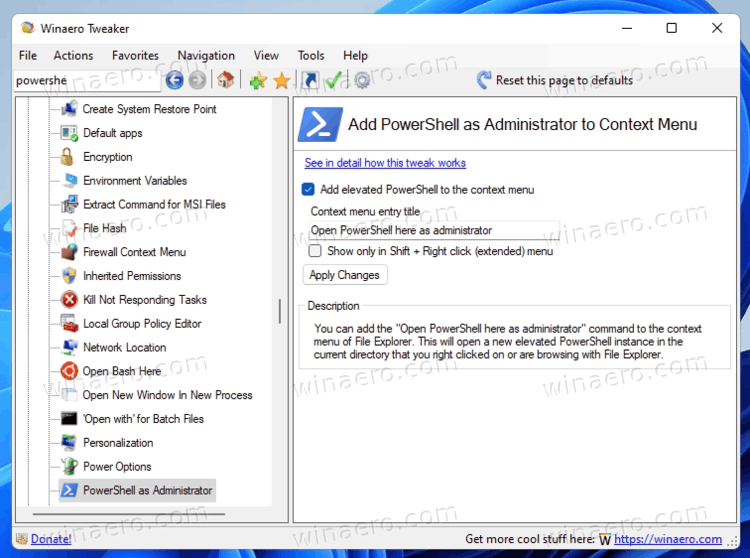
- Click Apply changes.
- Now open any folder and right-click anywhere. Select Show More options.
- Click Open PowerShell here.
Now you know how to open PowerShell as Administrator in Windows 11. Any of those methods work equally, so you can use whichever you prefer.
Support us
Winaero greatly relies on your support. You can help the site keep bringing you interesting and useful content and software by using these options:
