By default, Windows 10 mounts a new disk you have connected to the computer. If the OS is able to recognize its file system, it will assign a drive letter to the drive. It is possible to change this behavior and prevent the OS from recognizing newly connected drives automatically.
Advertisеment
The change will affect new drives only. Devices you had connected to the computer earlier will continue getting recognized automatically and will get their drive letters. If you are unhappy by this, you can apply a special 'scrub' option which will clear the drive letter cache and eliminate the drive information for all currently disconnected drives. After that, they will no longer be recognized by the OS.
You must be signed in with an administrative account to continue.
To disable automount of new drives in Windows 10, do the following.
- Open a new command prompt as Administrator.
- Type the command
diskpart. - In diskpart, type
automountand hit the Enter key. You will see the current state of the feature. In my case, it is enabled.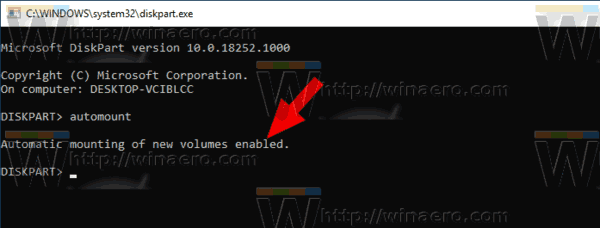
- To disable automout, execute the command
automout disablein diskpart.
You are done. The automount feature is now disabled.
To re-enable it later, run diskpart as described above and type automount enable.
Now, let's see how to clear the drive history and remove drive letters for previously connected drives.
Remove Drive Letters for Previously Connected Drives (Scrub)
The automount command of diskpart supports a special option that allows removing drive letters of previously connected drives. This can be done as follows.
- Open a new command prompt as Administrator.
- Type the command
diskpart. - In diskpart, type
automount scruband hit the Enter key.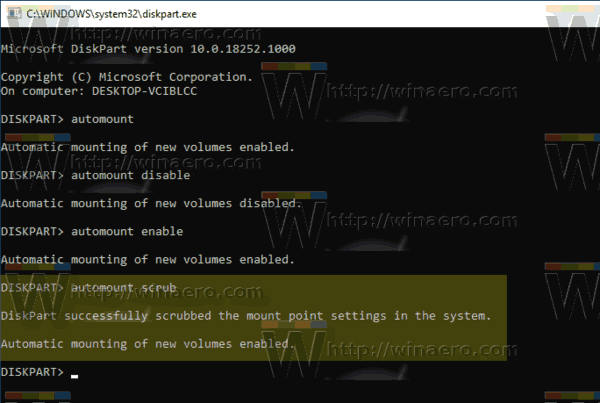
- Exit diskpart with the
exitcommand and close the command prompt. - Restart Windows 10 to apply the change.
It is worth mentioning that you can enable or disable the drive automount feature with the classic mountvol utility.
Using Mountvol
With mountvol, you can enable or disable the automount feature, and clear the drive letter history. Here is how it can be done.
- Open an elevated command prompt.
- Type
mountvol /nto disable the drive automount feature.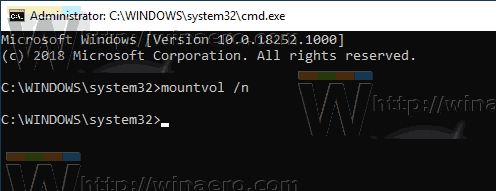
- Type
mountvol /eto enable it.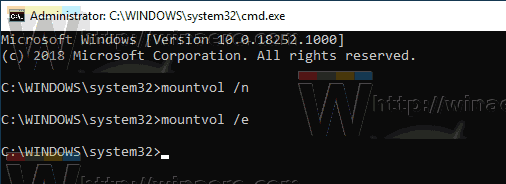
- The command
mountvol /rwill remove drive letters for previously connected drives.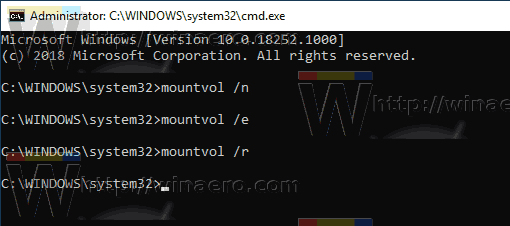
Finally, it is possible to disable the drive automount feature using a Registry tweak.
Disable Drive Automount with a Registry Tweak
- Open the Registry Editor app.
- Go to the following Registry key.
HKEY_LOCAL_MACHINE\SYSTEM\CurrentControlSet\Services\mountmgr
See how to go to a Registry key with one click.
- On the right, create a new 32-Bit DWORD value NoAutoMount. Note: Even if you are running 64-bit Windows you must still create a 32-bit DWORD value.
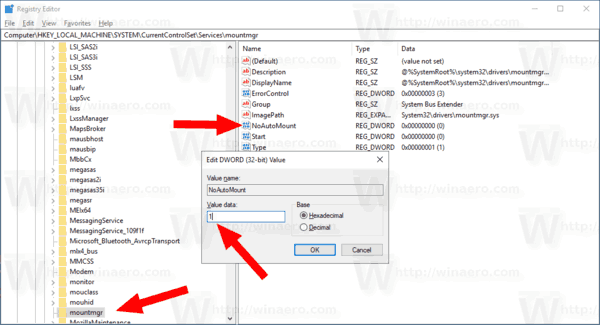 Set its value data to 1 in decimal to disable the feature.
 - Restart Windows 10.
That's it.
Support us
Winaero greatly relies on your support. You can help the site keep bringing you interesting and useful content and software by using these options:

Greetings,
thanks for this guide. I followed all the three options and see that they work perfectly when it comes to external HDD. Though, I see that Win10 keeps on mounting pen drives. What I’m trying to do is to avoid that it mounts a pen drive.
Is there some other step I can follow for this?
Best,
Alex
did you ever figure out how to do this?? random question on an old post I know but ya never know