Starting with Windows 10 version 1809, also known as "October 2018 Update", Microsoft implemented a new option - screen snipping. A new Snip & Sketch app has been added to Windows 10 to quickly snip and share a screenshot. Here's how to prevent the Snip & Sketch app from copying your snip to clipboard when annotating it.

Using the new Screen Snip tool, you can capture a rectangle, snip a freeform area, or take a full screen capture, and copy it directly to the clipboard. Immediately after taking a snip you’ll now get a notification that will take you and your snip to the Screen & Sketch app where you can annotate and share away. Screenshots can be opened in the Screen & Sketch app, which adds extra options like Ink Color and Delay. It allows adding annotations using a pen, touch, or mouse. The images can be shared with other apps. The following article covers various methods you can use to launch the Screen Snip tool:
Advertisеment
Take a Screenshot with Screen Snip in Windows 10
In short, you can Press the Win + Shift + S keys or use a special quick action button in the Action Center pane.
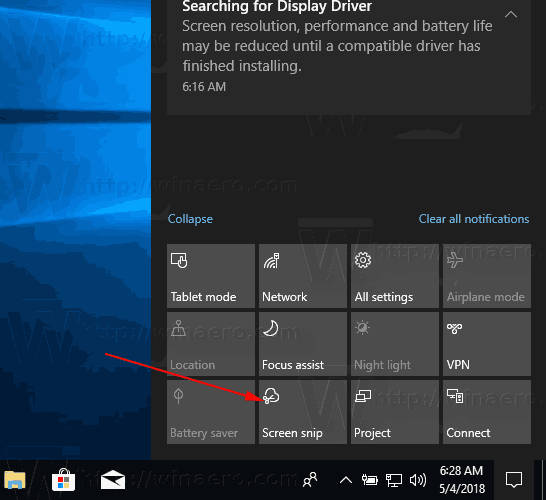
Also, for convenience, you can create a special Screen Snip taskbar button. See
Add Screen Snip To Taskbar in Windows 10
To disable Auto Copy to Clipboard in Snip & Sketch app in Windows 10, do the following.
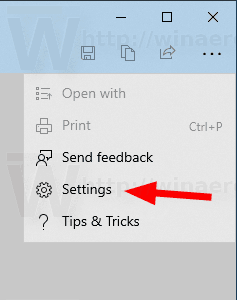
- Open the Snip & Sketch app.
- Click on the menu button with three dots.
- Select the Settings item from the menu.
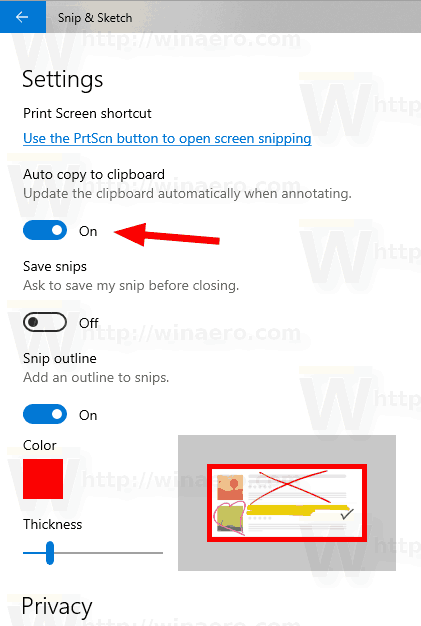
- In Settings, go to the Auto copy to clipboard section.
- Disable the option Update the clipboard automatically when annotating.
That's it.
Related articles:
- Enable Snip Outline in Snip & Sketch app in Windows 10
- Add Screen Snip To Taskbar in Windows 10
- Screen Sketch Keyboard Shortcuts in Windows 10 (Hotkeys)
- Enable Print Screen Key to Launch Screen Snipping in Windows 10
- Take a Screenshot with Screen Snip in Windows 10
- Add Screen Snip Context Menu In Windows 10
- Create Screen Snip Shortcut in Windows 10
- Uninstall and Remove Screen Sketch In Windows 10
Support us
Winaero greatly relies on your support. You can help the site keep bringing you interesting and useful content and software by using these options:

Does anyone know how to get this to actually work properly? I’ve been having this problem since 2019 where it will override the clipboard even though I have it set to NOT auto copy to clipboard. I’ve had this issue on 4 different devices, and both Windows 10 and 11. Microsoft support has been wholly unhelpful so I’m hoping someone out there has an idea. Thanks in advance :)
Nor me – the Auto Copy option is about updating what S&S has already copied to the clipboard with any highlighting or writing – there is no option that suppresses the clipboard copy.