As you may already know, Windows 10 includes the ability to automatically delete files in your Recycle bin, delete temporary files, and files in the Downloads folder to free up disk space. Starting with Windows 10 version 1809, the ability to remove the contents of the Downloads folder is added to the Storage Sense feature. In recent Windows 10 builds, you can configure Storage Sense to automatically delete files in the Downloads folder if they have been stored there for more that the specific number of days. Here is how.
Advertisеment
Storage Sense is a nice, modern addition to Disk Cleanup. It allows you to maintain certain folders by preventing them from getting too large and clean them up automatically. The Storage Sense feature can be found in Settings, under System -> Storage.
Storage Sense can be used to remove Windows upgrade log files, system-created Windows Error Reporting Files, Windows Defender Antivirus temporary files, Thumbnails, Temporary Internet Files, Device driver packages, DirectX Shader Cache, Downloaded Program Files, Delivery Optimization Files, old System log files, System error memory dump files and minidumps, temporary Windows update files, and more.
While you can clear the Downloads folder manually, you can automate this process (and forget about it). Here is how can be done with the Storage Sense feature of Windows 10.
Set When Storage Sense Should Delete Files in Downloads Folder
- Open Settings.
- Go to System - Storage.
- Turn on the Storage sense option on the right.
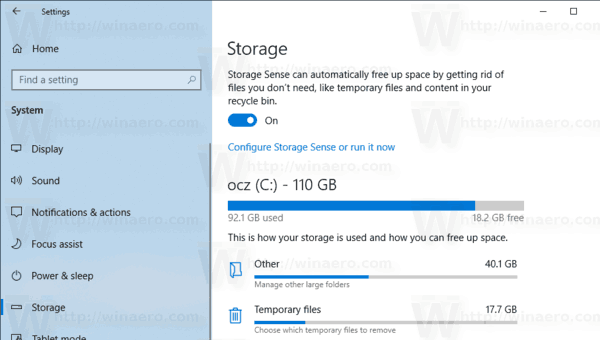
- On the right, click on the Configure Storage Sense or run it now link.
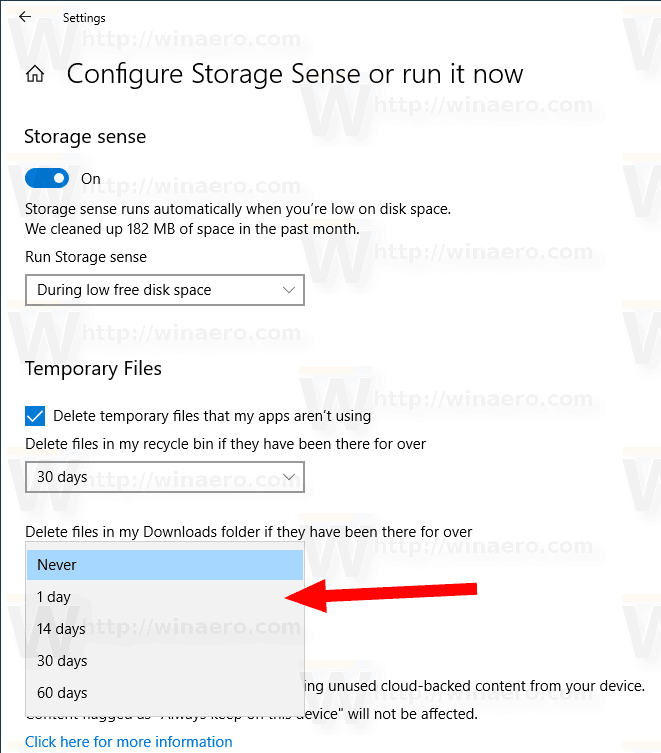
- On the next page, navigate to the Temporary files section.
- Select the option Never (default), 1 day, 14 days, 30 days, or 60 days from the drop-down list under Delete files in my Downloads folder if they have been there for over.
You are done.
The same option can be set with a Registry Tweak
A Registry Tweak
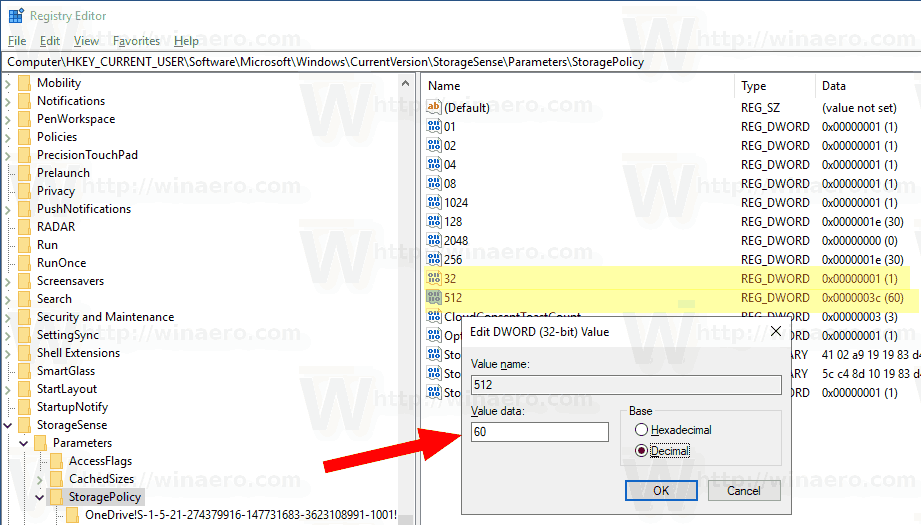
- Open the Registry Editor app.
- Go to the following Registry key.
HKEY_CURRENT_USER\Software\Microsoft\Windows\CurrentVersion\StorageSense\Parameters\StoragePolicy
See how to go to a Registry key with one click.
- On the right, modify or create a new 32-Bit DWORD value named 32. Set it to 1 to enable the automatic cleanup feature for the Downloads folder. A value data of 0 should be used to disable it.
Note: Even if you are running 64-bit Windows you must still create a 32-bit DWORD value. - Now, modify or create a new 32-Bit DWORD value named 512. Set it to 1, 10, 30 or 60 in decimal for the desired number of days.
- To make the changes done by the Registry tweak take effect, you need to sign out and sign in to your user account.
Finally, you can force set the specific number of days with Group Policy. It is possible starting in Windows 10 build 18282.
Using Group Policy
If you are running Windows 10 Pro, Enterprise, or Education edition, you can use the Local Group Policy Editor app to configure the options mentioned above with a GUI.
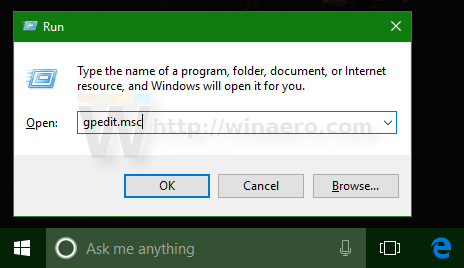
- Press Win + R keys together on your keyboard and type:
gpedit.msc
Press Enter.
- Group Policy Editor will open. Go to Computer Configuration\Administrative Templates\System\Storage Sense.
- Enable the policy option Configure Storage Storage Downloads cleanup threshold.
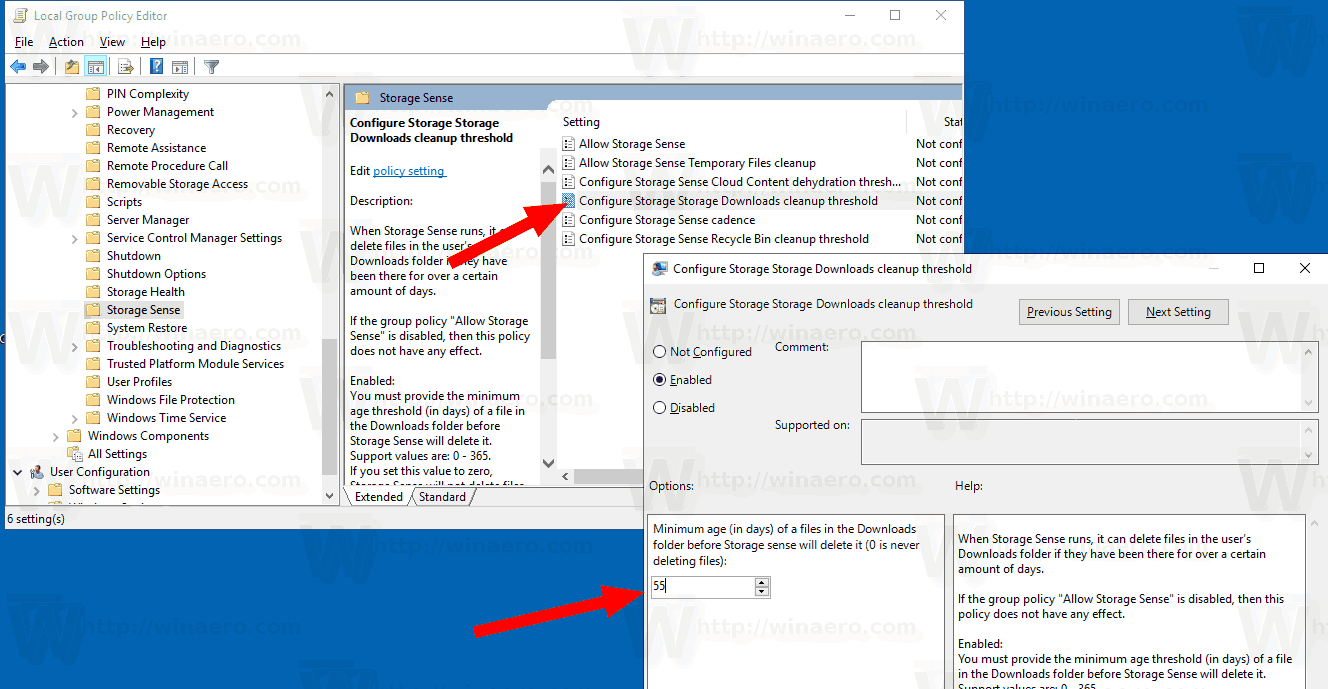
- Set the desired number of days in the Options: box. Enter a number between 0 to 365 for the number of days you want. It will be set for all users of your computer.
If your Windows 10 edition doesn't include the Local Group Policy Editor app (gpedit.msc), you can apply a Registry tweak. It works in all editions of the OS.
Apply a Registry tweak
- Open the Registry Editor app.
- Go to the following Registry key.
HKEY_LOCAL_MACHINE\SOFTWARE\Policies\Microsoft\Windows\StorageSense
See how to go to a Registry key with one click.
- On the right, modify or create a new 32-Bit DWORD value ConfigStorageSenseDownloadsCleanupThreshold.
Note: Even if you are running 64-bit Windows you must still create a 32-bit DWORD value. - Set its value to a number between 0 and 365 in decimal for how many days you want.
- Restart Windows 10.
To undo the change, delete the ConfigStorageSenseDownloadsCleanupThreshold value and restart the OS.
That's it.
Support us
Winaero greatly relies on your support. You can help the site keep bringing you interesting and useful content and software by using these options:
