When you delete files in Windows, they can be easily recovered. Windows only marks the file as deleted, but physically the files stay on the hard drive until they are overwritten by new data. Although on an SSD, they are harder to recover than hard drives because of TRIM and garbage collection done by the SSD controller, all of the deleted data is not securely wiped by default. If you deleted some sensitive data and want to be sure that it cannot be recovered before you give your PC away temporarily for whatever reason, here is how to add a special 'Secure Delete' context menu entry.
Advertisеment
Unfortunately, Windows 10 doesn't include built-in tools to securely remove a file or folder. For this purpose, we will use an external tool, SDelete. It is created by Microsoft's Mark Russinovich, and is available for download on the Microsoft Sysinternals web site.
The only way to ensure that deleted files, as well as files that you encrypt with EFS, are safe from recovery is to use a secure delete application. SDelete (Secure Delete) is such an application. It overwrites a deleted file's on-disk data using techiques that are shown to make disk data unrecoverable, even using recovery technology that can read patterns in magnetic media that reveal weakly deleted files. You can use SDelete both to securely delete existing files, as well as to securely erase any file data that exists in the unallocated portions of a disk (including files that you have already deleted or encrypted). SDelete implements the Department of Defense clearing and sanitizing standard DOD 5220.22-M, to give you confidence that once deleted with SDelete, your file data is gone forever.
To Add Secure Delete Context Menu in Windows 10,
- Download the latest version of SDelete from Microsoft's web site: Download SDelete.
- Unblock the SDelete.zip file.
- Double-click the SDelete.zip file to open it as a ZIP folder.
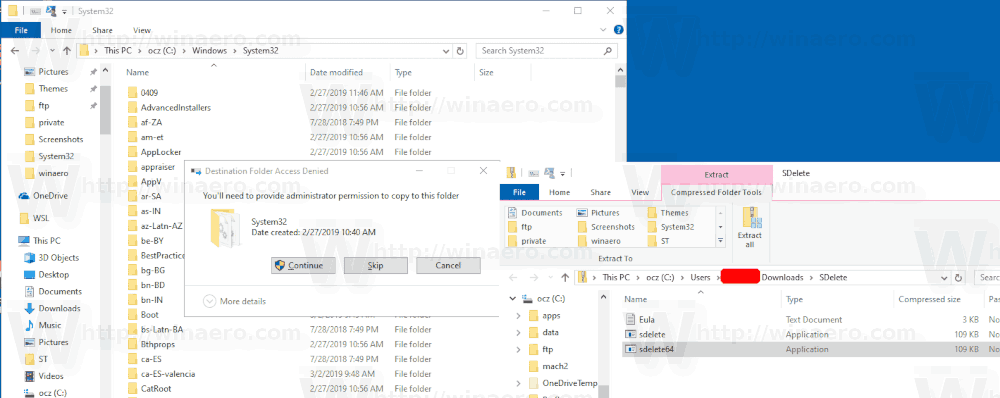
- If you are running 64-bit Windows, extract the file
sdelete64.exeto the folder C:\Windows\System32. You can simple drag and drop the file from the ZIP folder to the System32 folder opened in a separate File Explorer window. - You'll be prompted to confirm the operation. Click on the Continue button to approve.
- If you are running a 32-bit Windows 10 version, extract the sdelete.exe file to the C:\Windows\System32 folder.
- Download the following Registry files: Download Registry Files.
- Double-click the file Windows 64-bit\Add Secure Delete Context Menu.reg for the 64-bit Windows version, otherwise use the file Windows 32-bit\Add Secure Delete Context Menu.reg.
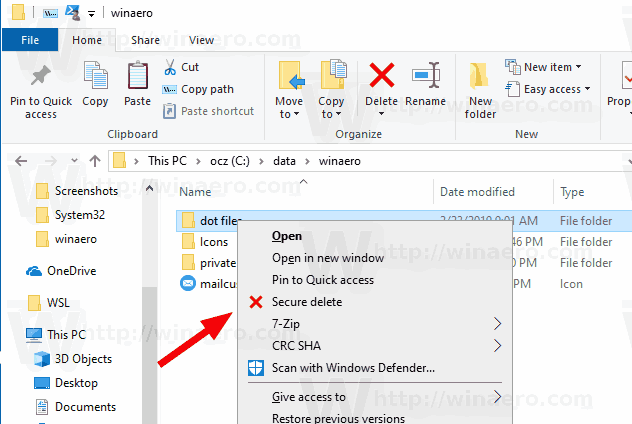
- Now, right-click on any file. Use the Secure Delete context menu entry to securely erase it.
You are done.
How it works
SDelete will perform 3 passes of zero-fill to securely delete your file or folder. The context menu entry calls SDelete as follows:
For files:
sdelete.exe -p 3 <Path \ to \ file>
For directories:
sdelete.exe -p 3 -r <Path \ to \ folder>
Arguments:
- -p - passes Specifies number of overwrite passes, in our case it is 3.
- -r - recurse subdirectories when erasing a folder.
Note that on SSDs, this causes some extra writes which will in the long term slightly lessen its life span. But your sensitive information will be securely erased, so nobody will be able to recover your files or know what activities you have done on the PC by recovering the partially deleted data. On hard disk drives, sdelete.exe is an excellent way to securely wipe free space.
Tip: To securely wipe all files and folder you have already deleted, i.e. securely wipe the free disk space, you can use the built-in console tool cipher.exe. Run it as follows:
cipher /w:C
Replace "C" with the letter of your drive on which you want to wipe the free space. For reference, see the post
Erase free space securely in Windows without third party tools
That's it.
Support us
Winaero greatly relies on your support. You can help the site keep bringing you interesting and useful content and software by using these options:

Deosn……….
Doesn’t work on any directories, only files. Win10 Pro build 1803 here.