In Windows 7, there were a number of options which are missing in Windows 10. For example, previous versions of Windows had more appearance options that modern Windows versions don't have. One such option is the ability to prevent Windows themes from changing mouse cursors.
Advertisеment
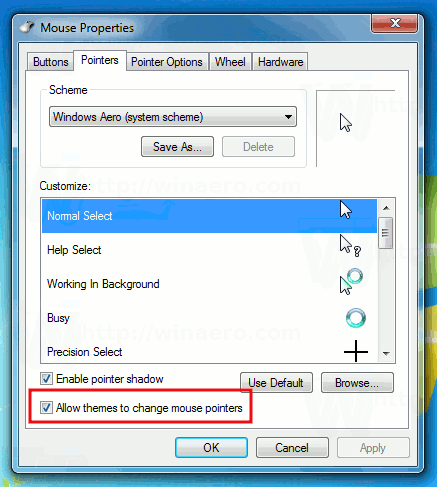
In Windows 7, there was a special checkbox in Mouse properties dialog of the Control Panel. See the following screenshot:
Now, let's open the same dialog in Windows 10: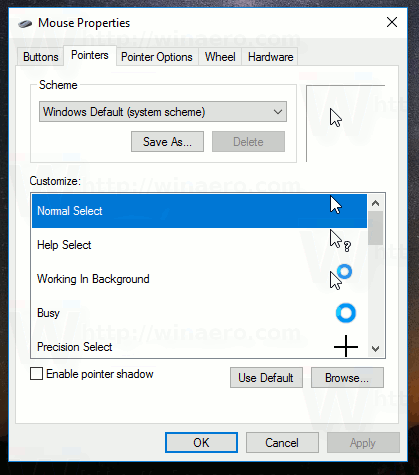
As you can see, the option "Allow themes to change mouse pointers" has been removed from the dialog in Windows 10. However, the ability to activate this function is still present in Windows 10 and can be activated with a Registry tweak. Let's see how it can be done.
Prevent Windows 10 themes from changing mouse cursors
Table of contents
- How to stop themes from changing cursors in Windows 10
- How to allow themes to change cursors in Windows 10
- Download ready-to-use Registry files
How to stop themes from changing cursors in Windows 10
To prevent Windows 10 themes from changing mouse cursors, you need to do the following.
- Open Registry Editor.
- Go to the following Registry key:
HKEY_CURRENT_USER\Software\Microsoft\Windows\CurrentVersion\Themes
Tip: How to jump to the desired registry key with one click.
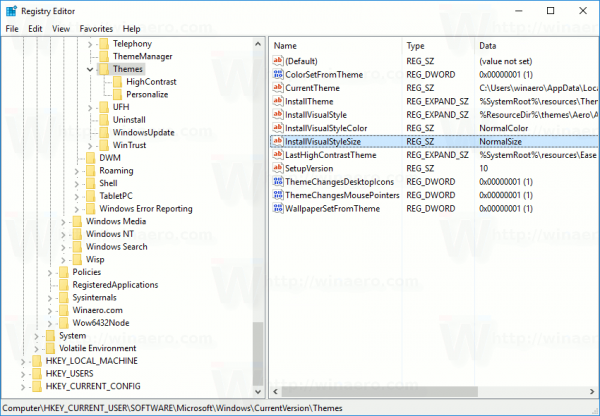
- In the right pane, find the 32-bit DWORD value named ThemeChangesMousePointers. Set its value data to 0.

Tip: if you don't have this parameter in the Registry, then create a new 32-bit DWORD value called ThemeChangesMousePointers.
Note: Even if you are running 64-bit Windows you must still create a 32-bit DWORD value. - Close Registry Editor and restart the Explorer shell. Alternatively, you can sign out and sign in again to your Windows 10 account.

After you do this, themes won't be able to change your mouse cursors.
How to allow themes to change cursors in Windows 10
To allow Windows 10 themes to change mouse cursors, do the following.
- Open Registry Editor.
- Go to the following Registry key:
HKEY_CURRENT_USER\Software\Microsoft\Windows\CurrentVersion\Themes
Tip: How to jump to the desired registry key with one click.
- In the right pane, find the 32-bit DWORD value named ThemeChangesMousePointers. Set its value data to 1.

- Close Registry Editor and restart the Explorer shell. Alternatively, you can sign out and sign in again to your Windows 10 account.

Download ready-to-use Registry files
To save your time, I prepared ready-to-use Registry files. Use them to do this tweak with just one click.
Please keep in mind that this tweak can be removed at any moment by Microsoft. If it does not work for you, tell us in the comments which Windows version and build you are running.
So, which setting do you prefer? Do you prevent themes from changing mouse cursors or allow them to be changed?
Support us
Winaero greatly relies on your support. You can help the site keep bringing you interesting and useful content and software by using these options:

Thanks! The registry fix worked.
Windows 10 x64
Thank you!