How to Enable or Disable NTFS Last Access Time Updates in Windows 10
NTFS is the standard file system of modern Windows versions. Windows keeps updated the 'Last Access Time' timestamp for each file and folder to store a time when they was last accessed on an NTFS volume.
Advertisеment
NTFS is the standard file system of the Windows NT operating system family. Starting with Windows NT 4.0 Service Pack 6, it supported the concept of permissions which can be configured to permit or restrict access to files, folders, and other objects locally and over a network. Modern NTFS supports advanced features like alternative data streams.
Also, NTFS supports compression for files and folders. Unlike ZIP file compression, with this compression type, you do not need to create an archive file. Compression will happen on-the-fly and the files can be accessed transparently as they were before compressing. Windows 10 supports NTFS compression natively like previous versions of the OS, but it supports a number of newer algorithms including LZX, which was not available prior to Windows 10.
Last Access Time Stamp
In older Windows versions, you could enable or disable the Last Access Time Stamp feature. Disabling it reduces the impact of logging updates to the Last Access Time stamp on files and directories and improves the speed of file and directory access.
The recent versions of Windows 10 support four different modes which you can set instead of just disabling it. The modes are:
- User Managed, Last Access Updates Enabled
- User Managed, Last Access Updates Disabled
- System Managed, Last Access Updates Enabled <-- this is used by default.
- System Managed, Last Access Updates Disabled
When in 'System Managed' mode, the last access time stamp is modified during the boot, once the OS mounts volumes. Windows 10 doesn't change it for large volumes (>128GB), it is a performance-maintenance trade off.
When in 'User Managed' mode, the last access time stamp remains unchanged during the boot, regardless of the volume size. When enabled, the OS changes it only when a user activity occur.
Setting the 'System Managed, Last Access Updates Disabled' mode completely disables the the Last Access Time Stamp feature for NTFS.
There are two methods you can use to change the the last access time stamp policy. Let's review them.
To Disable NTFS Last Access Time Updates in Windows 10.
- Open the Registry Editor app.
- Go to the following Registry key.
HKEY_LOCAL_MACHINE\SYSTEM\CurrentControlSet\Control\FileSystem
See how to go to a Registry key with one click. - On the right, modify or create a new 32-Bit DWORD value NtfsDisableLastAccessUpdate.
Note: Even if you are running 64-bit Windows you must still create a 32-bit DWORD value.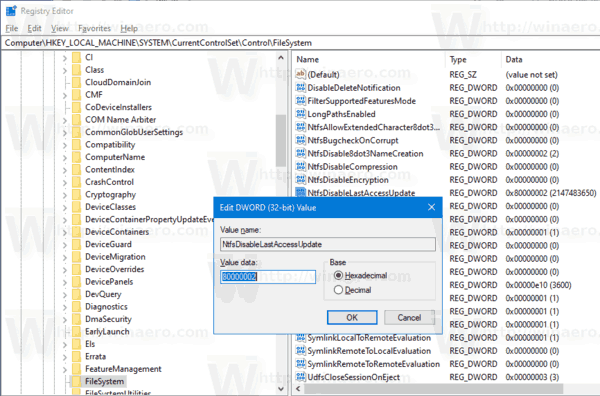
- Set it to one of the following values:
- 80000000 (hex) = User Managed, Last Access Updates Enabled
- 80000001 (hex) = User Managed, Last Access Updates Disabled
- 80000002 (hex) = System Managed, Last Access Updates Enabled
- 80000003 (hex) = System Managed, Last Access Updates Disabled
- Use the
80000003 (hex) = System Managed, Last Access Updates Disabledvalue to disable the Last Access Time Stamp updates. - Restart Windows 10.
You are done. You can download the ready-to-use Registry files below.
Alternatively, you can use the console tool fsutil to configure the Last Access Time Stamp feature for NTFS.
Windows comes with a special console tool, fsutil. Fsutil targets advanced users and system administrators. It performs tasks that are related to file allocation table (FAT) and NTFS file systems, such as managing reparse points, managing sparse files, or dismounting a volume. If it is used without parameters, Fsutil displays a list of supported subcommands. The tool is available in Windows starting in Windows XP.
To Change the Last Access Time Stamp for NTFS with fsutil,
- Open an elevated command prompt.
- Type or copy-paste the following command:
fsutil behavior set disablelastaccess <value>.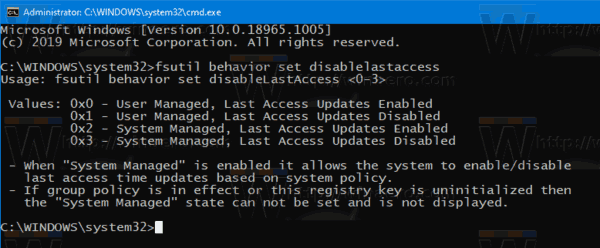
- Substitute the <value> portion with one of the following values:
- 0 = User Managed, Last Access Updates Enabled
- 1 = User Managed, Last Access Updates Disabled
- 2 = System Managed, Last Access Updates Enabled
- 3 = System Managed, Last Access Updates Disabled
- The default value is 2.
You are done!
Support us
Winaero greatly relies on your support. You can help the site keep bringing you interesting and useful content and software by using these options:
If you like this article, please share it using the buttons below. It won't take a lot from you, but it will help us grow. Thanks for your support!
Advertisеment

The fsutil last access help output shown in your post and in my powershell match. However … the actual output results shown in my powershell is just the opposite. Is it indicating something wrong with everyone’s system, my system or some type of convoluted thought process of the result I’m missing? What does your system show when you do this yourself?
My actual output was as follows:
PS C:\> fsutil behavior set disablelastaccess 0
DisableLastAccess = 0 (User Managed, Disabled)
PS C:\> fsutil behavior set disablelastaccess 1
DisableLastAccess = 0 (User Managed, Enabled)
PS C:\> fsutil behavior set disablelastaccess 2
DisableLastAccess = 2 (System Managed, Disabled)
PS C:\> fsutil behavior set disablelastaccess 3
DisableLastAccess = 3 (System Managed, Enabled)
New Windows 10 installation on ssd on laptop. Tried fsutil in cmd bit it kept resetting back to enabled (according to TweakSSD). Tried to set hexadecimal to 3 in registry but it has reset back to enabled as well.
I believe I have solved the problem!! You have to do the registry edit or fsutil command in Safe Mode for it to work properly.
Setting registry value to 80000003 did not work for me – it was resetting back to 80000002 after Windows rebooting. Safe Mode did not help too.
Solution was to set registry value to 80000001 (User Managed, Last Access Updates Disabled).