The Send To context menu of File Explorer in Windows 10 contains various items by default such as Desktop, Bluetooth, Mail and so on. You might have noticed that some applications are able to extend the Send To menu with their own shortcuts. For example, Skype places its icon into the Send To menu. Here is how to customize icons for items you see in the Send to menu in Windows 10.
Advertisеment
In Windows 10, the Send To context menu of File Explorer contains various items:
- Compressed folder - allows you to add the selected file or folder inside a ZIP file.
- Desktop - allows you to create a shortcut to the selected file and place it directly on the Desktop.
- Documents - allows you to send the selected item to the Documents folder.
- Fax recipient - will send the selection by fax via the default fax program.
- Mail recipient - will send the selection by e-mail via your default email program.
- Removable drives and network shares.
- Bluetooth device - allows sending the files to a paired Bluetooth device.
![]()
The user can extend it and add custom folders and apps to that menu.
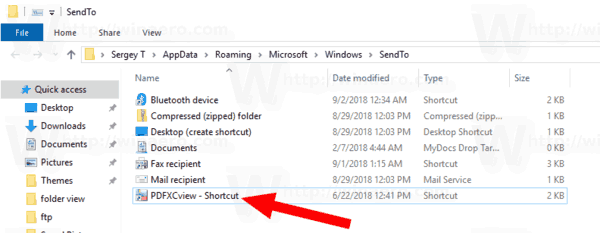
See the following article for details:
How to add custom items to the Send To menu in Windows 10
There are two types of shortcut stored in the Send to folder in Windows 10. Some of them are regular shortcuts, so their icons can be easily changed from the right-click context menu, using the Properties dialog.
Other shortcuts are links to the appropriate ActiveX objects (Shell Folders). In their case, you need to customize the icon of the related Shell Folder.
The following shortcuts can be customized via their properties:
- Bluetooth device
- Fax recipient
The next group of shortcuts should be customized by tweaking their Shell Folders:
- Compressed (zipped) folder
- Desktop (create shortcut)
- Documents
- Mail recipient
Let's see how it can be done.
To customize the Send To menu icons in Windows 10, do the following.
- Open File Explorer.
- Type in its address bar the following text:
shell:sendto. Hit the Enter key.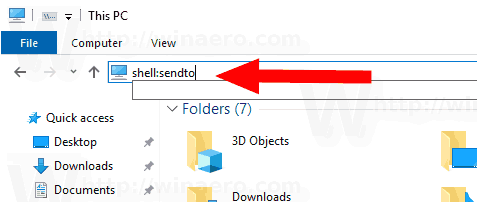
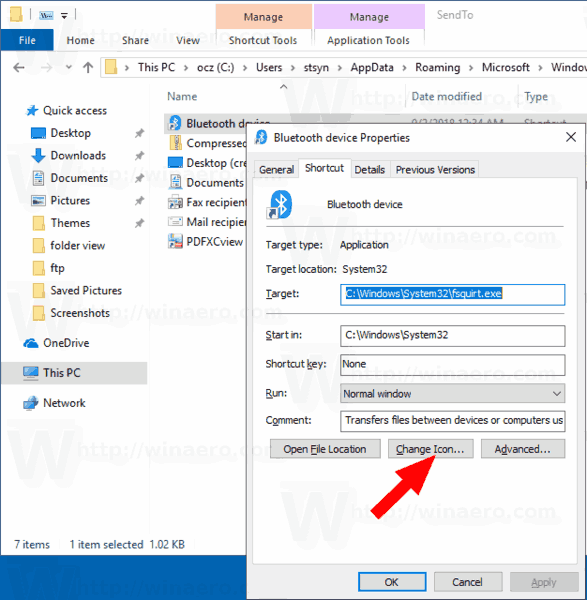
- Press and hold the Alt key on the keyboard and double-click the shortcut you want to customize. See How to open file or folder properties quickly in Windows File Explorer.
- Switch to the shortcut tab and click on the button Change icon....
- In the next dialog, pick the desired icon from an *.ICQ file or from the system files c:\windows\system32\imageres.dll, c:\windows\system32\shell32.dll, and c:\windows\system32\moricons.dll. They contain the majority of Windows icons.
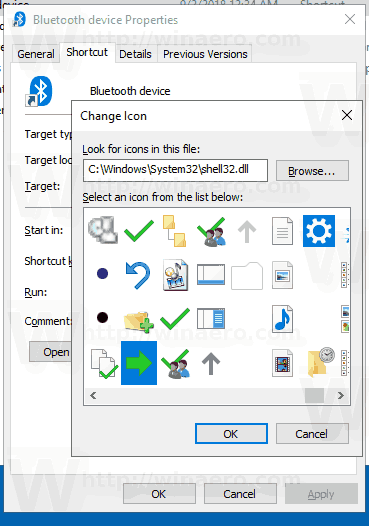
The method described above is applicable to the Bluetooth device and Fax recipient shortcuts.
![]()
Note: The shell:sendto is a special shell command which can be used to quickly open system folders. Read the following articles for details:
Now, let's see how to customize the other shortcuts stored in the Send to folder.
Customize Send To Shortcuts by Changing Their Shell Folders
- Open the Registry Editor app.
- Navigate to the key
HKEY_CURRENT_USER\Software\Classes\CLSID.See how to go to a Registry key with one click. - Here here a new subkey.
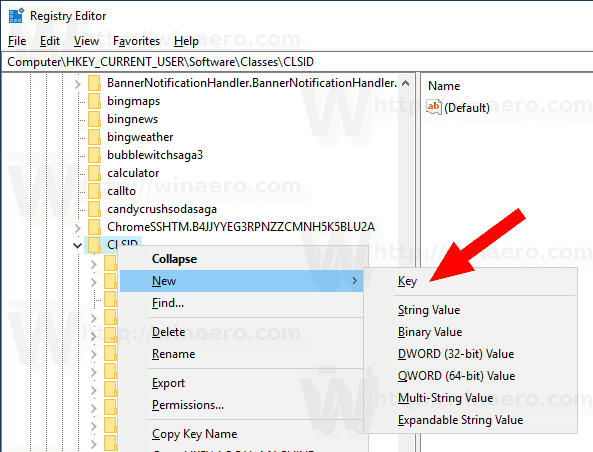 Use one of the following names for the key:
{888DCA60-FC0A-11CF-8F0F-00C04FD7D062} for Compressed (zipped) folder
{9E56BE61-C50F-11CF-9A2C-00A0C90A90CE} for Desktop
{ECF03A32-103D-11d2-854D-006008059367} for Documents
{9E56BE60-C50F-11CF-9A2C-00A0C90A90CE} for Mail recipient.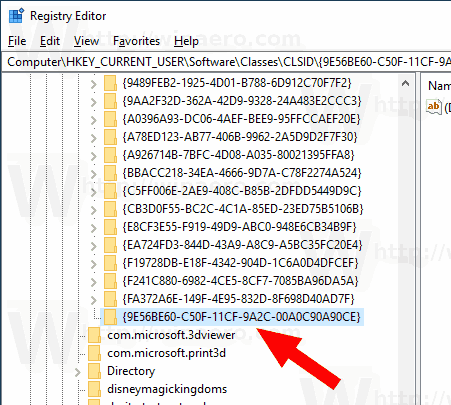
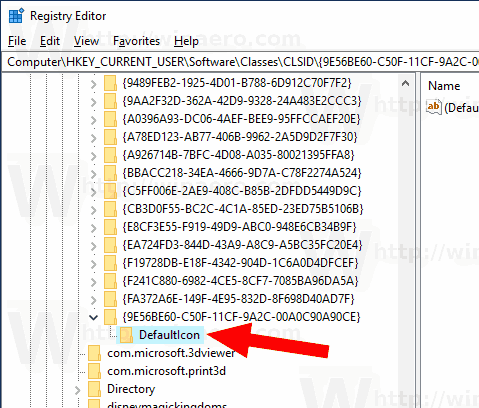
- Under the CLSID key you created, create a new subkey named DefaultIcon.
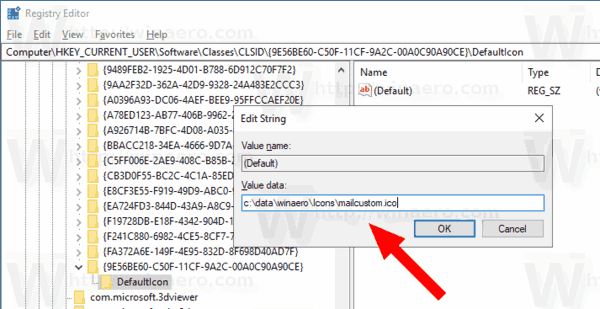
- On the right, double-click on the default (unnamed) string parameter. Set its value data to the full path to the *.ico file you want to use as your new icon.
- To make the changes done by the Registry tweak take effect, you need to sign out and sign in to your user account. Alternatively, you can restart the Explorer shell. If this doesn't help, reset the icon cache.
This will change the icons for the current user only.
![]()
Tip: Instead of an *.ico file, you can specify the path to a DLL file containing the icon and its icon resource number. For example, this is the Control Panel icon: %SystemRoot%\system32\imageres.dll,-27.
Change icons for all users
To change them for all users, modify the unnamed value of the DefaultIcon subkey under the following branch.
HKEY_CLASSES_ROOT\CLSID\{GUID}\DefaultIcon
Use the following GUID values:
{888DCA60-FC0A-11CF-8F0F-00C04FD7D062} for Compressed (zipped) folder
{9E56BE61-C50F-11CF-9A2C-00A0C90A90CE} for Desktop
{ECF03A32-103D-11d2-854D-006008059367} for Documents
{9E56BE60-C50F-11CF-9A2C-00A0C90A90CE} for Mail recipient.
Do it as follows.
- You must be signed in with an administrative account to continue.
- Download the ExecTI freeware and start regedit.exe using it. This will open the Registry Editor app with the highest privilege level. Otherwise, you won't be able to modify the mentioned Registry key.
- Go to the appropriate Registry branch and edit the icon path in the Registry.
That's it.
Related articles:
- How to move files using Send To menu in Windows 10
- How to add custom items to the Send To menu in Windows 10
- How to hide drives from the Send To menu in Windows 10
- Fix Send to Compressed (zipped) folder is missing in Windows 10 context menu
- Add Quick Launch to the Send To menu to create new shortcuts faster
- Change Any Control Panel Item Icon in Windows 10 (Shell Folder)
- Change Control Panel Icon in Windows 10
Support us
Winaero greatly relies on your support. You can help the site keep bringing you interesting and useful content and software by using these options:

Hi
Is it possible to remove the My People section from UWP share UI?
If it is, could you please add it to winaero tweaker?
Sergey, I’m sorry if I’m going ot:
I’m getting a new Windows Update notification icon on systray by “C:\Windows\System32\MusNotificationIcon.exe” file.
How can I stop it?
Thanks!
Edit:
file is
“C:\Windows\System32\MusNotifyIcon.exe”
try to change its NTFS permissions. Deny access for the user SYSTEM.
I’ve tried, but it seems I have no choice to do that.
Is there any chance to introduce a trick to stop musnotification.exe in your tweaker?
Thanks!
Honestly, it should be already handled when you apply the “disable Windows Update” tweak.
I can tell you that I get the same issue even on other pc with Windows 10 1803.
Maybe it’s just a countdown to remember you that you have to update your Windows, but how to stop it?