Here are two ways to get the classic notepad without tabs in Windows 11. In Windows 11, the famous plain editor has turned into a Store app with new features, appearance and behavior. But not everyone likes the changes.
Advertisеment
Some users prefer the old classic Notepad for several reasons. It starts much faster than the new Store-based app. It also has a exit confirmation when you have some changes unsaved. Finally, it doesn't have tabs, allows managing your work in classic multi-window mode.
Microsoft also plans to integrate AI in the modern Notepad, that will rewrite and summarize texts. But there are Copilot rebels among users who are categorically against this addition!
Obviously, the Windows 11 app has pros and cons. For example, it supports the Dark theme. Also, it auto-saves the "session", i.e. all your documents will open where you left of, including the ones you didn't even save!
But it starts much slower, and it is really resource-heavy against the tiny classic editor which is blazing fast. Many are interested in getting the latter back in the OS.
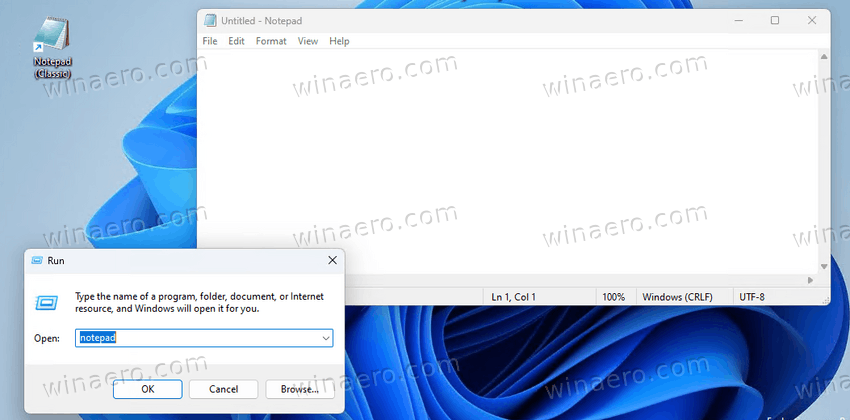
Let's review how to restore the old Notepad on Windows 11. There are actually two ways of doing so, but we will become familiar with both. We will start with a dedicated setup program with Notepad built from Windows 10 resources.
To get the classic Notepad for Windows 11, do the following.
Download Classic Notepad for Windows 11
- Go to the following website and download the setup program.
- Run the installer, and follow the steps.
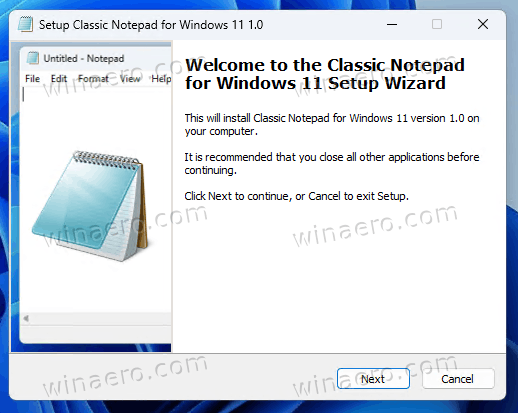
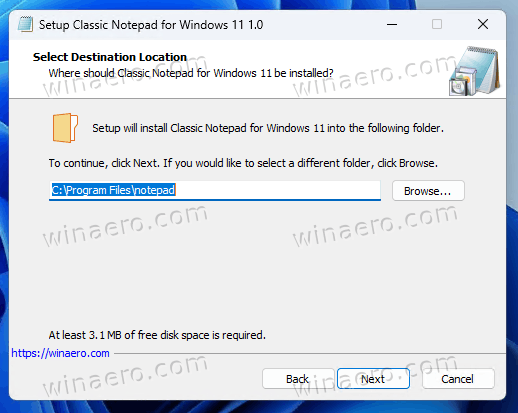
- The installer will ask for the destination folder, but the default \Program Files\Notepad is fine enough.
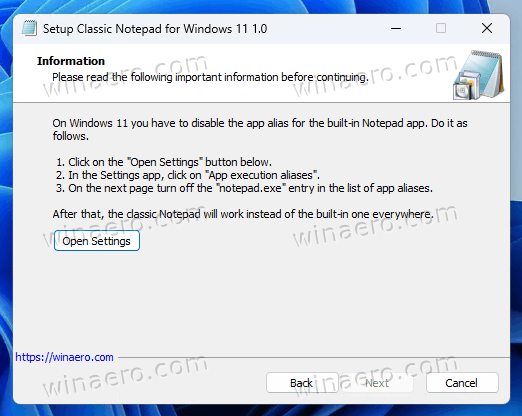
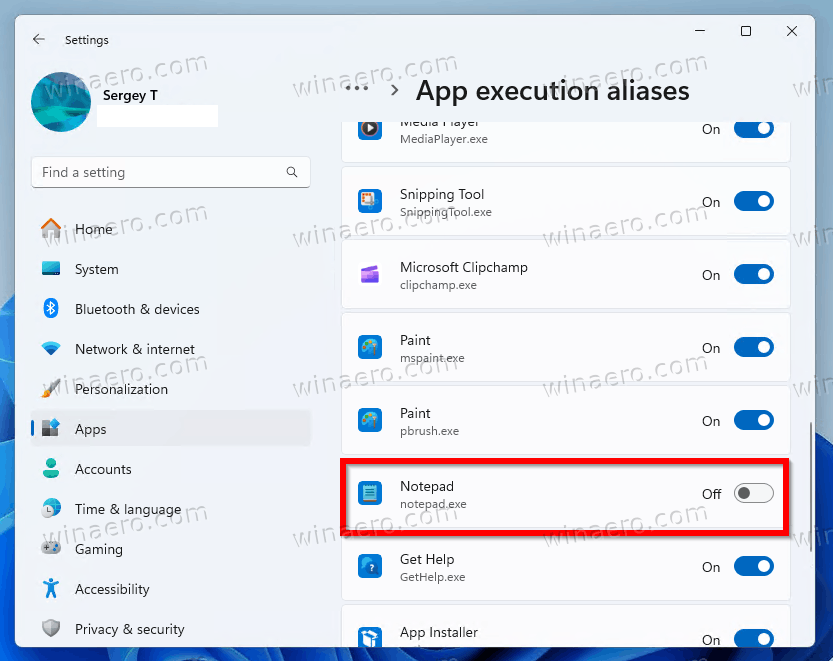
- At the next step, you need to click on the "Open Settings" button and click App execution aliases. There, disable the notepad.exe alias. Otherwise it will prevent the old one from starting.
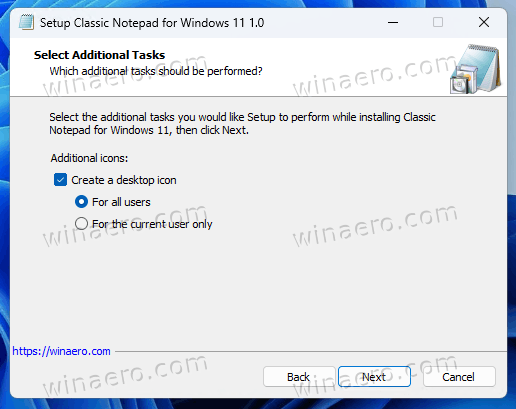
- Finally, get back to the installer, and create the desktop shortcut if you want.
- Click Finish. Voila, now you have the classic Notepad installed in your Windows 11.
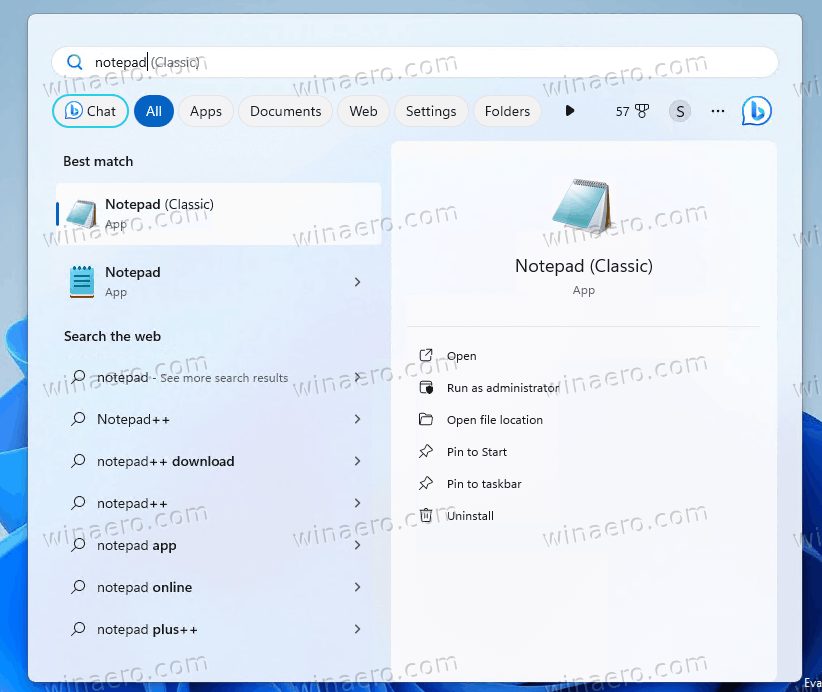
You are done.
The installer is built with genuine Windows 11 22H2 files that aren't tampered with. The installer comes with the full set of locale and user interface language support, so Notepad will always be in your native language. It supports the following languages:
ar-sa, bg-bg, cs-cz, da-dk, de-de, el-gr, en-gb, en-us, es-es, es-mx, et-ee, fi-fi, fr-ca, fr-fr, he-il, hr-hr, hu-hu, it-it, ja-jp, lt-lt, lv-lv, nb-no, nl-nl, pl-pl, pt-br, pt-pt, ro-ro, ru-ru, sk-sk, sl-si, sr-latn-rs, sv-se, th-th, tr-tr, uk-ua, zh-cn, zh-hk, zh-tw.
Moreover, it will add the app to the File Explorer's context menu. You'll be able to open any file with it!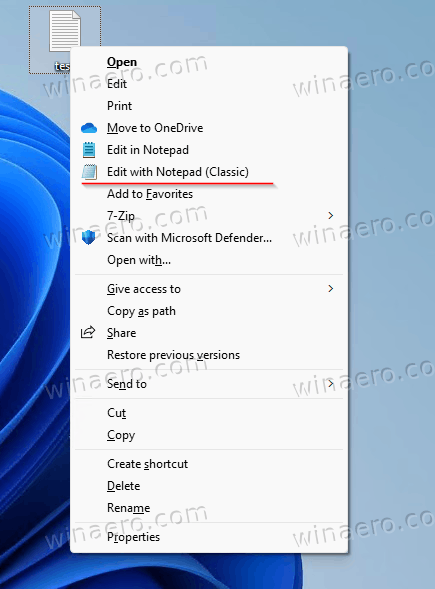
The installer registers notepad.exe as an execution alias, so you can run it this way from any place and any app! For example, entering notepad.exe in the Run dialog (Win + R) will bring up the classic app and not the newer one.
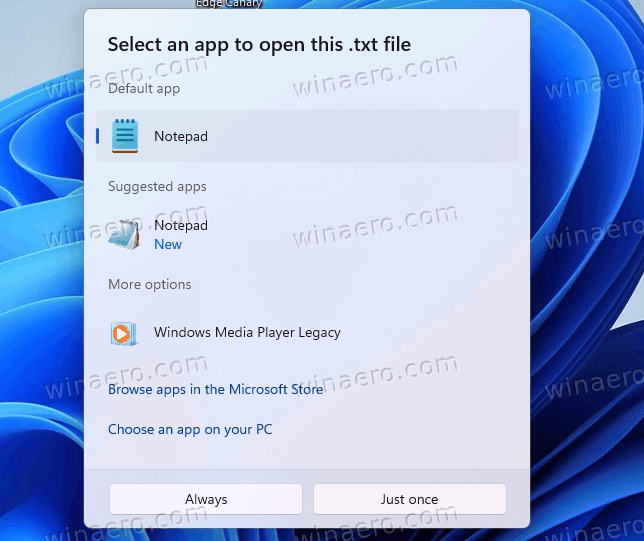
Additionally, the classic Notepad will appear in the Open with dialog, bringing you the option to set as your default text file editor.
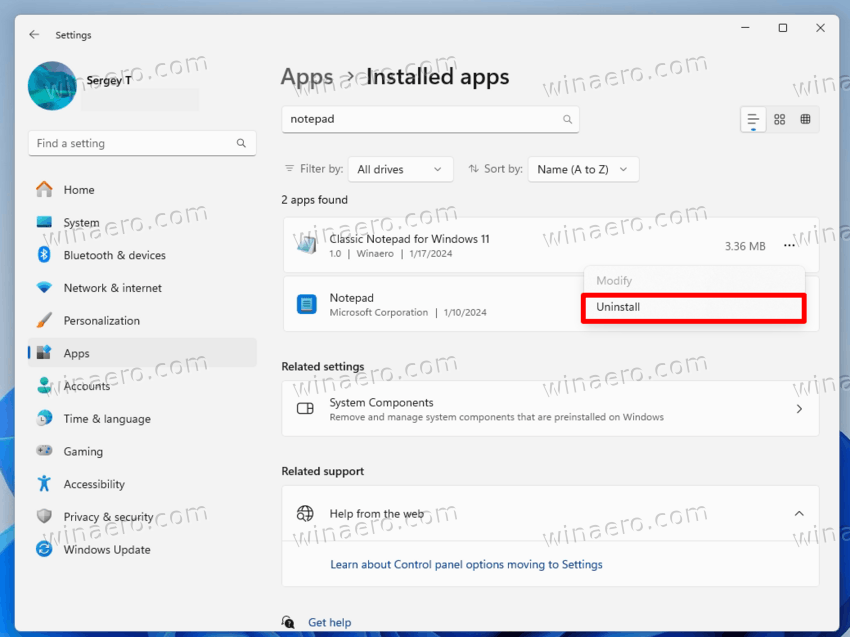
The installer adds itself to Settings > Apps > Installed apps. From there, you can uninstall it like any other regular app.
If downloading legacy files aren't your way, here is an alternative solution. You can disable the modern Notepad, and Windows 11 will revert to a built-in plain text old editor. It remains available in the OS, as it is still used in WinRE, OOBE and other scenarios where the Store subsystem doesn't function.
Here are the details.
Disable Modern App and Restore Old Classic Notepad
Step 1. Install the classic app if it is missing
- Open the Settings app (press Win + I), and go to System > Optional features.
- On the next page, search for Notepad. It must be installed like it shown in my picture.
- If not, click on Add an optional feature, and install it manually.
Step 2. Disable the Store Notepad alias
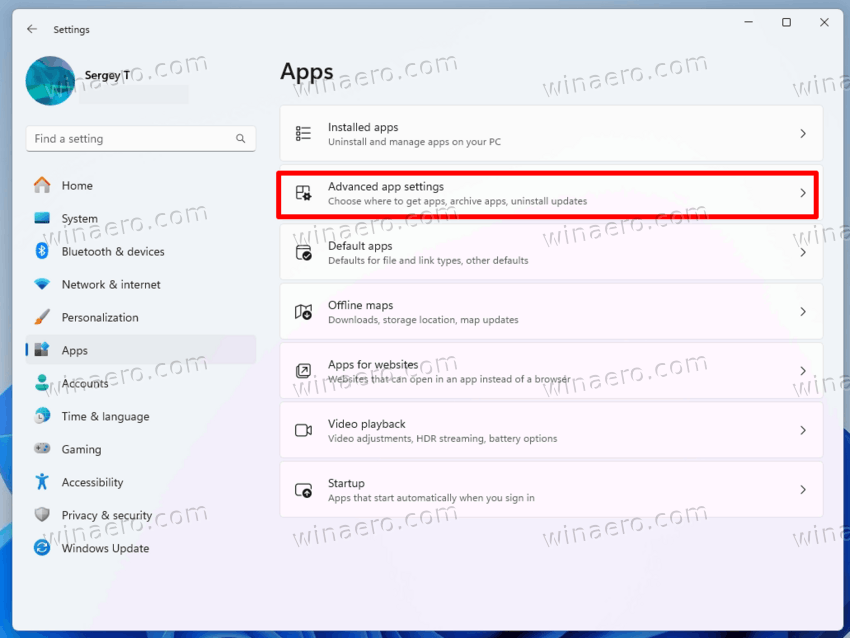
- Open Settings (Win + I), and navigate to Apps > Advanced app settings.
- On the next page, click on the App execution aliases.
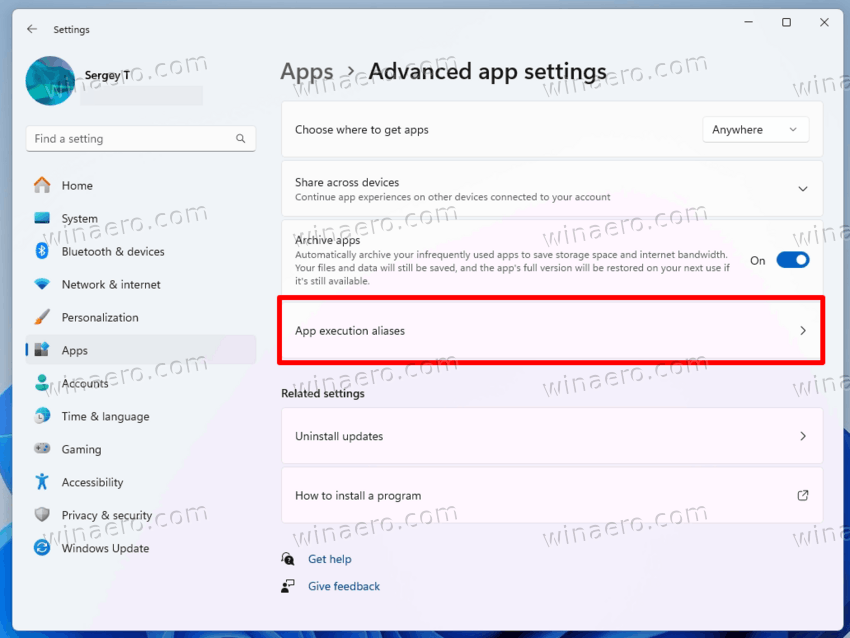
- Now, in the list of execution aliases, find notepad.exe and turn off the toggle option next to it.
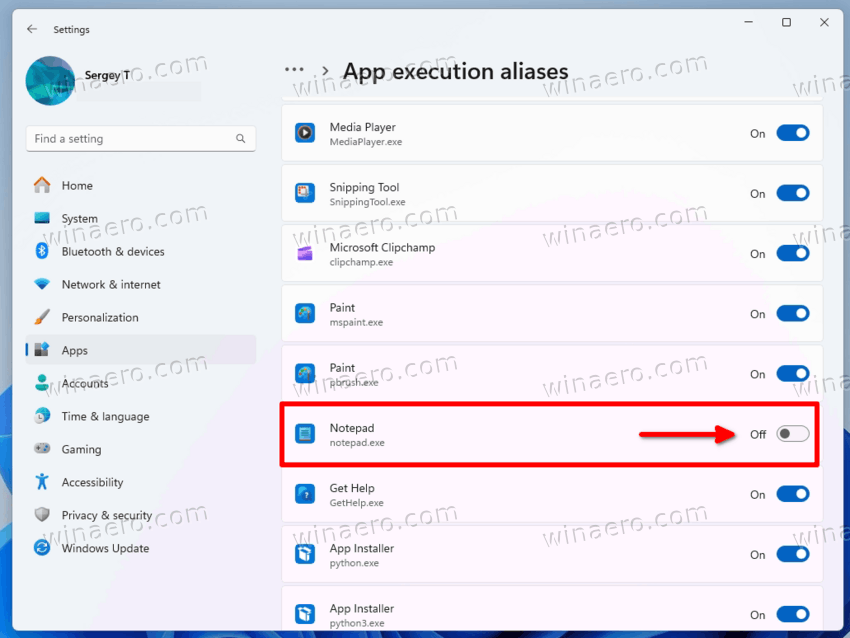
From now on, the legacy Notepad is your default Notepad. Try to run it from the Run dialog. You will find that it is indeed an older app, not the modern one with tabs. And you didn't even install anything third-party.
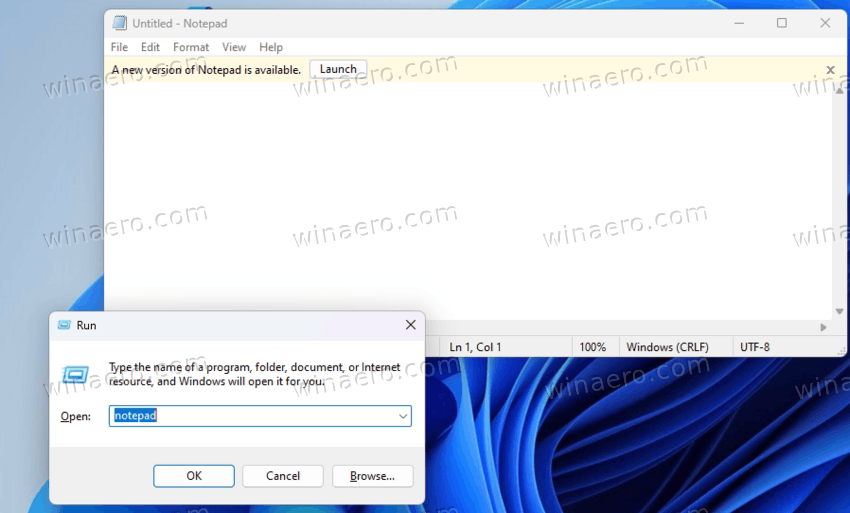
Next thing is to make it appear in the context menu and associate it with text files.
Step 3. Add file associations to the classic Notepad
- Press Win + R, and type regedit in the Registry Editor app.
- Paste the following path into the address bar and press Enter to open the required key:
HKEY_LOCAL_MACHINE\SOFTWARE\Classes\txtfilelegacy. - Right-click the
txtfilelegacyfolder in the left pane, and select New > Key from the menu.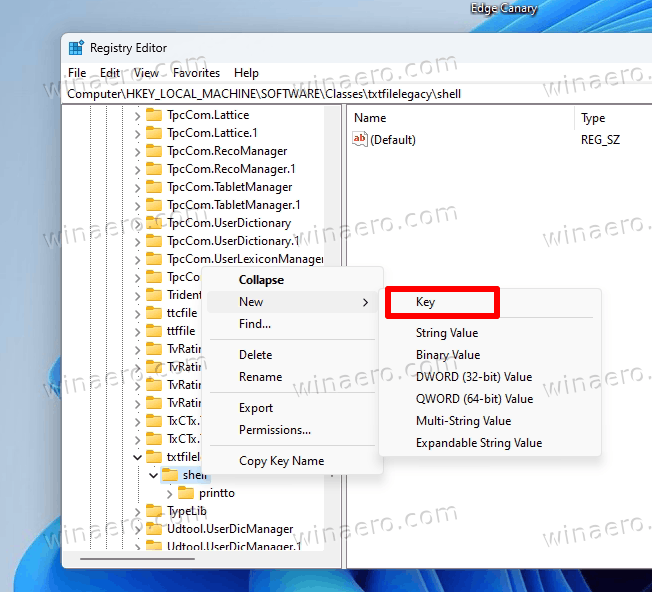
- Name the new key Shell.
- Now, right-click the Shell key, and again select New > Key.
- This time, name the new key Open.
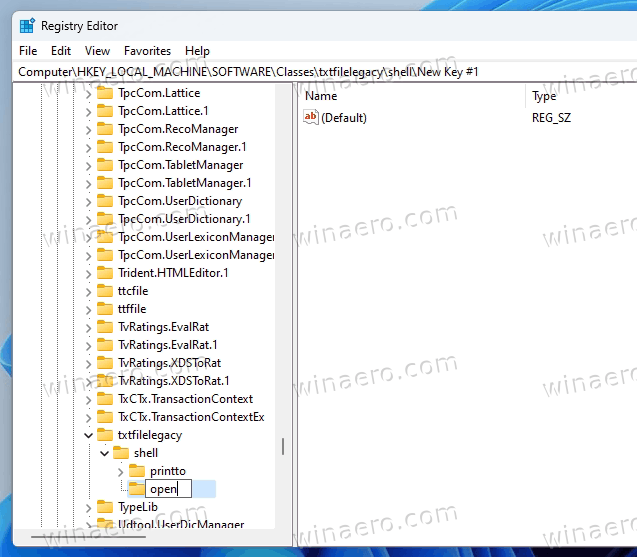
- Now right-click the Open key you just created and again select New > Key. This time name the new key Command.
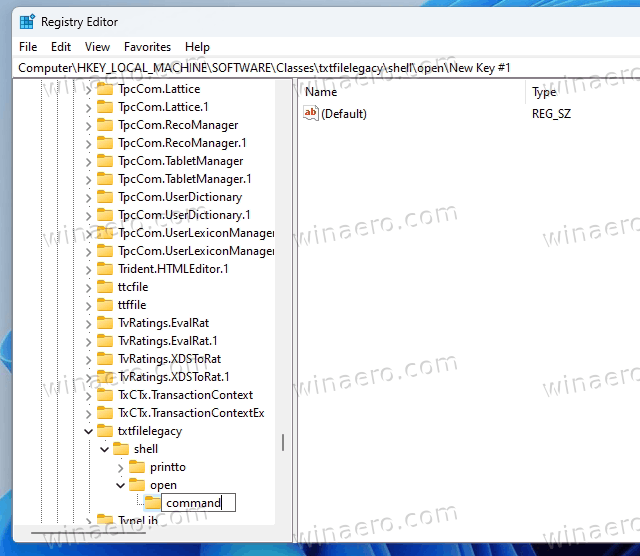
- Finally, double-click the unnamed (default) value in the right pane of the Command key to edit it. Set its value data to
c:\windows\system32\notepad.exe "%1".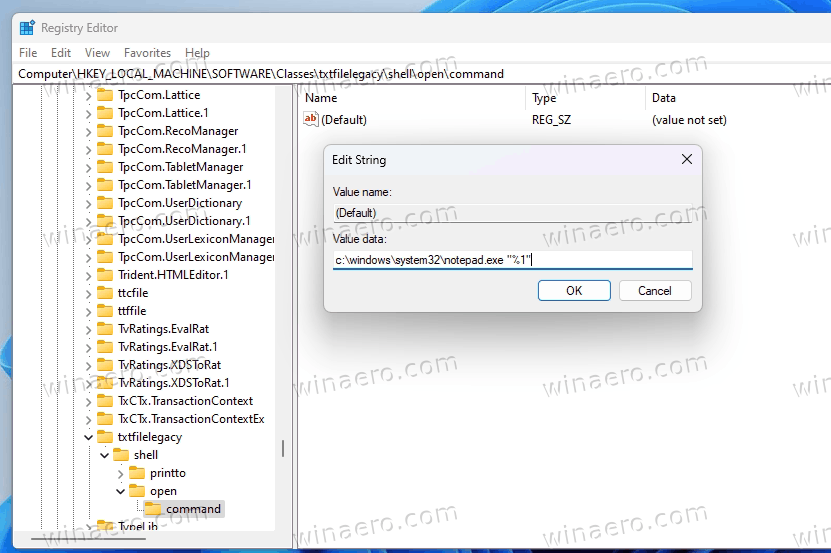
- Now, right-click any text file (.txt) in your File Explorer, and select Open with > Choose another app.
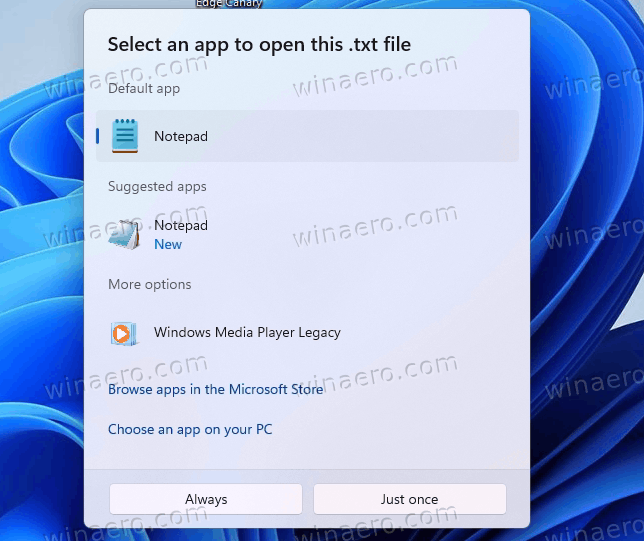
- Select the other Notepad with the legacy icon and click Always.
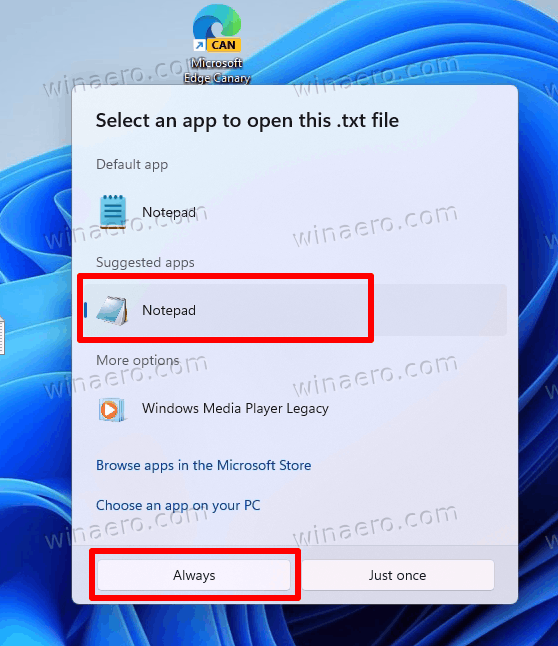
You are done! Now, you can double-click a text file (.txt) anywhere in File Explorer. It will open in the classic Notepad!
Download REG files
💡To avoid manual registry modifications, you can download a ready-to-use REG files from here.
Unpack the ZIP file by the above link to any folder. You will see two REG files.
-
add_open_command_for_notepad.reg- adds the reviewed modifications to the Registry. -
remove_open_command_for_notepad.reg- this is the undo file.
Double-click the first one to make the classic Notepad handle text files.
The other one undoes this change.
After doing all these steps, you will get the old Notepad app everywhere. It will even run for the "Edit" context menu entries. E.g. when you shift + right-click a .reg file in File Explorer and choose "Edit", it will open in the classic app!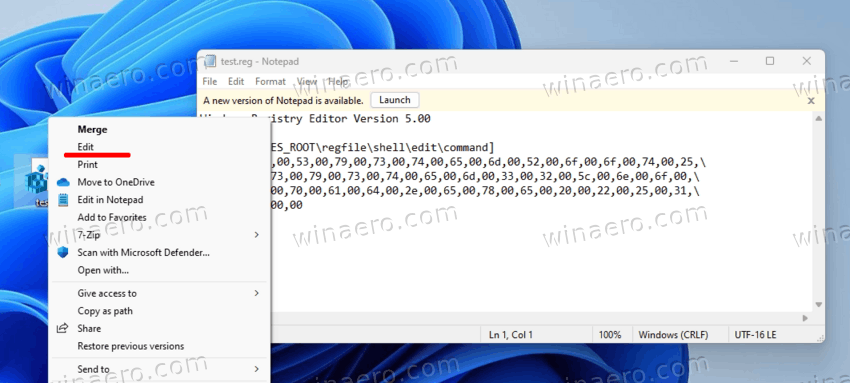
Another great thing is that the other command, "Edit in Notepad", still opens files in the new app. You now have a choice which one to use.
By default, the Start menu only has a shortcut for the newest Notepad. There is no mouse-click way to launch the old one from the Start menu. But it is an easy-to-fix issue.
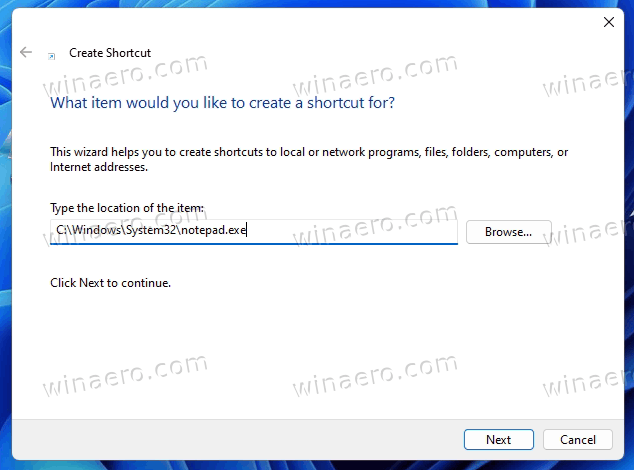
- Right-click the Desktop background, and select New > Shortcut from the context menu.
- Create a new shortcut for the C:\Windows\System32\notepad.exe file.
- Press Win + R, and type the
shell:Common Start Menushell command. Hit Enter.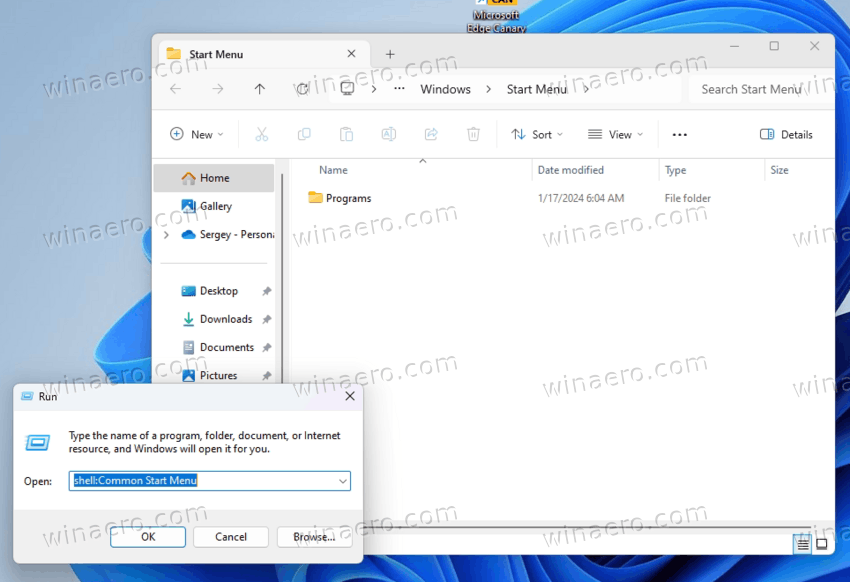
- The File Explorer will open with the folder that contains Start menu shortcuts for all users.
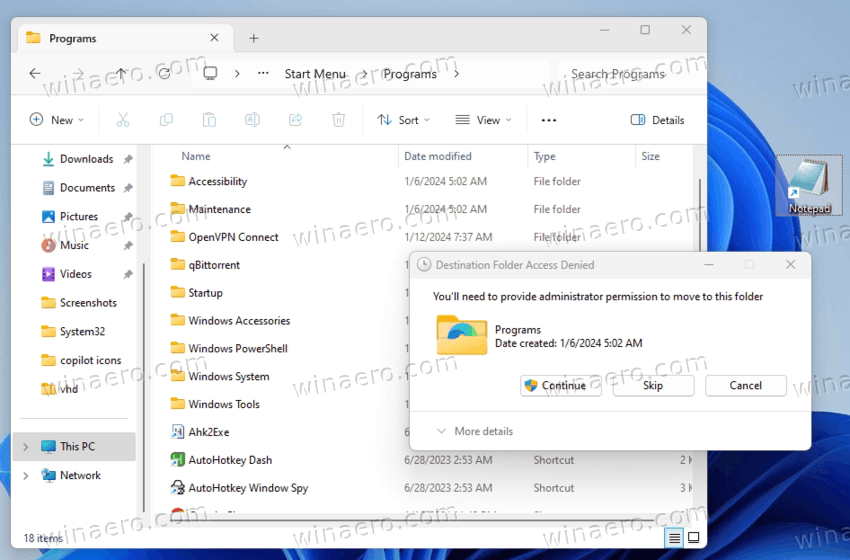
- Double-click the Programs subfolder to open it. You will place your shortcut there.
- Cut the the shortcut you have created in the Step #2, and paste it here. Click on Continue to confirm the operation.
- Now open the Start menu. You now have two Notepad shortcuts for both apps.
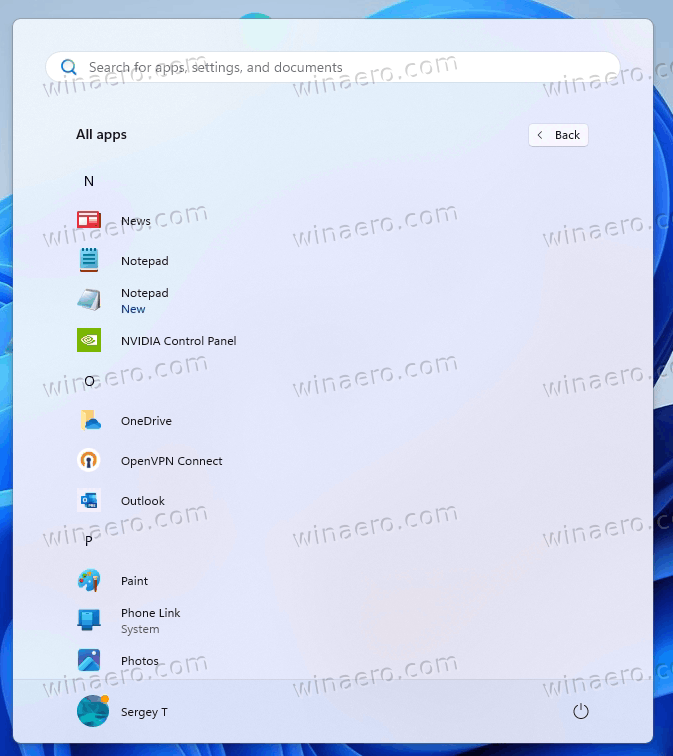
Moreover, you still will be able to run two Notepads simultaneously. The modern Notepad remains available in the Start menu.
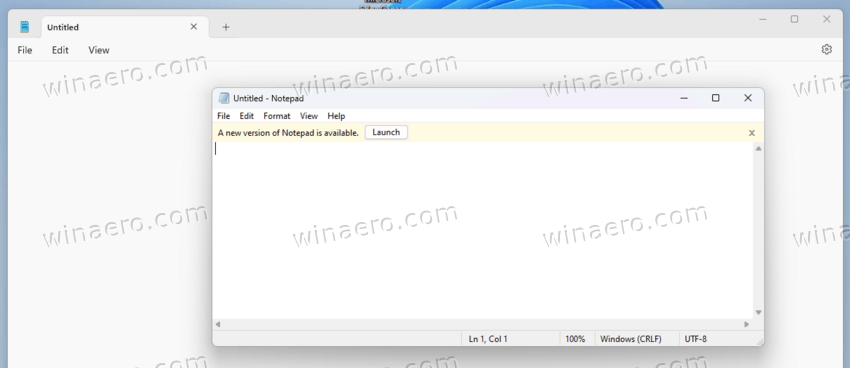
Reverting everything back to defaults
If you decide one day that it is the time to move on and go with the modern Notepad, it is easy to restore the defaults.
First of all, delete the Notepad shortcut in the Start menu from the C:\ProgramData\Microsoft\Windows\Start Menu\Programs folder.
Next step is to open regedit.exe, navigate to HKEY_LOCAL_MACHINE\SOFTWARE\Classes\txtfilelegacy, and delete the open subkey.
And the last step: Open Settings (Win + I), navigate to Apps > Advanced app settings > App execution aliases. Enable the Notepad entry and you are good to go.
Whatever method you preferred, the package or manual steps, both will restore the old classic Notepad on Windows 11 for you with ease.
That's it.
Support us
Winaero greatly relies on your support. You can help the site keep bringing you interesting and useful content and software by using these options:

I’ve never liked the new one. I usually just go into the C and Windows folder and there it should be. Then I create a shortcut to it and put it in C:ProgramDataMicrosoftWindowsStart MenuPrograms. Uninstalling the new one.
I was wondering if you know how to… When righ clicking on the desktop you could add a new, then choose text file. This option seem to be lost on the old notepad and this update. I get an error message using the reg edit. Is there a way to get it back?
Thanks for the info.
I will look.
Recently i discovered that you can open the old Notepad if you just updated windows (ex: 22H2 to 23H2) there will be a windows.old folder; navigate to C:\Windows.old\WINDOWS and open notepad.exe (not system32) and it will open the old one (although it will give you a banner to update for some reason)
Thank you.
A similar method is also reviewed in the post.
Missing link in context menu to create new *.txt file. Not good. MS is screwing the whole OS, now we have manually to set file association and tamper reg entries. Where is here a common sense ? MS is screwing functionality that was previous here/there. I get the sense that MS want us to become “developers” just like Linux 25+ years ago, where almost everything user should fix by him self because developers aren’t.
I uninstalled the new notepad in Build 22631.4037, then followed all the registry steps. But opening files like *.log seems to do not work, i manually picked the exe from the “Choose an app” menu, but then this error appears:
[Window Title]
Cannot associate file type with this program
[Content]
The program you have selected cannot be associated with this file type. Please choose another program.
[OK]
Correction ( you can track the screenshots )
Step 3. Add file associations to the classic Notepad
Press Win + R, and type regedit in the Registry Editor app.
Paste the following path into the address bar and press Enter to open the required key: HKEY_LOCAL_MACHINE\SOFTWARE\Classes\txtfilelegacy.
Right-click the (txtfilelegacy -> shell) folder in the left panel, while shell selected Right-click and select New > Key from the menu.
It works well and thanks for guide!
Thanks a lot, updated the post.
Is there any way to get back the right click Create .txt file entry?
its work only if the new notepad is installed along side with the legacy one
Also go to HKEY_CLASSES_ROOT\Applications\notepad.exe and remove the NoOpenWith setting.
That will allow the old notepad to appear in the Open With app selections, for either always or just once.
The installer & instructions worked as advertised a couple months ago but when I tried it on another W11 pc late december the installer did not offer an “install to” location and automatically put it in C:\Windows\system32\. Also, the registry fix to allow old notepad to be the default doesn’t work until you delete the NoOpenWith setting as suggested by JA.
This was so great! And if it should be possible to create something similar to restore the old Windows Photo Viewer (from Windows 7) then that would be truly amazing too! I’ve really tried to find some other viewer that’s equally good, but haven’t been able to find anything.
The ability to restore Windows Photo Viewer is integrated in Winaero Tweaker, and is also possible with a Registry tweak. Check out the linked post, it covers both methods.
Ok, nice, thanks. Until about a year ago I was actually able to run Photo Viewer on Windows 11 by using some registry changes, but when 24h2 came out it didn’t work anymore. But if the methods you describe work also on 24h2 (and 25h2) then it’s absolutely fantastic!