As you may already know, NTFS, the standard file system of the Windows NT operating system family, supports disk quotas. Quotas help administrators track and control disk space usage by users. If you have enabled quotas for users, you can turn on logging for events like Disk Quota Limit Exceeded and Disk Quota Warning Level Exceeded. Here are various methods you can use to enable the logs.
Advertisеment
The NTFS file system allows administrators to control the amount of data that each user can store on an NTFS file system volume. Administrators can optionally configure the system to log an event when users are near their quota, and to deny further disk space to users who exceed their quota. Administrators can also generate reports, and use the event monitor to track quota issues.
The Disk Quota feature can be enabled for an individual drive, or forced for all drives. Also, there are a number of options you can adjust for disk quotas. Before proceeding, ensure that your user account has administrative privileges.
You can use the GUI to set disk quotas in Windows 10. The operation is reviewed in detail in the article How To Enable Disk Quotas In Windows 10. Alternatively, disk quotas can be set in the command prompt.
Additionally, you can enable logs for the disk quota limit exceeded event, and for the disk quota warning level exceeded event. Here's how.
To Log Disk Quota Quota Limit and Warning Level Exceeded,
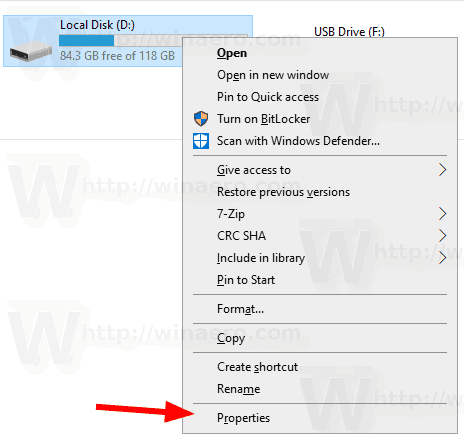
- Open File Explorer and navigate to the This PC folder.
- Right-click on the NTFS drive you want to enable disk quotas for, and select Properties from the context menu.
- Switch to the Quota tab, and click on the Show Quota Settings button.
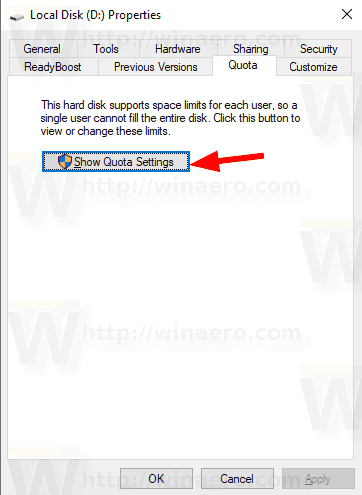
- Turn on the option Log event when a user exceeds their quota limit.
- Turn on the option Log event when a user exceeds their warning level.

View the logs
- Press the Win + R keys together on the keyboard to open the Run dialog, type eventvwr.msc, and press the Enter key.
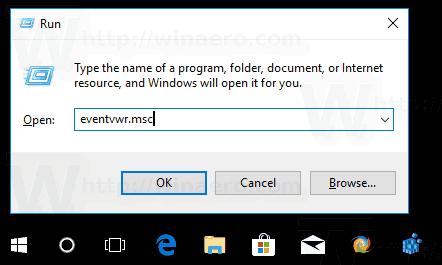
- In Event Viewer, select Windows Logs -> System on the left.
- Look for events with an Event ID of 36 to find the event log for when users exceed their disk quota warning level.
- Look for events with an Event ID of 37 to find the event log for when users exceed their disk quota limit.
- Tip: Click on the Filter Current Log link on the right to find the events faster.
You are done.
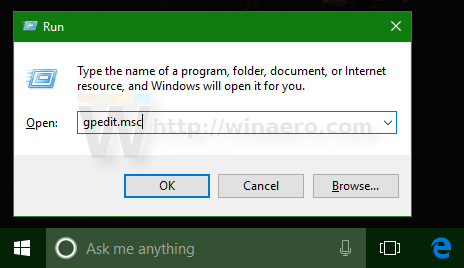
You can force enable logs with a special Group Policy option.
Force Enable Logs for All Users in Windows 10
- Press Win + R keys together on your keyboard and type:
gpedit.msc
Press Enter.
- Group Policy Editor will open. Go to Computer Configuration\Administrative Templates\System\Disk Quotas.
- Enable the policy option Log event when quota limit is exceeded.
- Enable the policy option Log event when quota warning level is exceeded.
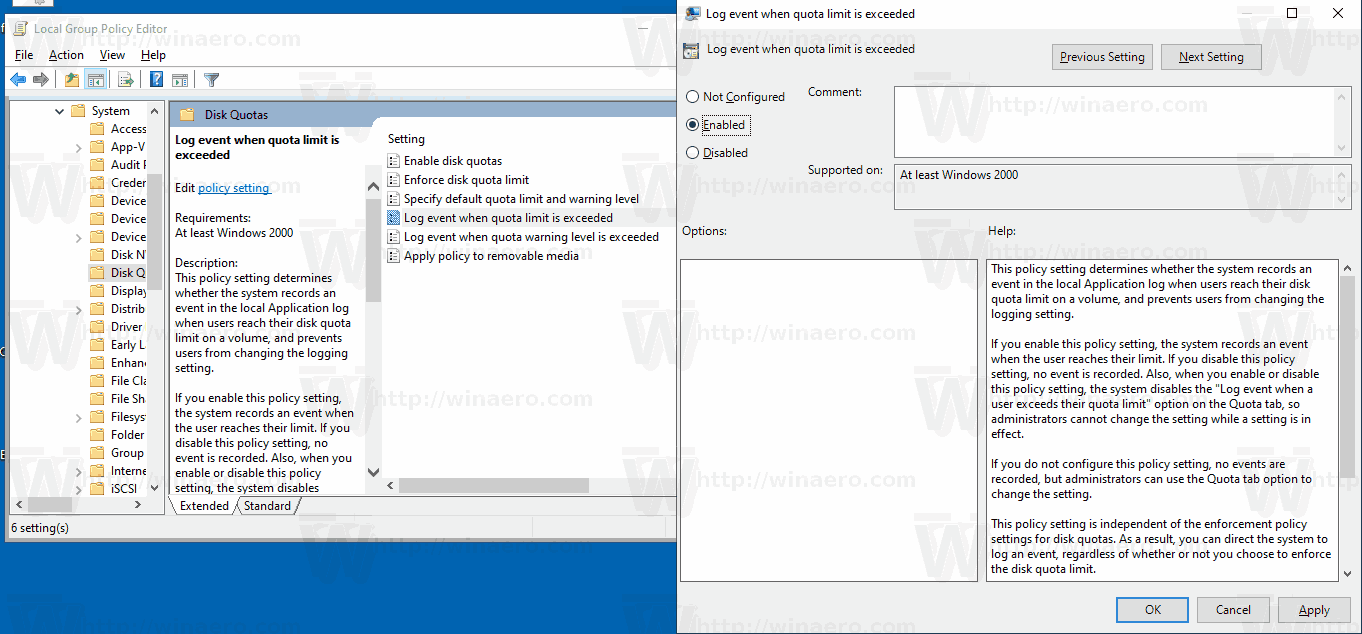
- Restart the computer.
Tip: You can apply the changes without restarting the OS. See Force Update Group Policy Settings in Windows 10 Manually.
The Local Group Policy editor app is available in Windows 10 Pro, Enterprise, or Education edition. If your Windows 10 edition doesn't include the app, you can apply the following Registry tweak.
Force Enable Logs with a Registry tweak
- Open Registry Editor.
- Go to the following Registry key:
HKEY_LOCAL_MACHINE\SOFTWARE\Policies\Microsoft\Windows NT\DiskQuota
Tip: See how to jump to the desired Registry key with one click.
If you do not have such a key, then just create it.
- Here, create a new 32-bit DWORD value LogEventOverThreshold. Set it to 1 to enable the 'Log event when disk quota warning level is exceeded' feature.
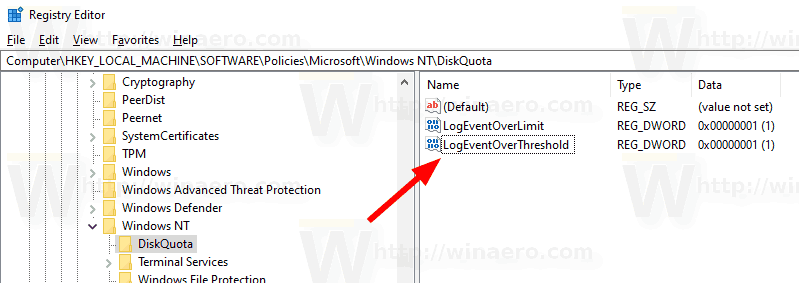
- Create a new 32-bit DWORD value LogEventOverLimit. Set it to 1 to enable the 'Log event when disk quota limit is exceeded' feature.
- Restart the computer or force update Group Policy settings manually.
Note: Even if you are running 64-bit Windows, you still need to use a 32-bit DWORD as the value type.
That's it.
Related articles.
- How To Enable Disk Quotas In Windows 10
- Set Disk Quota in Command Prompt in Windows 10
- Force Enable Disk Quotas In Windows 10 with Group Policy
- How to Enforce Disk Quota Limits in Windows 10
Support us
Winaero greatly relies on your support. You can help the site keep bringing you interesting and useful content and software by using these options:
