A number of Winaero readers have faced an issue in Windows 10 that after a few build upgrades, Search becomes slow and consumes a notable amount of CPU power. It happens every time the user searches for a file or document using the Cortana UI/Search text box in the taskbar. Here is a solution we found to make search fast and responsive again.
Advertisеment
As you may be already know, search results in Windows are instant because they are powered by the Windows Search indexer. It is not new to Windows 10, but Windows 10 uses the same indexer-powered search like its predecessors although it uses a different algorithm and a different database. It runs as a service that indexes file names, contents and properties of file system items and stores them in a special database. There is a designated list of indexed locations in Windows, plus Libraries which are always indexed. So, instead of performing a real-time search through files on the filesystem, the search performs a query to the internal database, which allows showing results immediately.
When you search for some folder or file which is not located in an indexed location, the search is slower by several orders of magnitude. That's exactly what was happening in this case after upgrading the Windows 10 build. Some locations which need to be indexed were missing from the search index.
If this slow Windows 10 search issue affects you, follow these simple instructions below to easily fix it.
- Open the Control Panel.
- Go to
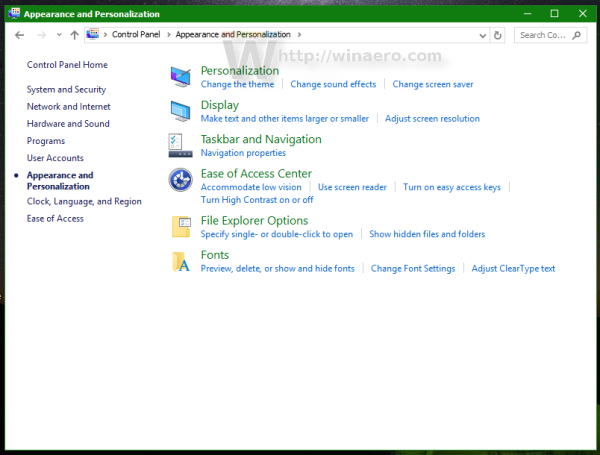
Control Panel\Personalization and Appearance
- There you will find an icon named File Explorer Options:
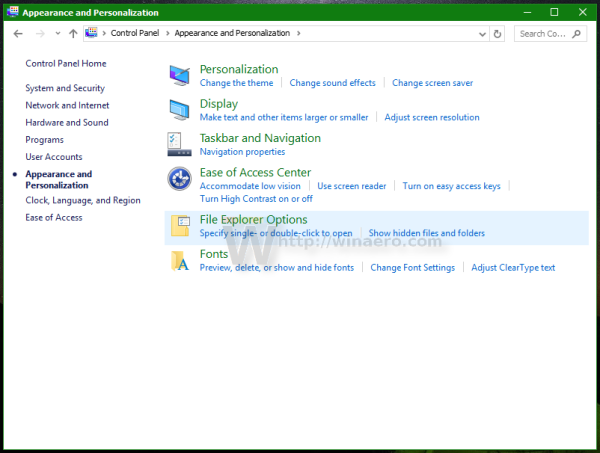
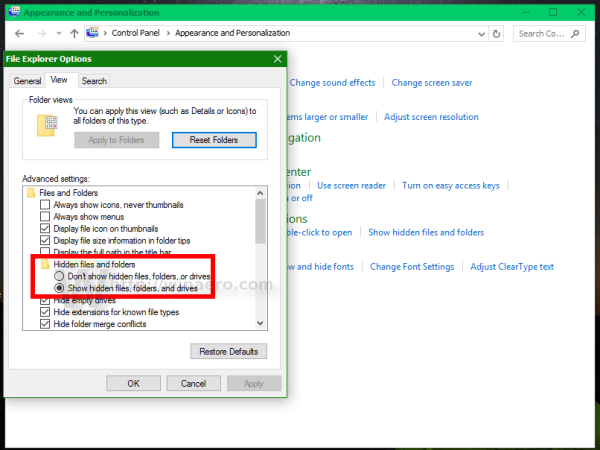
- Open File Explorer Options, switch to the View tab and turn on the display of hidden items as shown in the screenshot below. Refer to this article to understand how to show hidden items.
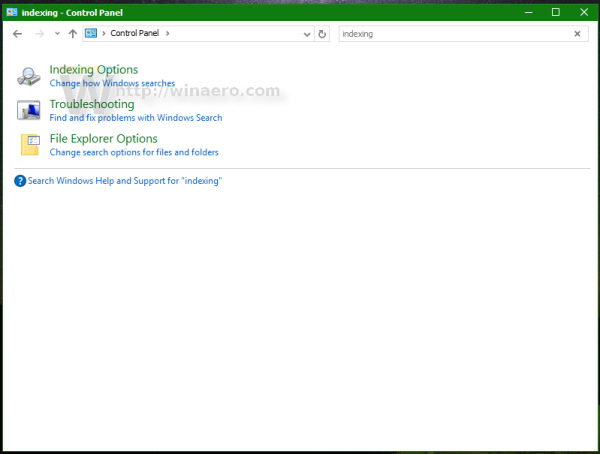
- Now, open Indexing Options by typing indexing options in the search box of the Control Panel, and then click the settings item Indexing Options.
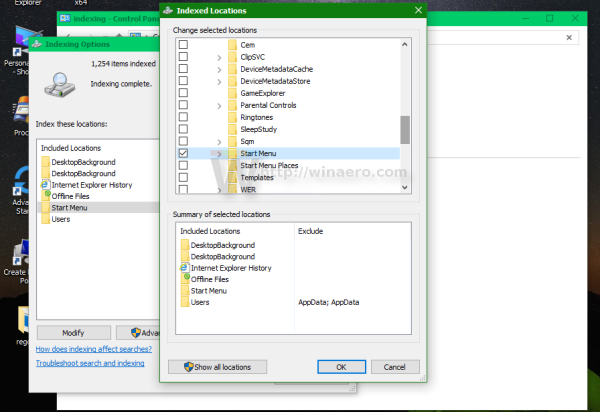
- Open the Indexing Options applet. The Start menu folder should be in the list of indexed locations.If you are having the issue of very slow search results, then in such a case, the Start Menu folder might not be in the list of indexed locations.You should add this location back.
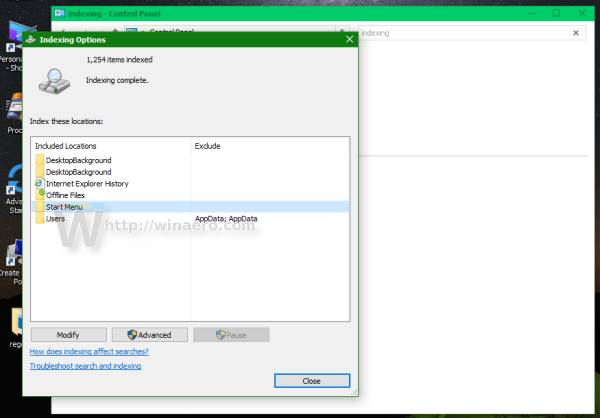
- Click the 'Modify' button.
- Add the following folder:
C:\ProgramData\Microsoft\Windows\Start Menu
Just locate it in the folders tree and tick the appropriate checkbox:
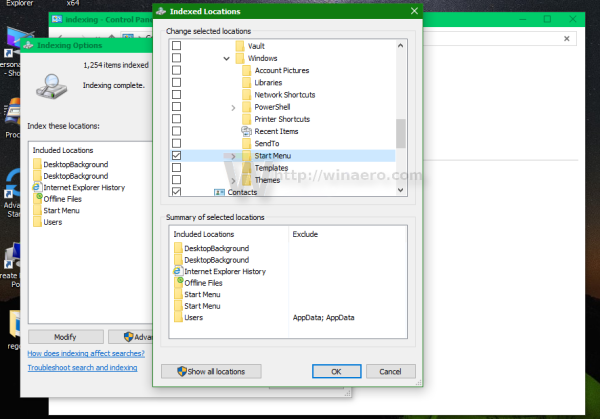
- Repeat step #6 for the following location:
C:\Users\you user name\AppData\Roaming\Microsoft\Windows\Start Menu\
That's it. Give Windows a few minutes to index these locations. Then your search in Windows 10 will be fast again!
I recommend you to read the following articles to make your search faster and more useful:
- Search apps faster in the Start menu in Windows 10
- How to search in Windows 10 Start menu with search box disabled
- How to disable web search in the Windows 10 taskbar
- How to get world’s fastest Start menu in Windows 10 with Classic Shell
- How to search network shares or mapped drives in Windows 10
Support us
Winaero greatly relies on your support. You can help the site keep bringing you interesting and useful content and software by using these options:

how do you make titlebar thinner?
I was using Winaero Tweaker
https://winaero.com/blog/how-to-reduce-title-bar-height-and-size-of-window-buttons-in-windows-10/
oh
Thanks for this. With a new stock 10586 install, the system-wide Start Menu folder is indexed, but not the user’s Start Menu folder. As I didn’t want add the folder manually every time I installed 10, I used the Microsoft sample code here https://github.com/pauldotknopf/WindowsSDK7-Samples/blob/HEAD/winui/WindowsSearch/CrawlScopeCommandLine/csmcmd.cpp to make an AutoHotkey script that calls SHGetKnownFolderPath and calls the COM methods to add the user’s Start Menu folder programmatically. Maybe something to add to the Tweaker?
(Sorry if this isn’t suitable, but, hey, you moderate your comments – I figure this reply won’t see the light of day if that’s the case…)
The Windows 7 SDK sample, csmcmd can be compiled as a standalone command line tool. Here you go: https://onedrive.live.com/redir?resid=5B7C6992DE8CC9F7!2217&authkey=!AH6Om_gzYWXutow&ithint=file%2czip
User can add folder to search index like this:
csmcmd /add_rule e:\games /include
and remove the folder from the index like this (seems that “file:///” path prefix is required for removal):
csmcmd /remove_rule file:///e:\games
It works from an admin cmd prompt.
TrainedToGo is on to the real problem here. I’ve put the explanation in a separate comment (%appdata% is excluded from Indexing by default and that includes the individual users’ \Microsoft\Windows\Start Menu folders) but, in summary, to fix this, find Indexing Options in Start, hit Modify, browse to the \Users\{username}\AppData\Microsoft\Windows\Start Menu folder and hit its checkbox, then hit OK, then OK. To fix this for other users on your system, Open Explorer, browse to and select their \Users\{username} folder, click to get access, then repeat the above process to enable Indexing. Then wait for Indexing to update the location(s).
Useless. Still searching like molasses. Windows 10 is a total POS.
I’ve put an explanation as a separate comment, but, in summary, to fix this, find Indexing Options in Start, hit Modify, browse to the \Users\{username}\AppData\Microsoft\Windows\Start Menu folder and hit its checkbox, then hit OK, then OK. To fix this for other users on your system, Open Explorer, browse to and select their \Users\{username} folder, click to get access, then repeat the above process to enable Indexing. Then wait for Indexing to update the location(s).
The search may be slow because Explorer defaults to searching file contents and system files. When you are just looking for part of a filename, that causes extremely slow searching. To change this, open a File Explorer window and click in the search box at the right of the address bar. This should open the options ribbon. Look for and open “Advanced Options”. Under the header “In non-indexed locations” you may see two options checked: “File Contents” and “System Files”. If they are checked, uncheck them. A search will then only look for filenames rather than digging through the contents of all the files.
I’ve put an explanation in a separate comment, but, in summary, to fix this, find Indexing Options in Start, hit Modify, browse to the \Users\{username}\AppData\Microsoft\Windows\Start Menu folder and hit its checkbox, then hit OK, then OK. To fix this for other users on your system, Open Explorer, browse to and select their \Users\{username} folder, click to get access, then repeat the above process to enable Indexing. Then wait for Indexing to update the location(s).
THANK YOU!
I have been battling this WAY too long.
I did not try your solution but I’m not convinced that it will work.
I mean, how does adding a folder to the search will make it faster?
I’ve put an explanation in a separate comment, but, in summary, to fix this, find Indexing Options in Start, hit Modify, browse to the \Users\{username}\AppData\Microsoft\Windows\Start Menu folder and hit its checkbox, then hit OK, then OK. To fix this for other users on your system, Open Explorer, browse to and select their \Users\{username} folder, click to get access, then repeat the above process to enable Indexing. Then wait for Indexing to update the location(s).
Start search uses Windows Search which uses Indexing Service. By default, MS Indexes %programdata%\Microsoft\Windows\Start Menu – all well and good HOWEVER, by default, MS DOES NOT index %appdata% — and in there is %appdata%\Microsoft\Windows\Start Menu – and if you check Indexing Options, you will find that no, MS does NOT include that specific directory. I’ve sent feedback using Feedback Hub on this, but for now, any items in Users’ Start Menu folder and not the %programdata% Start Menu folder will cause delays, and it appears Start Menu will wait for those results, so even if your item is in %programdata%, your result will be delayed. NOTE you cannot enable indexing of other users’ Start Menu locations unless you FIRST access their profile folder in Explorer to get access (their folders will show as not existing in the Indexing Options dialog as that dialog does not display folders the user does not currently have access to). ALSO, it will take a while for Indexing to update and include results from the users’ Start Menu folder, so either find a way to force immediate Indexing, or let the computer idle for a half hour on AC power when testing this.
In summary, to fix this, find Indexing Options in Start, hit Modify, browse to the \Users\{username}\AppData\Microsoft\Windows\Start Menu folder and hit its checkbox, then hit OK, then OK. To fix this for other users on your system, Open Explorer, browse to and select their \Users\{username} folder, click to get access, then repeat the above process to enable Indexing. Then wait for Indexing to update the location(s).