Starting with the next major update, which is Windows 10 19H1, Microsoft is making a few changes to how Windows 10 manages disk space. Some disk space, reserved storage, will be set aside to be used by updates, apps, temporary files, and system caches. Here's how to enable or disable this feature.
Advertisеment
Windows 10 will reserve some disk space to ensure that critical OS functions always have access to disk space. If a user almost fills up her or his storage, several Windows and application scenarios become unreliable. For example, Windows Update may fail to download new update packages. Reserved storage solves this issue. It will be introduced automatically on devices that come with version 1903 pre-installed or those where 1903 was clean installed.
With reserved storage, updates, apps, temporary files, and caches are less likely to take away from valuable free space and should continue to operate as expected.
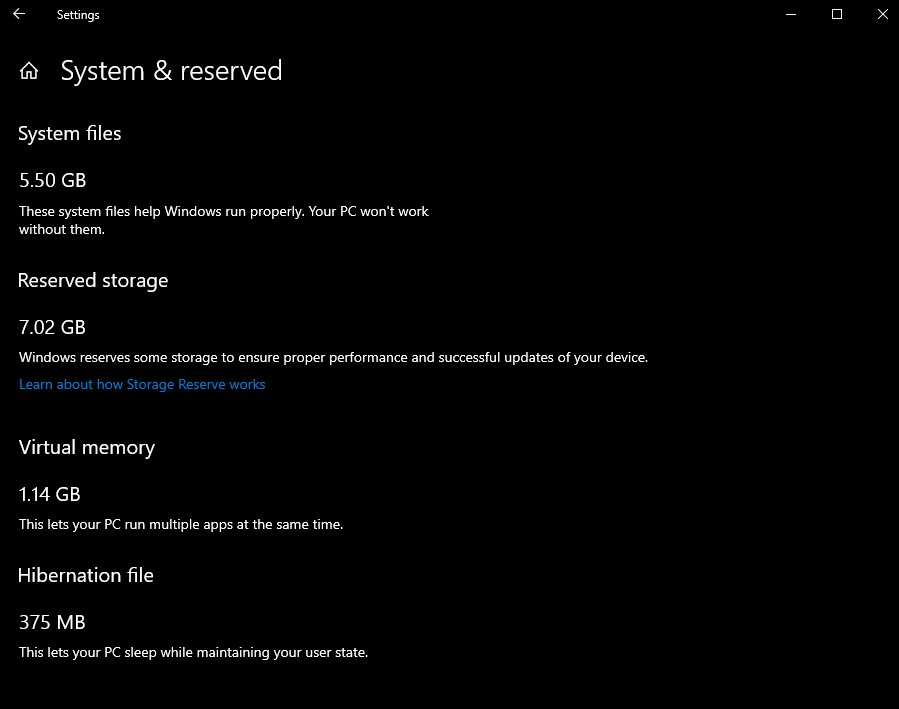
How much of storage is reserved
In the next major release of Windows (19H1), Microsoft anticipates that reserved storage will start at about 7GB, however the amount of reserved space will vary over time based on how you use your device. For example, temporary files that consume general free space today on your device may consume space from reserved storage in the future. Additionally, over the last several releases Microsoft reduced the size of Windows for most customers. Microsoft may adjust the size of reserved storage in the future based on diagnostic data or feedback. The reserved storage cannot be removed from the OS, but you can reduce the amount of space reserved.
The following two factors influence how reserved storage changes size on your device:
- Optional features. Many optional features are available for Windows. These may be pre-installed, acquired on demand by the system, or installed manually by you. When an optional feature is installed, Windows will increase the amount of reserved storage to ensure there is space to maintain this feature on your device when updates are installed. You can see which features are installed on your device by going to Settings > Apps > Apps & features > Manage optional features. You can reduce the amount of space required for reserved storage on your device by uninstalling optional features you are not using.
- Installed Languages. Windows is localized into many languages. Although most of our customers only use one language at a time, some customers switch between two or more languages. When additional languages are installed, Windows will increase the amount of reserved storage to ensure there is space to maintain these languages when updates are installed. You can see which languages are installed on your device by going to Settings > Time & Language > Language. You can reduce the amount of space required for reserved storage on your device by uninstalling languages you aren’t using.
As of this writing, Windows 10 "19H1", version 1903 comes with the Reserved Storage feature disabled by default. You must be signed in with an administrative account to configure it.
Update: Starting in Windows 10 version 2004, also known as '20H1', you can use DISM or PowerShell to enable or disable the Reserved Storage feature. A legacy method that requires you to edit the Registry is also described below.
To Enable Reserved Storage in Windows 10,
- Open a new elevated command prompt.
- Type
DISM.exe /Online /Get-ReservedStorageStateto see if the Reserved Space feature is enabled or disabled.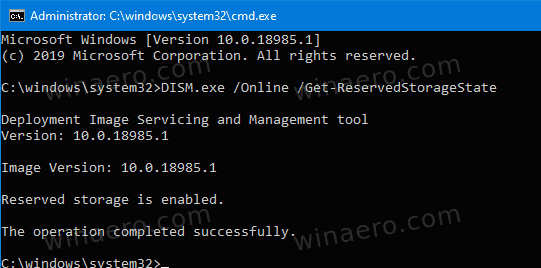
- Execute the following command to enable Reserved Storage:
DISM.exe /Online /Set-ReservedStorageState /State:Enabled.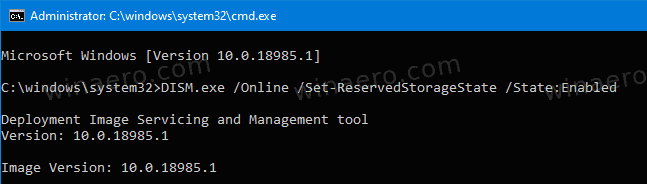
You are done! No restart required.
Enable Reserved Storage in Windows 10, version 1903 and 1909
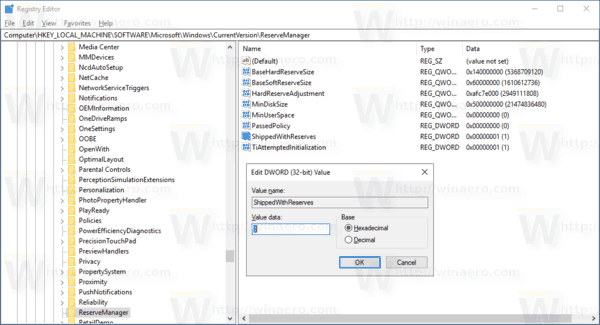
- Open the Registry Editor app.
- Go to the following Registry key.
HKEY_LOCAL_MACHINE\SOFTWARE\Microsoft\Windows\CurrentVersion\ReserveManager
See how to go to a Registry key with one click.
- On the right, modify or create a new 32-Bit DWORD value ShippedWithReserves.
Note: Even if you are running 64-bit Windows you must still create a 32-bit DWORD value.
Set its value to 1. - Restart Windows 10.
To Disable Reserved Storage in Windows 10,
- Open a new elevated command prompt.
- Type
DISM.exe /Online /Get-ReservedStorageStateto see if the Reserved Space feature is enabled or disabled. - Run the following command to disable Reserved Storage:
DISM.exe /Online /Set-ReservedStorageState /State:Disabled.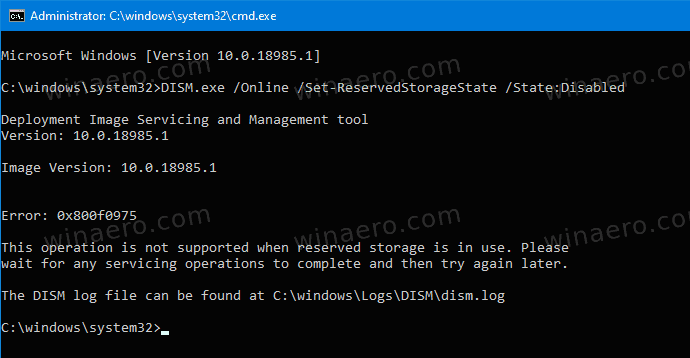
Note: If Windows 10 is performing a servicing operation, e.g. it is installing an update, you won't be able to enable or disable the Reserved Storage feature. The operation will fail. You should try to execute the appropriate DISM command later.
Manage Reserved Storage with PowerShell
- Open PowerShell as Administrator.
- Type
Get-WindowsReservedStorageStateto see if the Reserved Space feature is enabled or disabled.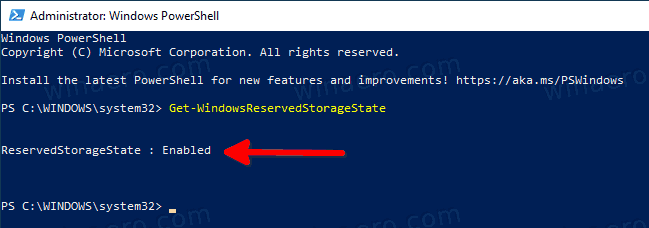
- Execute the following command to enable Reserved Storage:
Set-WindowsReservedStorageState -State Enabled. - Run the following command to disable Reserved Storage:
Set-WindowsReservedStorageState -State Disabled.
Disable Reserved Storage in Windows 10, version 1903 and 1909
- Open the Registry Editor app.
- Go to the following Registry key.
HKEY_LOCAL_MACHINE\SOFTWARE\Microsoft\Windows\CurrentVersion\ReserveManager
See how to go to a Registry key with one click.
- On the right, modify or create a new 32-Bit DWORD value ShippedWithReserves.
Note: Even if you are running 64-bit Windows you must still create a 32-bit DWORD value.
Set its value to 0. - Restart Windows 10.
To save you time, you can download the following ready-to-use Registry files.
The undo tweak is included.
That's it.
Support us
Winaero greatly relies on your support. You can help the site keep bringing you interesting and useful content and software by using these options:

It’s not disable with registry, even after restart Win10.
In 18305, ShippedWithReserves=1 but Reserved Storage not exist.
The reserved storage space will appear after installing the next build via Windows Update.
Tested with 18343 and doesn’t work, the reserved storage space is still present
Thanks
In version 1909 (18363.418) unfortunately not working. I’m frustrated :(
thank u