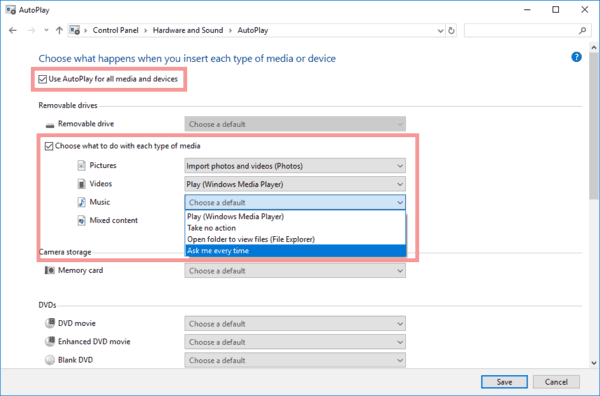
AutoPlay is a special feature of the shell which allows the user to quickly pick a desired action for various media types you have connected or attached to your computer. You can configure it to open your favorite image viewer app when you insert a disk with photos, or launch a media player app automatically for your drive containing media files. It saves your time, since the required app starts automatically every time you connect your device or insert your disk.
Once you have configured the AutoPlay settings to what want, you might want to backup your customizations in order to quickly restore them later or transfer them to another user account or Windows 10 PC. Here is how it can be done.
Advertisеment
Note: In Windows 10, there are different ways to enable or disable AutoPlay. It can be done using Settings, the classic Control Panel or the Registry. See for reference:
How to Disable or Enable AutoPlay in Windows 10
To Backup AutoPlay Settings in Windows 10, do the following.
- Open the Registry Editor app.
- Go to the following Registry key.
HKEY_CURRENT_USER\Software\Microsoft\Windows\CurrentVersion\Explorer\AutoplayHandlers\EventHandlersDefaultSelection
See how to go to a Registry key with one click.
- Right-click on the key AutoplayHandlers on the left and select Export from the context menu.
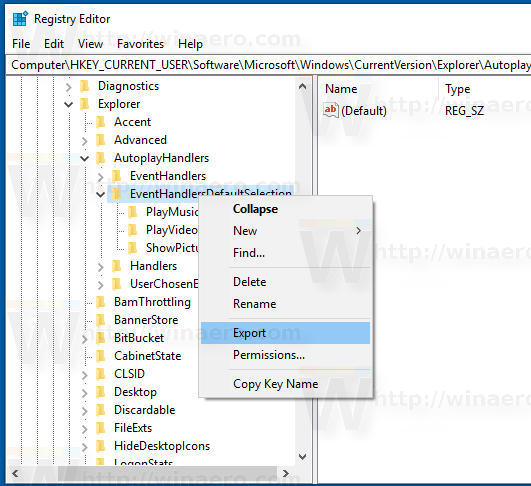
- Specify the file name the Registry key will be exported to.
- Now, go to the key
HKEY_CURRENT_USER\Software\Microsoft\Windows\CurrentVersion\Explorer\AutoplayHandlers\UserChosenExecuteHandlers
- Right-click on the UserChosenExecuteHandlers folder and select Export from the context menu.

- Save the key to a *.REG and you are done.
Now, let's see how to restore the AutoPlay preferences in Windows 10.
Restore AutoPlay Settings in Windows 10
To restore the AutoPlay options from the backup you have created using the instructions above, just double-click on the *.REG files to import them to the Registry. After that, sign out and sign in to your user account. Alternatively, you can restart Windows 10.
That's it.
Related articles:
How to Disable or Enable AutoPlay in Windows 10
How to create a shortcut to open the Autoplay settings in Windows 8.1
Support us
Winaero greatly relies on your support. You can help the site keep bringing you interesting and useful content and software by using these options:
