Let's review in detail how to enable or disable hibernation in Windows 11, remove the hiberfil.sys file, reduce the hiberfil.sys file size, and add Hibernation to the Start menu. This post pretends to be your ultimate guide on Hibernation in Windows 11.
Advertisеment
Hibernation is a sort of advanced shutdown mode that allows you to power off your computer without losing any data or closing apps. When you put a PC into hibernation, Windows saves your current session into a dedicated hyberfil.sys file on the system drive. Once a PC is back on, the saved session restores and continues where you left off.
By default, Windows 11 (this also applies to Windows 10) uses Fast Startup that combines log-off and hibernation. When enabled, it makes Windows boot very fast. The operating system uses a hybrid shutdown which writes the memory occupied by the OS kernel and loaded drivers to the C:\hiberfil.sys file.
If you prefer standard hibernation to Fast Startup, this article will show you how to turn on hibernation in Windows 11.
How to Enable Hibernation in Windows 11
There are two ways to enable hibernation in Windows 11. You can do that from the Command Prompt, or in the Registry Editor.
Enable hibernation in Windows 11 using Command Prompt
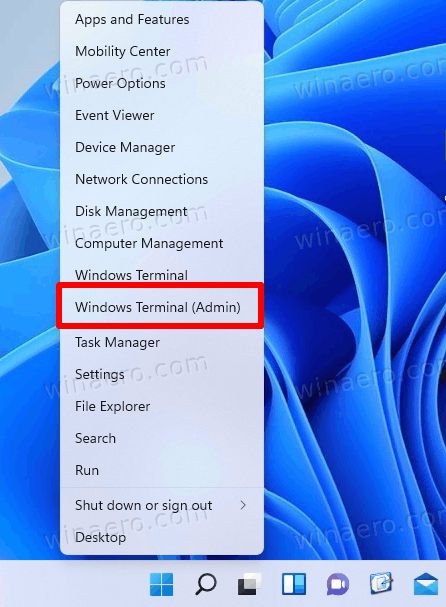
- Open Windows Terminal as Administrator in Windows 11. You can also use PowerShell or the classic Command Prompt.
- Enter the following command:
powercfg -h on. Press Enter.
- This will enable the Hibernation option instantly.
Note: The opposite command is powercfg -h off. It will disable the hibernation feature.
Enable hibernation using Registry Editor
Finally, as with virtually any other Windows setting, you can enable hibernation by tweaking Windows Registry.
- Press Win + R and enter the
regeditcommand. - Open the
HKEY_LOCAL_MACHINE\SYSTEM\CurrentControlSet\Control\Powerkey.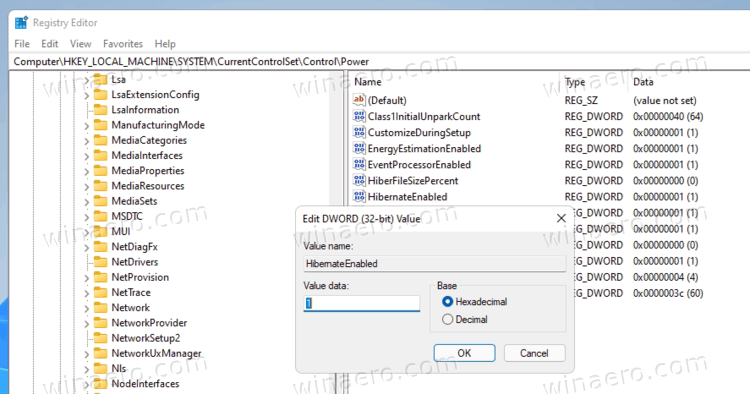
- In the right pane, find the
HibernateEnabledDefaultvalueand double-click it. - Change its value data from
0to1. - Click OK to save changes.
That is how to turn on hibernation in Windows 11. After enabling it, you need to add the Hibernate command to the Start menu. Here's how.
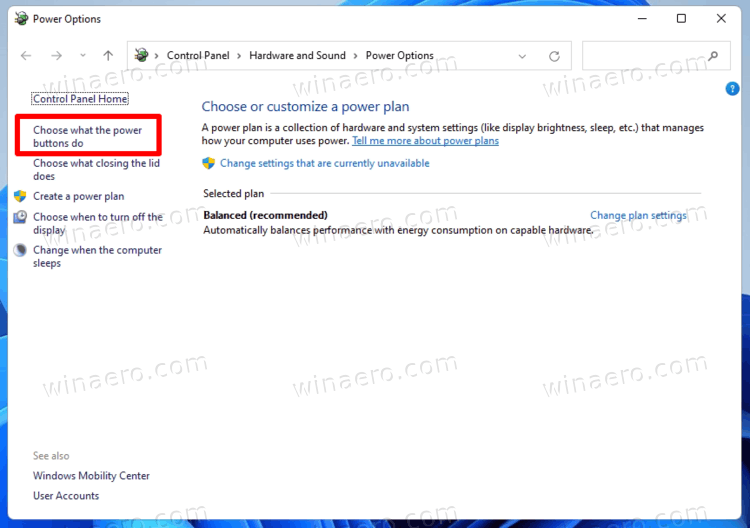
- Press Win + R and type the following Control Panel command:
powercfg.cpl. Press Enter. - Alternatively, open Control Panel in Windows 11 and go to the Power Options section.
- Click the Choose what the power button does link in the left panel. Note that you need administrative privileges to change the following settings.
- Click Change settings that are currently unavailable.
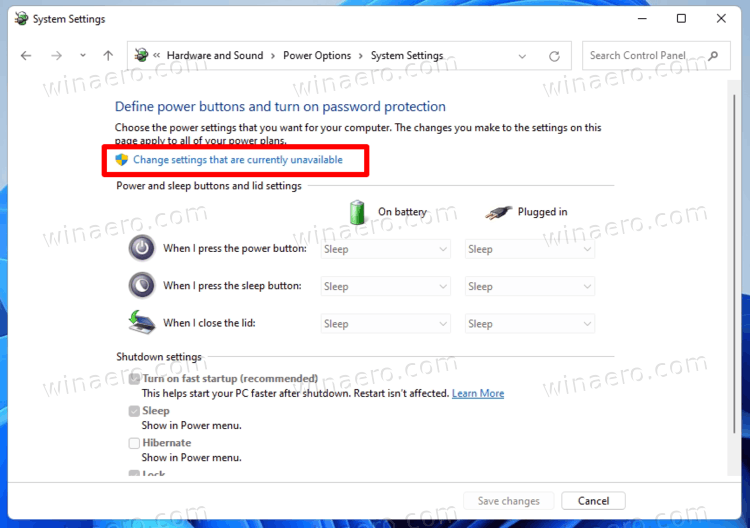
- Place a check mark next to the Hibernate option.
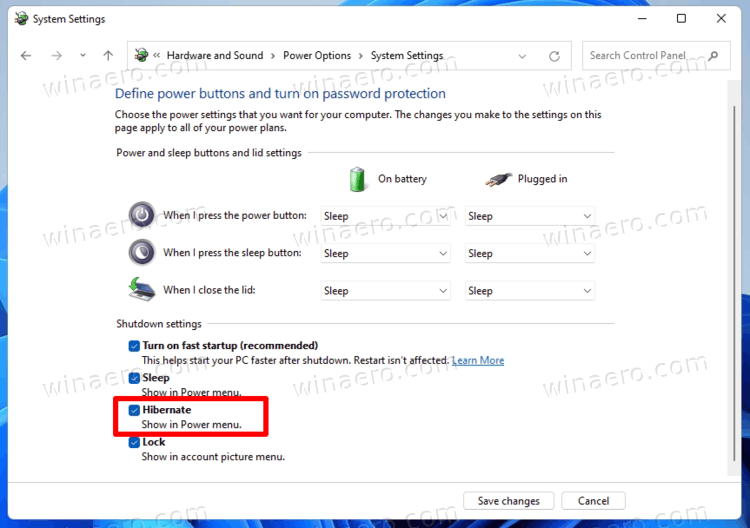
- Click Save Changes to add the Hibernate command to the Start menu in Windows 11.
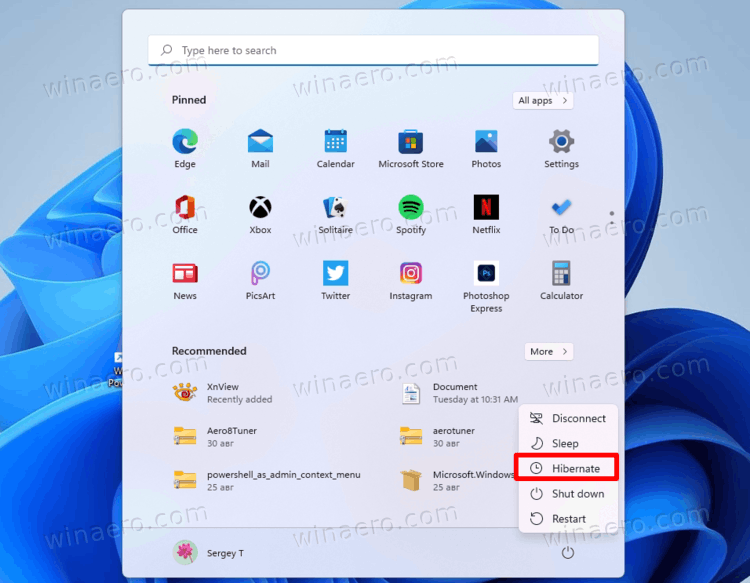
Now you can also choose hibernation in Windows 11 power menu.
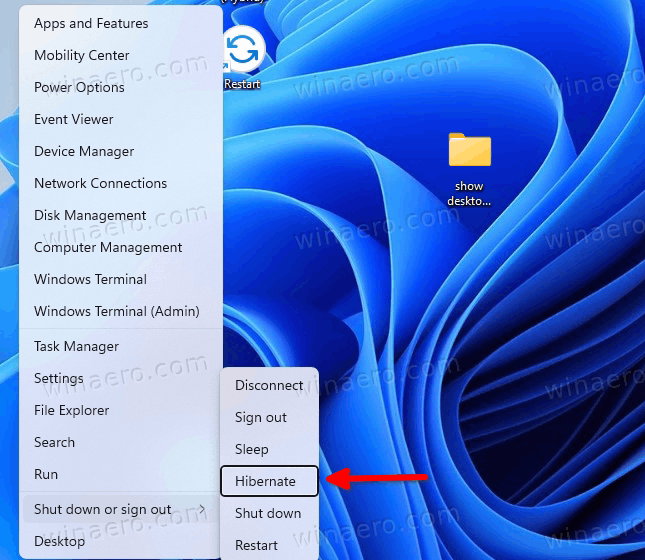
Note: You might not find the Hibernate option in the Control Panel right after clean-installing Windows 11. Make sure you have installed the chipset and all other drivers.
That is how you turn on hibernation option in Windows 11 using the classic Control Panel.
Manage Hibernation File Hiberfil.sys in Windows 11
Depending on the size of the RAM installed in your computer, the hiberfil.sys file might reach several GBs in size. It can be a very big file. Here's how to delete it, reduce its size, or keep it as small as required for the Fast Startup feature. First of all, you may want to learn what is the current size of the file.
Find the hiberfil.sys file size
- Open File Explorer (Win + E).
- Make it show hidden files and specially protected system files. Means the Hide protected operating system files option in Folder options must be unchecked.
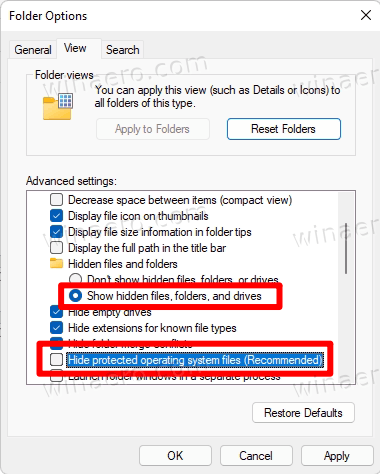
- Navigate to the root of the system drive, which is
C:in most cases. - Windows 11 now shows the hiberfil.sys file and its actual size.
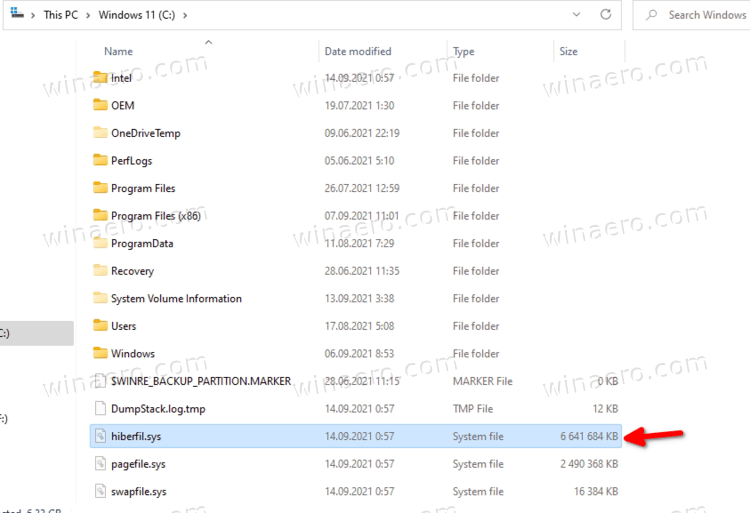
Say you want to get rid of the hiberfil.sys file. It is easy to do, but keep in mind that the Hibernation feature does't work without that file, as well as Fast Startup. So the only way to remove the file is to disable Hibernation. If it is fine, then continue.
Delete the hiberfil.sys Hibernation file in Windows 11
- Open Windows Terminal as Administrator; right-click the Start button and select Windows Terminal (Admin) from the menu.
- Type
powercfg -h offin either PowerShell or Command Prompt profile. Press Enter. - The hiberfil.sys hibernation file is now deleted.
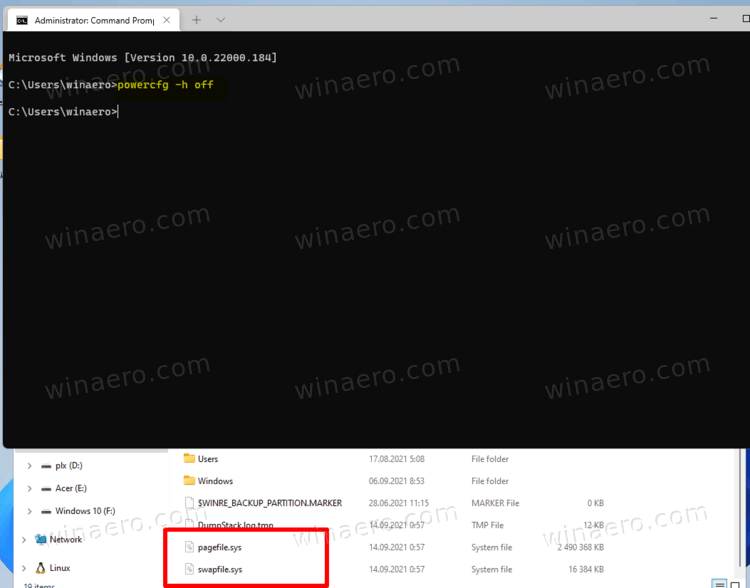
This will disable hibernation, will remove the hiberfil.sys file, and also disable the Fast Startup feature. You can restore everything back with a single command reviewed in the beginning of this tutorial, powercfg -h on.
Disable Hibernation but keep Fast Startup
Usually, users want to disable hibernation to save disk space on the partition where Windows 11 is installed. The hiberfil.sys file is really huge. Luckily, there is an additional option you can use to save disk space without completely turning off hibernation.
To disable Hibernation but keep Fast Startup in Windows 11, do the following.
- Open Windows Terminal as Administrator, e.g. press Win + X and the click on Windows Terminal (Admin).

- Type the command
powercfg hibernate size 0and hit the Enter key. This will decompress the hiberfil.sys file if it was compressed. See the next chapter for more details on this. - Finally, run the command
powercfg /h /type reduced. Now you have a smaller hibernation file, enough for having Fast Startup working.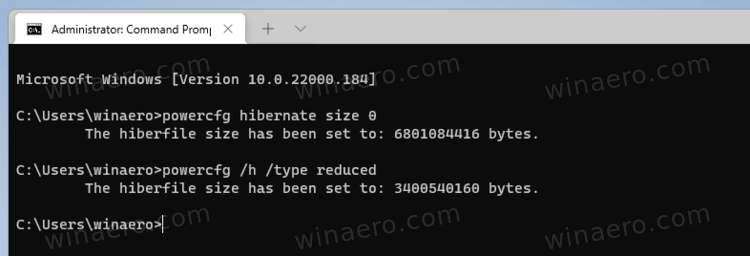
The command will shrink the hibernation file size for storing only the OS kernel and drivers for Fast Startup. The hiberfil.sys will take only 20% of the installed RAM. However, you won't be able to use the Hibernate command in this reduced mode. It will disappear from the Start menu and the Power menu in Win + X.
Restore the default hibernation configuration
If some day, you decide to restore the default hibernation settings on Windows 11, the following command will do it for you: powercfg /h /type full. Again, run it in an elevated Windows Terminal.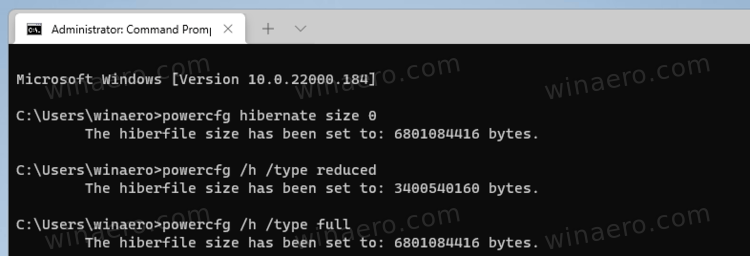
Note that after you run it, the size of the hiberfil.sys file will be restored. The operating system will enable the hibernation file to store the full contents of memory.
Reduce the hibernation file size
Modern devices can handle huge RAM capacities. This directly leads to a large hiberfil.sys stored on your system partition. To solve this issue, Microsoft added the ability to compress the hibernation file. This means that the C:\hiberfil.sys file does not take as much disk space as your RAM capacity. It can take significantly less disk space, even 50% of your installed RAM capacity. This is a fantastic improvement Microsoft has made in Windows 7 and later, but it's turned off by default even in Windows 11.
To reduce the hibernation file size in Windows 11, do the following.
- Open a new elevated Windows Terminal. For that, right-click the Start button, and select Windows Terminal (Admin).
- Switch to the PowerShell or Command Prompt profile if it does open to something else for you.
- Type the following command:
powercfg hibernate size NN. SubstituteNNwith the desired hiberfil.sys size in percentage of the total memory. For example,powercfg hibernate size 60for 60% of RAM.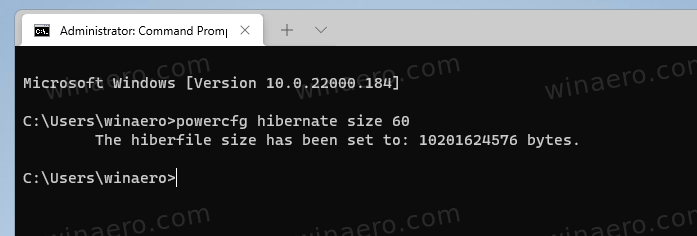
- You can now close the Windows Terminal console.
In the example above, we set the hibernation file to 60% RAM. If you have 8 GB of RAM, 60% of it is 4.8 GB <-- this is the size of your hiberfil.sys file. You will save 3.2 GB of disk space.
The percentage of the total memory for the powercfg command cannot be smaller than 50.
To undo the compression, execute the command powercfg hibernate size 0, with which you are already familiar.
Using Winaero Tweaker
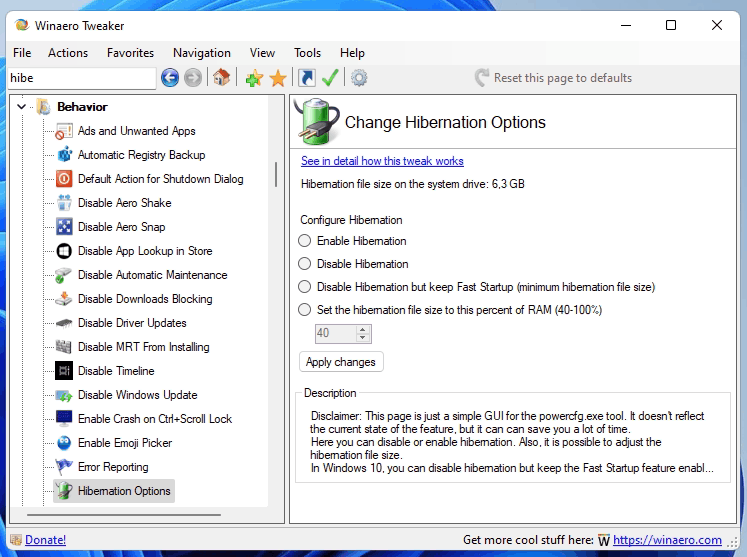
To automate the above tasks, you can use Winaero Tweaker. Select Behavior\Hibernation options on the left, and then change the option on the right according to your preferences.
That's it.
Support us
Winaero greatly relies on your support. You can help the site keep bringing you interesting and useful content and software by using these options:

This is a great article. Thank you for posting it. All the different scenarios answered my questions.