Run as administrator in Windows 11 is a term that describes the process of starting an app elevated with highest privileges. Windows 11, like any other modern OS version, runs applications and programs with standard (limited) privileges. Some programs require administrator access to perform specific tasks. In such cases, you may need to quit the app and run it elevated. There are several ways to run a program as an administrator in Windows 11. This article will show you most of them.
Advertisеment
Note: Do not run programs as an administrator without reason. We recommend launching programs with elevated privileges only if you know exactly why the app requires administrator access level.
How to Run as Administrator in Windows 11
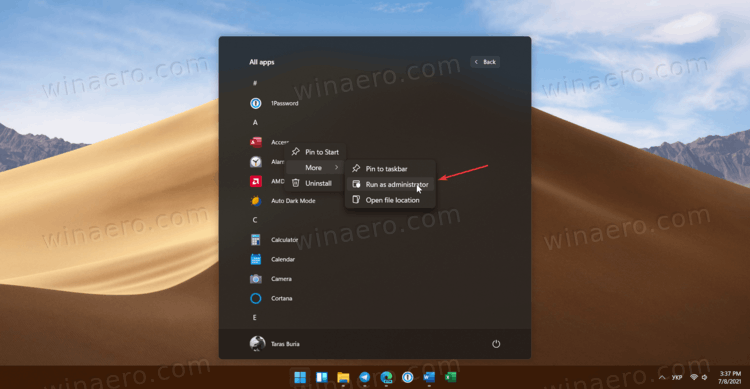
- Open the Start menu, then click All Apps.
- Find the app you want to run as an administrator and right-click it. Select More.
- Select Run as administrator.
- Alternatively, press and hold Ctrl + Shift and click an app shortcut while holding those keys. The app will start elevated.
Note that the context menu method works in both the Start menu and File Explorer. Simply right-click an app or shortcut, then select Run as administrator. The command has the icon with a window and a shield.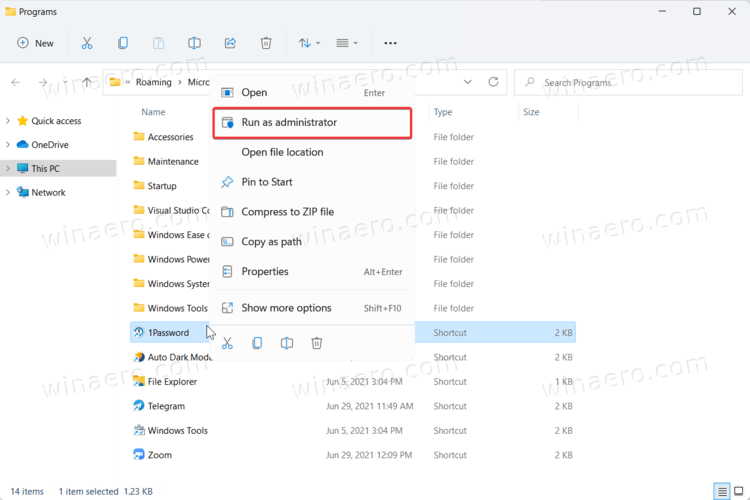
Using Windows Search
Another way to launch a program with elevated privileges in Windows 11 is by clicking the appropriate command in Windows Search.
- Open the Start menu and start typing the app's name you want to launch. Alternatively, press Win + S to open the search box.
- If the program shows up under the Best Match section, click Run as Administrator on the right side of the search window. Alternatively, press Ctrl + Shift + Enter to launch the app with the administrator access level.
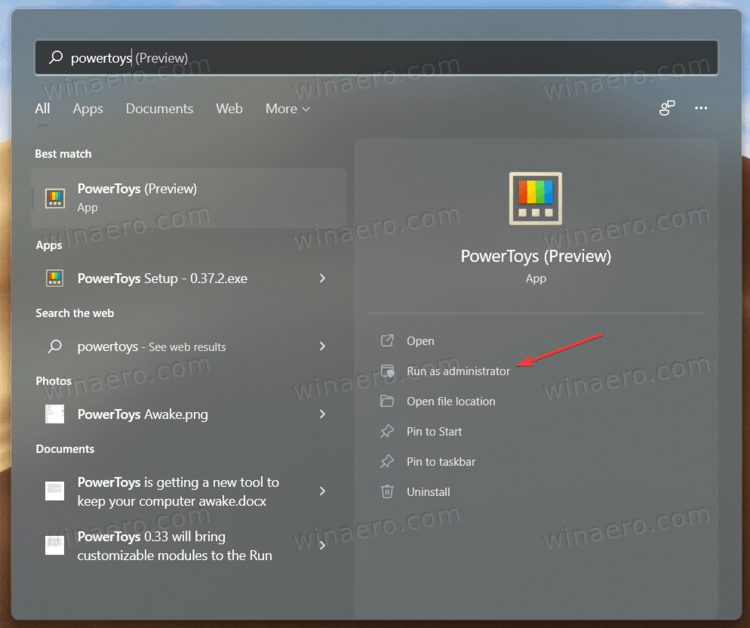
- If the program appears lower, click the button with a small arrow pointing to the right, then select Run as Administrator.
Launch a pinned app from the taskbar
If the app you want to run as an administrator is pinned to the taskbar, there is no need to use search or the list of all apps. Press Ctrl + Shift, then click the program on the taskbar. Windows 11 will start the app with elevated privileges.

Also, you can directly run a pinned app elevated with the Ctrl + Shift + Win + <Number> hotkey, where <Number> is a digit from 1 to 9. The first pinned app is 1, the next after it is 2, and so on. In my case, the first icon is Total Commander, so I have to use the Ctrl + Shift + Win + 1 sequence to start it as admin.
Using Command Prompt, PowerShell, or Windows Terminal
Windows 11 allows launching an app as an administrator from the elevated Command Prompt, PowerShell, or Windows Terminal. All that is needed is to run your preferred console app as an administrator. Then, use the app's executable path to launch it.
Using the Run dialog
Press Win + R to open the Run dialog. Alternatively, you can right-click the Start button and select Run from the menu.
In the Run box, type the executable name of the app you want to start as Administrator. You can also use the Browse... button to find the app using the open file dialog.
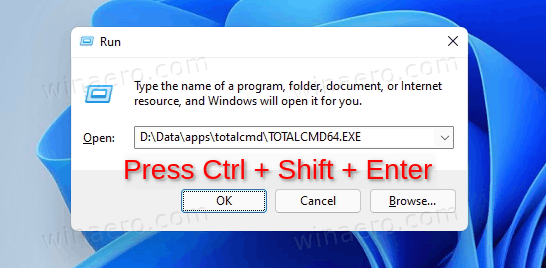
Finally, press Ctrl + Shift + Enter, or press and hold Ctrl + Shift and click the OK button. The app will start elevated.
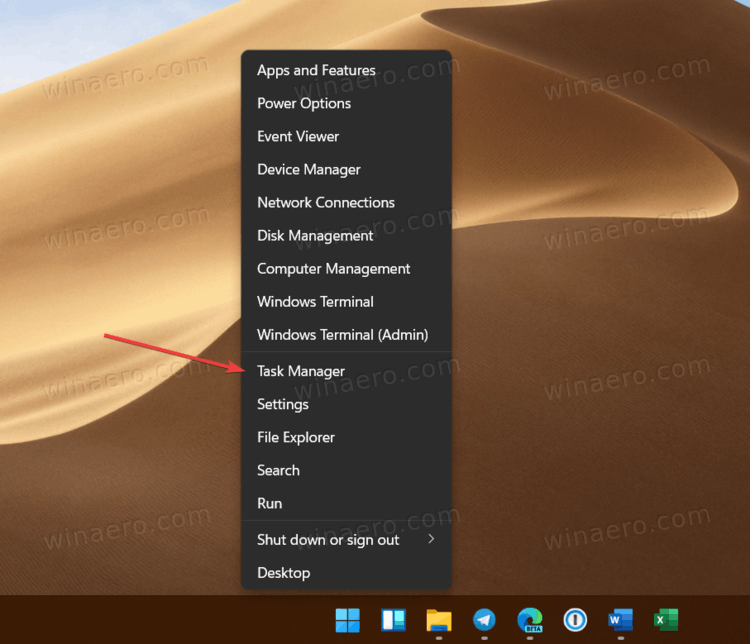
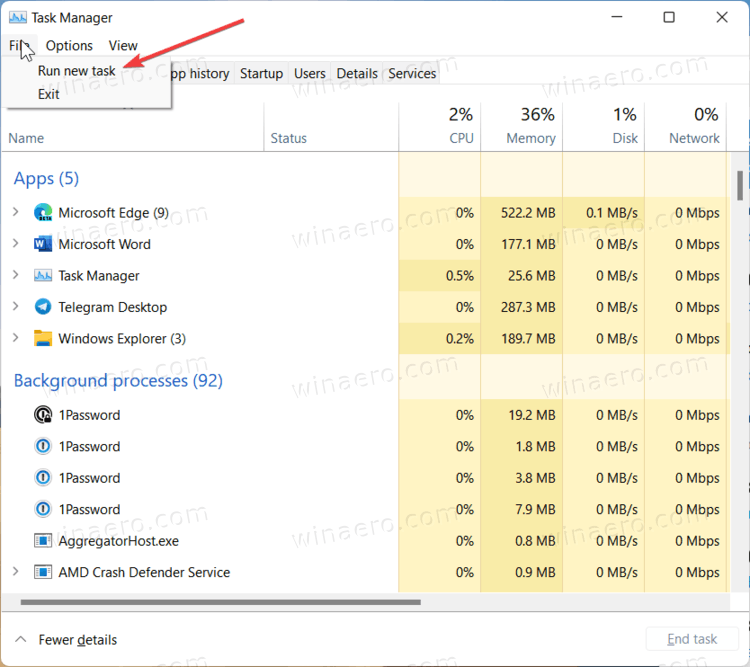
Open an app as Administrator from Windows 11 Task Manager
- Open Task Manager with the Ctrl + Shift + Esc shortcut. Alternatively, right-click the Start menu and select Task Manager.
- Click File > Run new task.
- Type the path to the program you want to launch as an administrator, then place a checkmark next to the Create this task with administrative privileges.
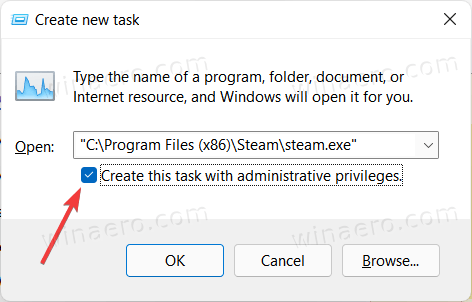
- Click OK.
Always run an app as Administrator in Windows 11
All the methods below are "single-use." In other words, you need to repeat the procedure every time you launch your program. If you need to always start an application as an administrator in Windows 11, do the following:
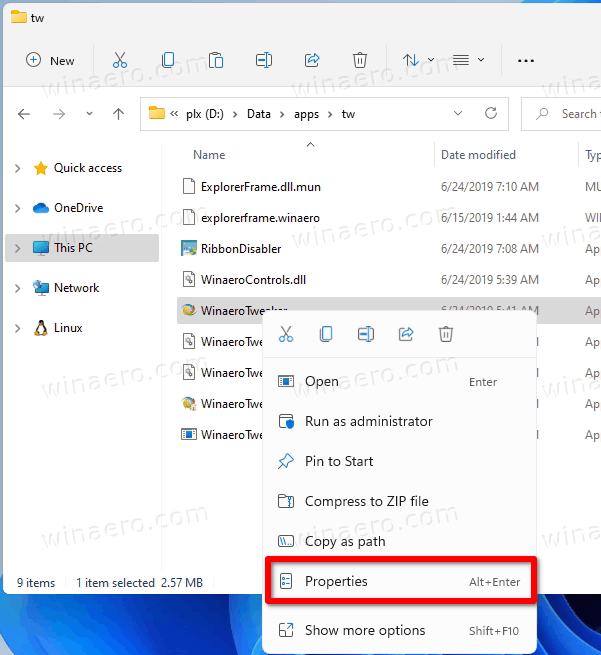
- Find the app you need and right-click it.
- Select Properties. Tip: You can open the properties window without opening context menus. Just select a file or program, then press Alt + Enter.
- Go to the Compatibility tab and place a checkmark next to the Run this app as an administrator option.
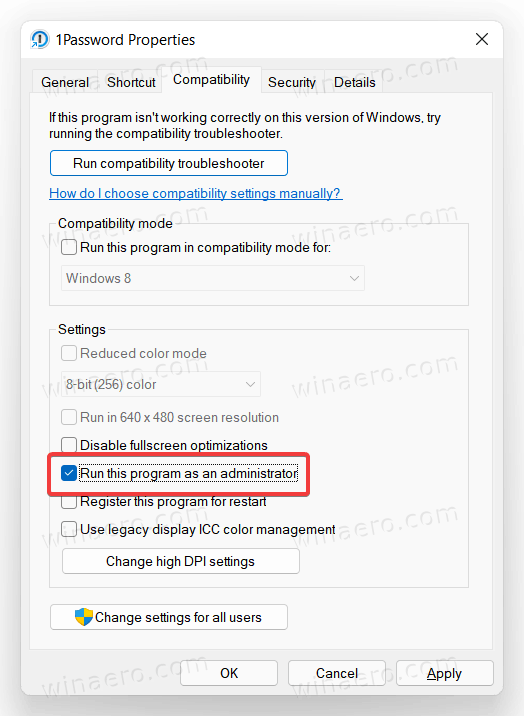
- Click OK.
That is how you set a program to always run as an administrator in Windows 11.
However, this method has one drawback. Every time you start the app using such a modified shortcut, it will bring you a User Account Control confirmation (UAC), where you have to click on Yes. It is a minor, but very annoying inconvenience. Here is a workaround that you can use to suppress the UAC request.
Run as Administrator without UAC Confirmation
The idea here is to create a special task in the Task Scheduler, and then run the task instead of the direct launch of the app. The task will start the specified app elevated, however, it will not bring an UAC prompt.
This can be useful in certain cases. For example, if you often work with a Registry editor, you will find it annoying to confirm UAC every time you launch.
Create a task in Task Scheduler
To run an app as Administrator without UAC Confirmation, do the following.
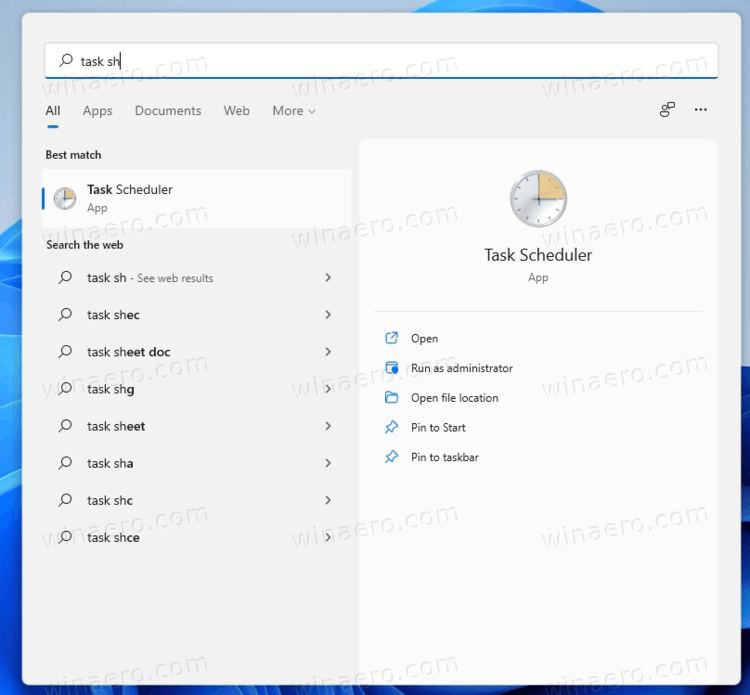
- In Windows Search (Win + S), and enter task scheduler in the search box.
- In the Task Scheduler, create a new task and give it a short and meaningful name. For example, task_regedit.
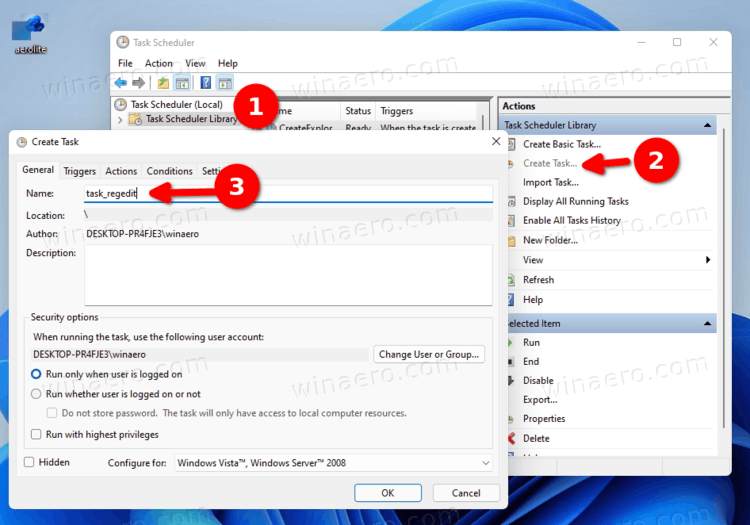
- On the General tab, turn on (check) the checkbox Run with highest privileges.

- On the Actions tab, create a new action with the following parameters.
- In program/script, specify
c:\windows\system32\cmd.exe. - In "Add arguments", enter:
/c start "" program.exe <program arguments if required>. Substituteprogram.exewith the actual app path or built-in tool likeregedit.exe.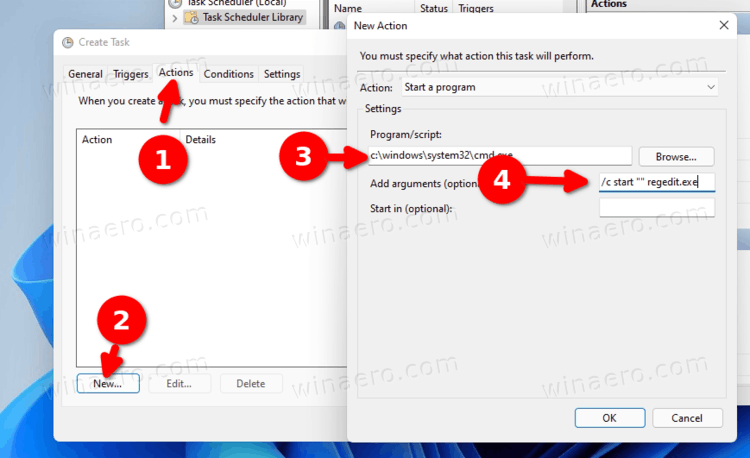
- Switch to the Conditions tab and uncheck the Stop if the computer switches to battery power and Start the task only if the computer is on AC power options.

Done. You can now test your task. Simply right-click it in the Task Scheduler library and select Run. The app of your choice will start elevated. Now, let's create a shortcut for it to directly launch it.
Create a shortcut for your task
- Right-click the desktop background and select New item > Shortcut.
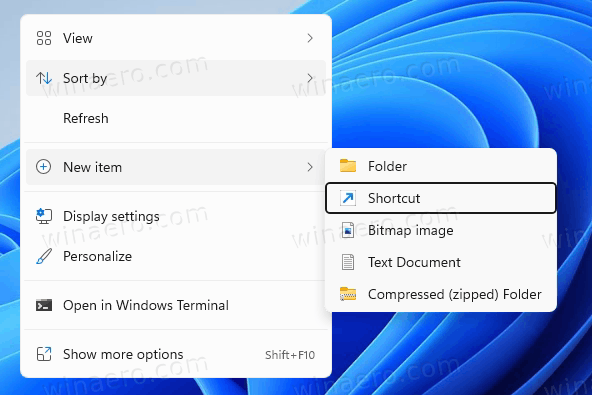
- Specify
schtasks /run /tn "your task name"in the location of the item box. For example,schtasks /run /tn "task_regedit".
- Customize the shortcut name and its icon.
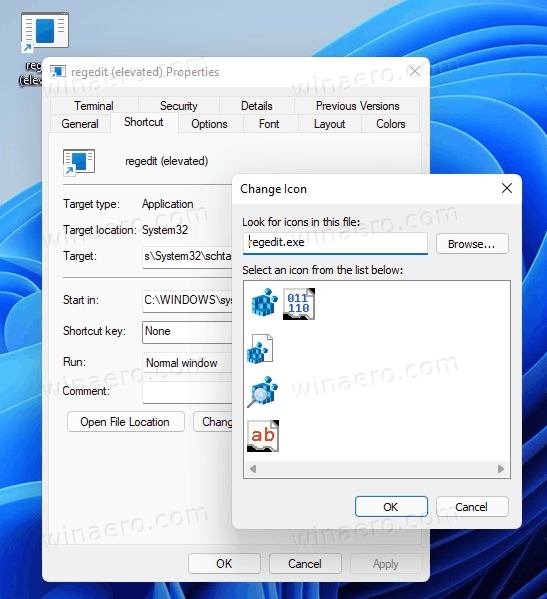
- Now, double click on the shortcut. It will start the app elevated without a UAC request.
Finally, you can save your time and automate the task creation with Winaero Tweaker.
Using Winaero Tweaker
- Download and install Winaero Tweaker using this link.
- Go to Tools > Elevated Shortcut on the left.
- On the right, simply specify the path to your app, and set the desired name and folder location for your shortcut.
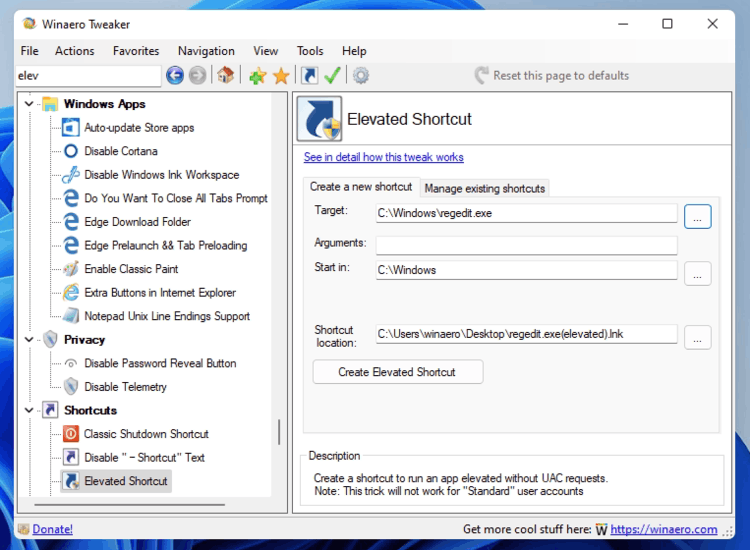
- Click on the Create Elevated Shortcut button and you are done.
This is a convenient and fast method to create such a shortcut.
That is it.
Support us
Winaero greatly relies on your support. You can help the site keep bringing you interesting and useful content and software by using these options:

Set compatibility to admin does not work that way, Explorer closes when I use right click, alt enter/properties has no compatibility tab.
What does work is start the compatibility tool, select to run an app for a previous version etc.
Yeah, now if only Microsoft would default to “other” account (in the UAC challenge) when you tell Windows you want to run as an admin, INSTEAD OF DEFAULTING TO WHO YOU’RE ALREADY LOGGED IN AS.
Sheesh.