Being a multi-user OS, Windows 11 allows you to run apps as a different user. It means that if you have more than one user account, you can run some app under different credentials. This can be useful when you quickly need to apply some restrictions to an app or prevent it from accessing your personal data.
Advertisеment
Run as different user is a built in feature of Windows 11, so you don't have to install extra software. Besides launching regular apps (.exe), you can use it with batch files (.bat, .cmd) and installer packages (.msc, or .msi).
This way, the app, script, or installer will run with the same right, restrictions and permissions as the target user. They won't use the user account data to which you are currently signed in.
The latter allows you to have multiple instances of the same app running under different credentials on the desktop.
There are four ways to run an app as different user in Windows 11. For that, you can use options available in File Explorer, the taskbar, Start menu, and Command Prompt.
Run as Different User in Windows 11
To run an app as a different user in Windows 11, do the following.
- Open File Explorer (Win + E) and go to the folder that contains the app exe file.
- Press and hold the Shift key on the keyboard
- Right-click the executable file to open the context menu. You can now release the Shift key.
- Click on "Show more options" to open the extended context menu.
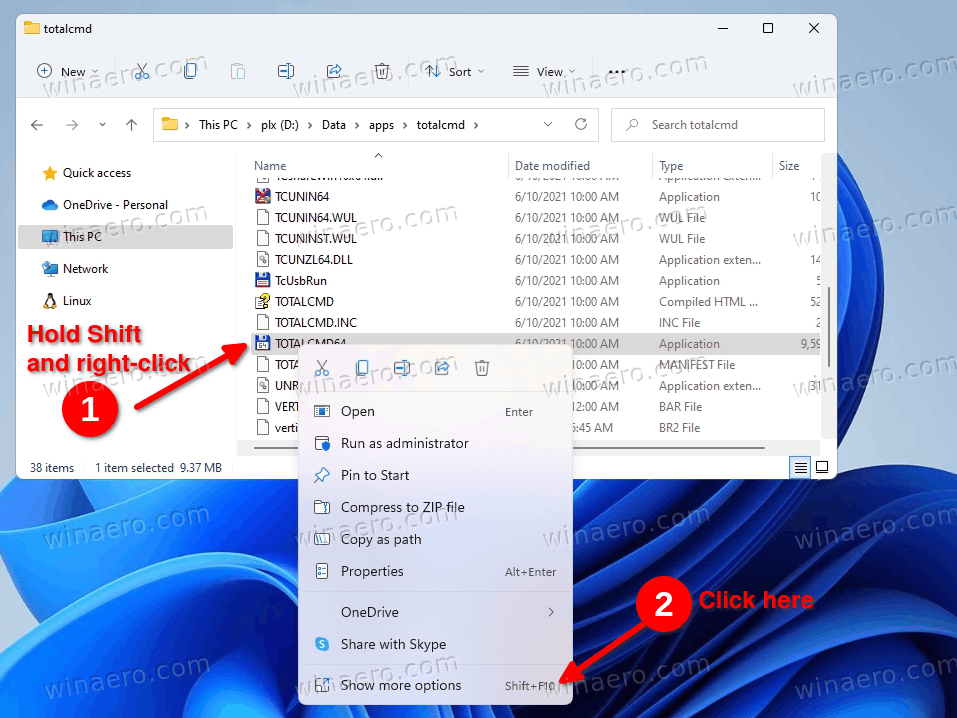
- Click on the Run as different user in the context menu.
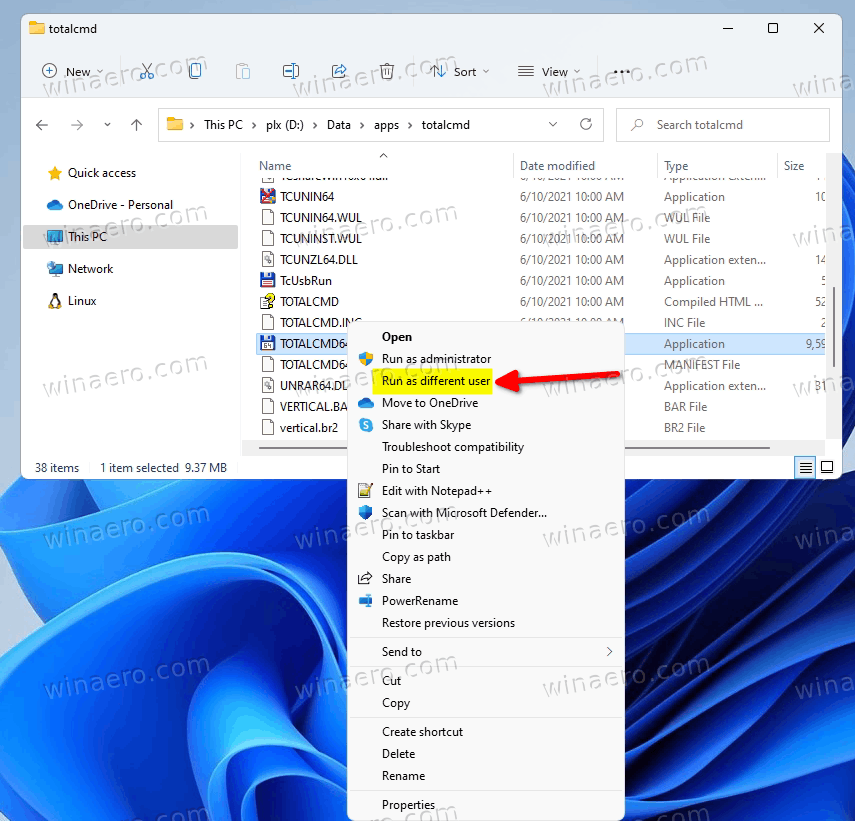
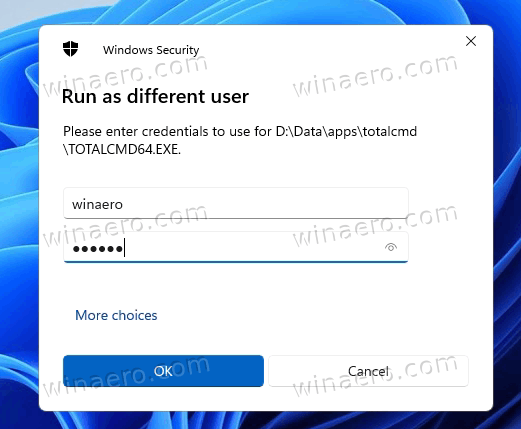
- Fill in the the user name and password for the user you want to run as.
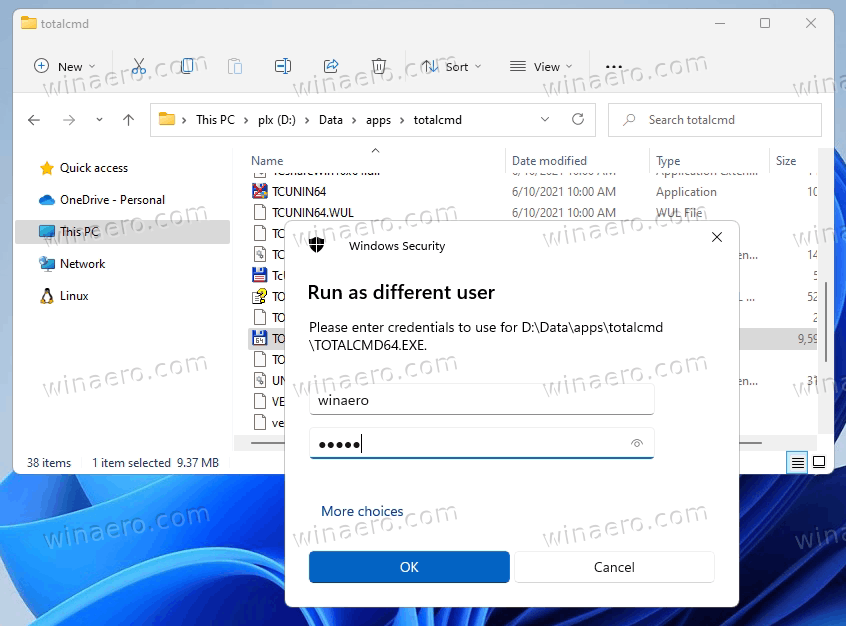
You are done. The app will start under the provided credentials of the different user.
Again, there a few more methods to launch an executable file, script or installer under different credentials.
- Right-click the app icon in the taskbar. It can a pinned or running app.
- Press and hold the Shift key.
- While holding Shift, right-click the app name in the context menu to see extra menu items.
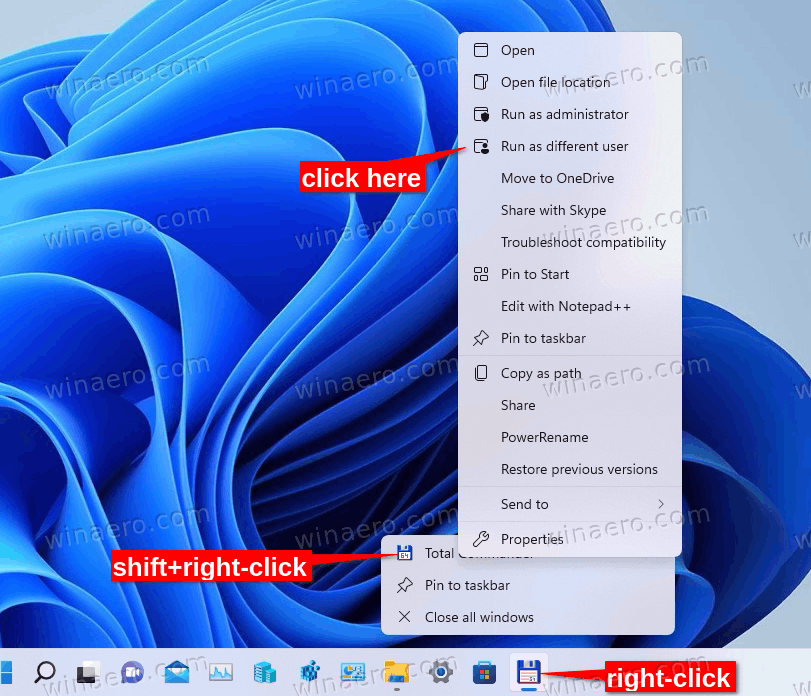
- Release the Shift key and click Run as different user.
- Finally, provide the user account data to run a new instance of the app from.
Note: This method doesn't work for File Explorer, either pinned or running. The Run as command isn't available for its taskbar icon.
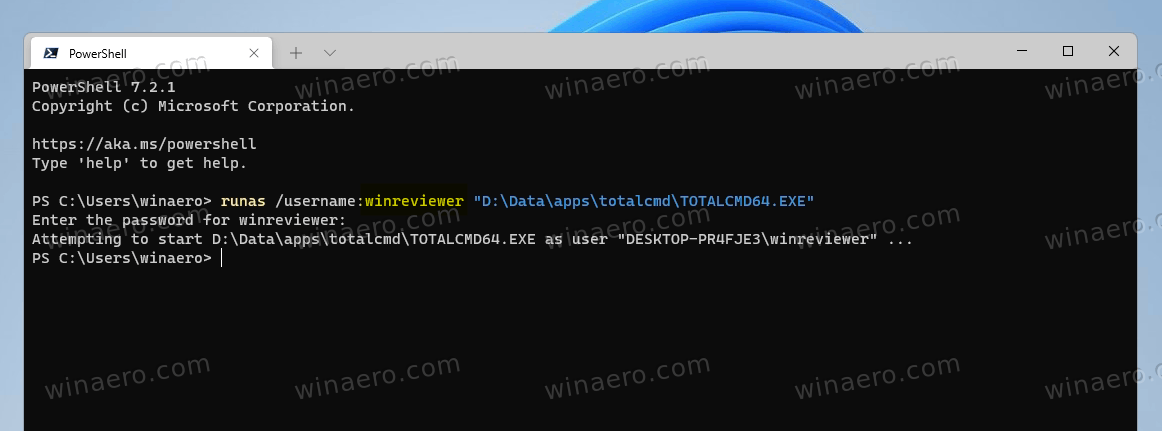
Finally, Windows 11 includes the console app "runas" that allows you to launch apps using different credentials. Here's how to use it.
Run as different user in Windows 11 from Command Prompt
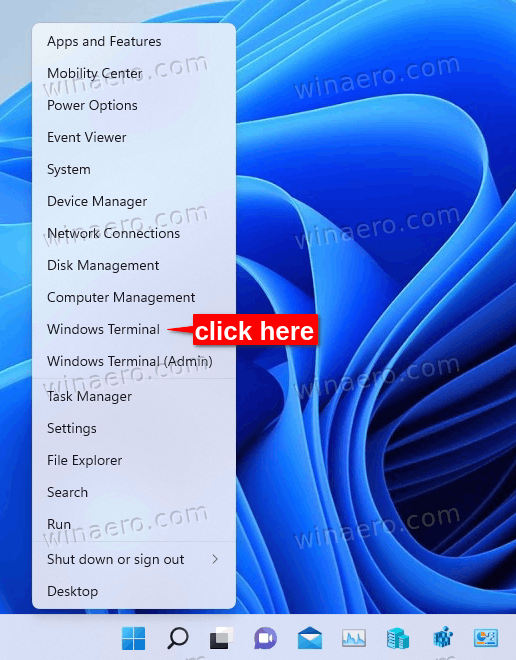
- Right-click the Start button in the taskbar and select Windows Terminal from the context menu.
- Select PowerShell or Command Prompt if Terminal opens to some other profile.
- Type the following command and press Enter.
runas /user:"username" "Full path to the exe file". - Substitute username with the actual user account name you want to run as. If it is a domain account, use the Domain name\User name format.
- Also, if you want to save the entered credentials for future use, run the command as
runas /user:"username" /savecred "Full path to the exe file". Windows will save the password to Credential Manager and won't ask it next time.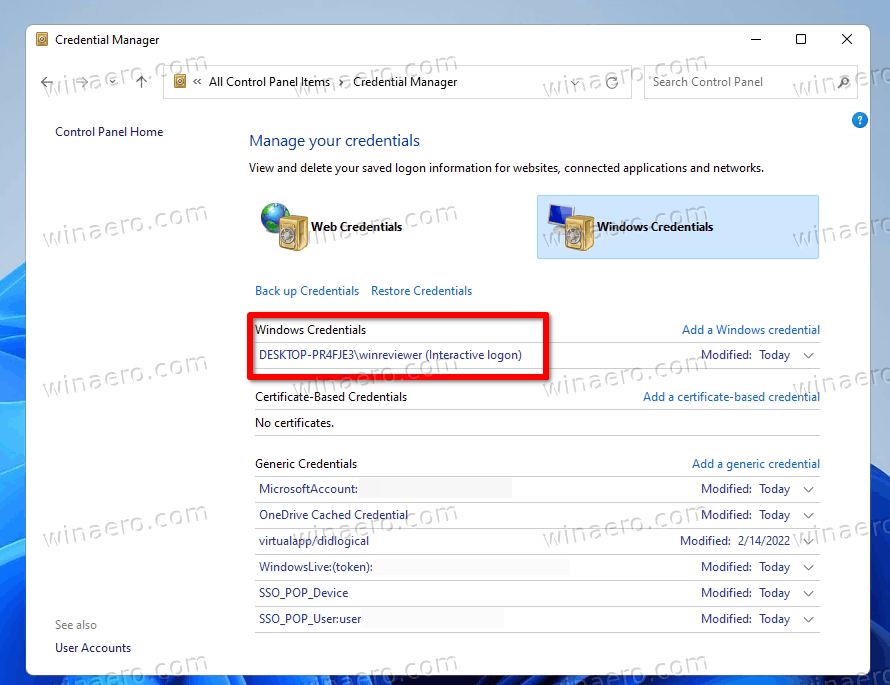
In addition to the above reviewed methods, you can also add the "Run as different user" command to the Start menu. It will appear in the right-click menu for shortcuts in the "All apps" view.
For that purpose, Windows 11 includes a Group Policy. You can activate it with either a Registry tweak or in gpedit.msc. The first option works in all editions of Windows 11. The latter is only available in Windows 10 Pro and above.
To enable the Run as different user option for the Start menu in Windows 11, do the following.
- Download the ZIP archive using this link.
- Extract the REG files from it to any folder.

- Double-click the file
Add_Run_as_different_user_for_Start_menu.regto enable the option for the Start menu shortcuts. - Confirm the UAC prompt by clicking on the Yes button.
- Sign out from Windows 11 or simply restart it to apply the change.
- The Start menu now shows the Run as different user command.
You are done. The undo file is Remove_Run_as_different_user_for_Start_menu.reg; use it to restore the defaults.
If you are running Windows 10 Pro or above, you can use the Local Group Policy Editor instead.
The Group Policy method
- Press Win + R and type
gpedit.mscinto the Run box, then hit Enter.
- Navigate to User Configuration > Administrative Templates > Start Menu and Taskbar.
- Find the Show "Run as different user" command on Start policy on the right and double-click it.
- Select Enabled to add the Run as different user" command to Start menu shortcut context menu. Click apply and OK.
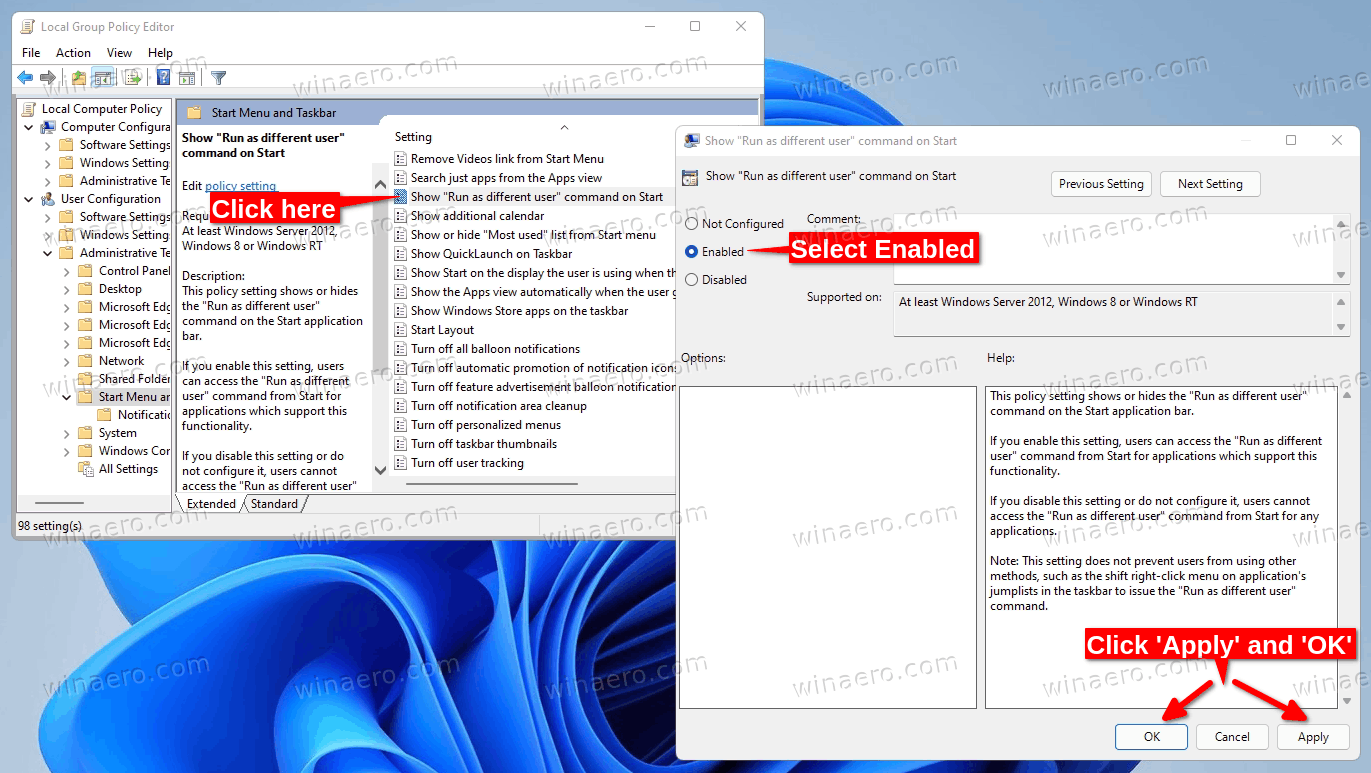
- Setting it to Not configured at any moment later will hide the command (defaults).
You are done. Now the command is available for the Start menu shortcuts. Here's how to use it.
- Enable the Run as different user command for
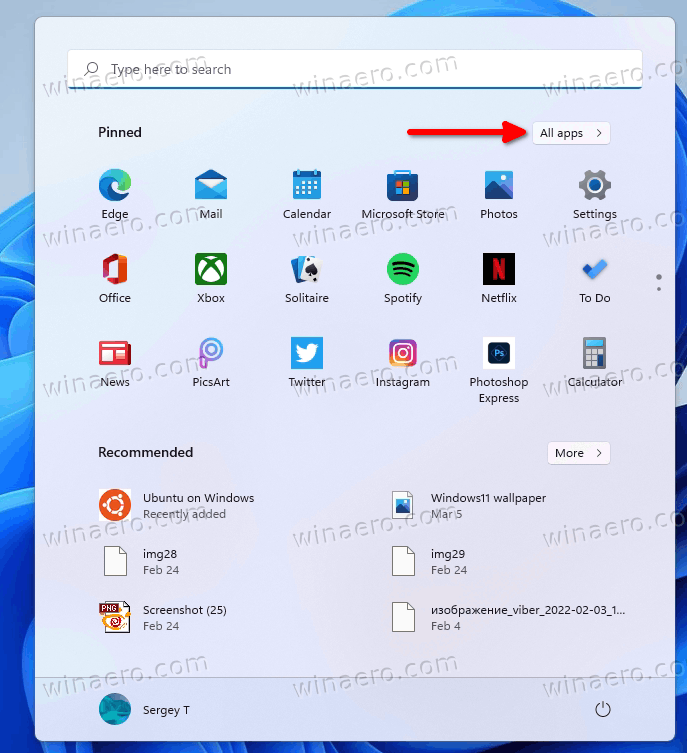
- Open the Start menu.
- Click on the All apps button.
- Locate the app shortcut for your app and right-click it.
- Select More > Run as different user.
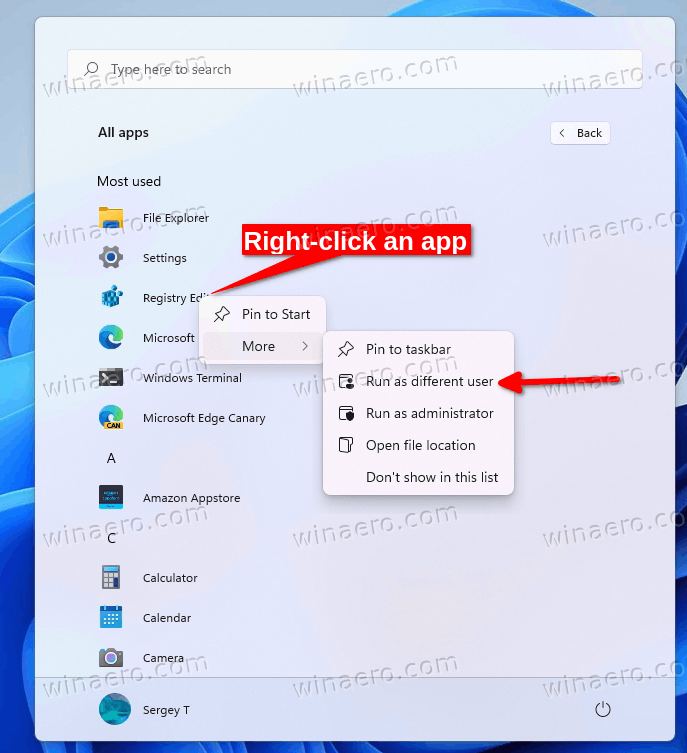
- Fill in the user name and password text boxes and hit the Enter key.
Done!
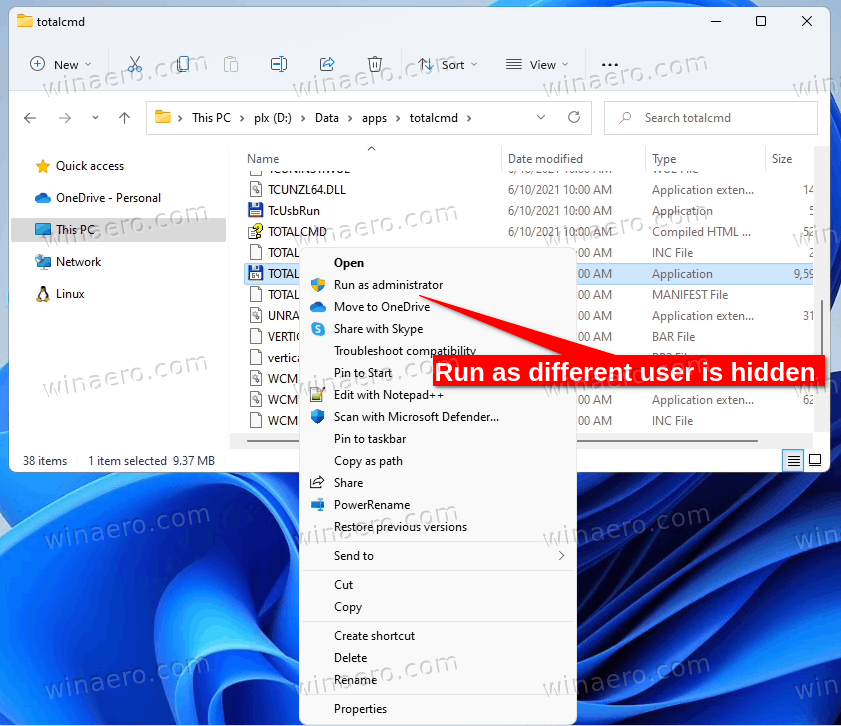
Finally, if you often use the Run as different user context menu, you may find annoying to hold the Shift key every time you click the Show more options item. To save your time, you can make it always visible in the extended context menu under "Show more options". Note: You cannot add to the default "compact" context menu. Do be confused between the two menu types.
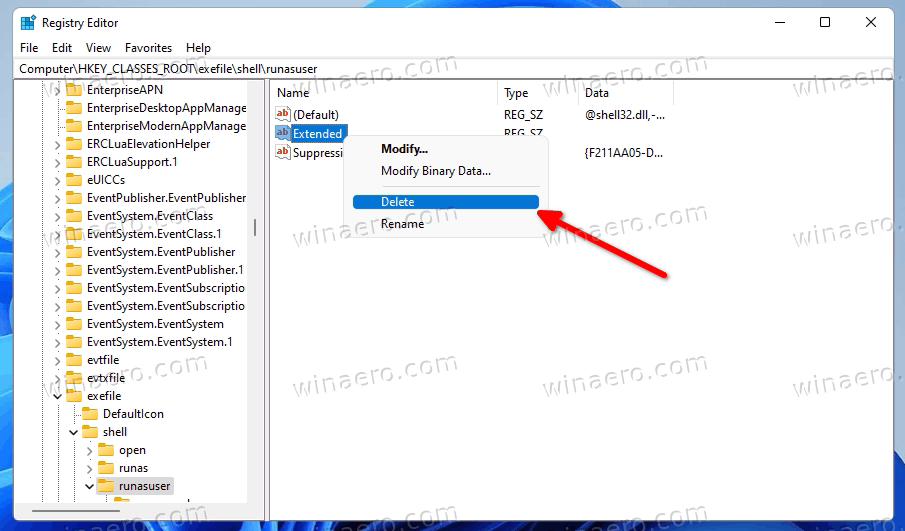
- Press Win + R to open the Run dialog; type
regeditand hit Enter to open the Registry editor. - In the left pane, go to the
HKEY_CLASSES_ROOT\exefile\shell\runasuserkey. - On the right, delete the Extended empty string value.
- Now, delete the same Extended string value under the following keys:
- HKEY_CLASSES_ROOT\cmdfile\shell\runasuser
- HKEY_CLASSES_ROOT\batfile\shell\runasuser
- HKEY_CLASSES_ROOT\mscfile\shell\runasuser
- HKEY_CLASSES_ROOT\Msi.Package\shell\runasuser
- The Run as different user command will now always be visible in the "Show more options" menu variant.
To undo this change, simple re-create the removed "Extended" value under the respective keys.
To automate this process, you can use the following ready-to-use Registry files.
The Always_show_Run_as_different_user.reg file makes the command appear directly without holding the Shift key for the "Show more options" item. The other included REG file will undo the change.
However, sometimes you may want to achieve the opposite effect and hide the "Run as different user" command for all users. For that purpose, you need to apply a little bit different tweak. Let's review it for the sake of completeness.
- Open the Registry editor (regedit.exe).
- Navigate to the following key
HKEY_CLASSES_ROOT\cmdfile\shell\runasuser. - Right-click the runasuser key on the left and select New > String value from the menu.
- Name the new value as ProgrammaticAccessOnly and leave its value data empty.
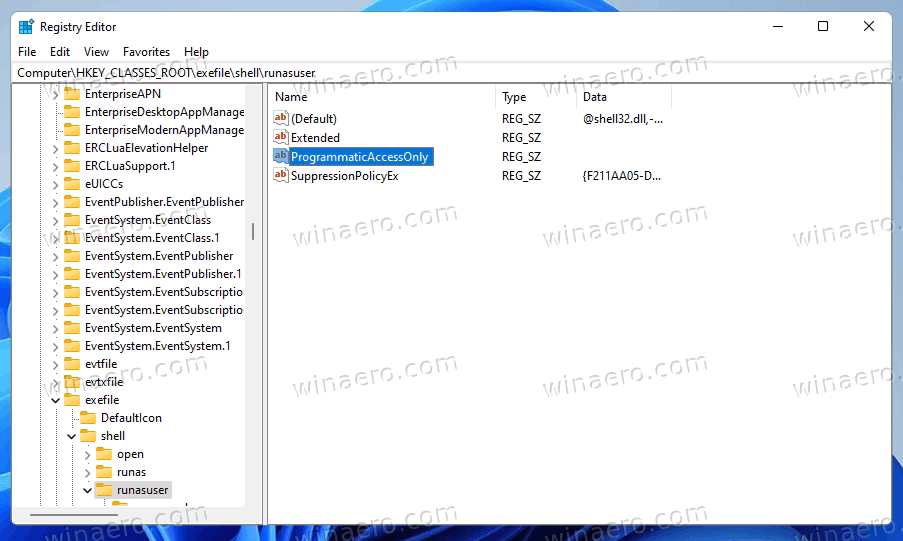
- Repeat the steps 2-4 under the following keys
- HKEY_CLASSES_ROOT\cmdfile\shell\runasuser
- HKEY_CLASSES_ROOT\batfile\shell\runasuser
- HKEY_CLASSES_ROOT\mscfile\shell\runasuser
- HKEY_CLASSES_ROOT\Msi.Package\shell\runasuser
- The "Run as different user" entry is now removed for all users.
You are done. The ProgrammaticAccessOnly value instructs File Explorer to hide the context menu item from the user. But it doesn't break functionality of apps or Windows. The hidden command remains accessible for apps if some of them need to access it.
To add the context menu item back, simply remove the ProgrammaticAccessOnly value you have created.
To save your time, I have prepared a couple of REG files for this case. Click here to download them:
The file Remove_Run_as_different_user_from_context_menu.reg will hide the menu item. The other file, Add_Run_as_different_user_from_context_menu.reg, will restore the command in the right-click menu.
That's it!
Support us
Winaero greatly relies on your support. You can help the site keep bringing you interesting and useful content and software by using these options:
If you like this article, please share it using the buttons below. It won't take a lot from you, but it will help us grow. Thanks for your support!
Advertisеment
