By default, almost all system files, system folders and even Registry keys in Windows 10 are owned by a special built-in user account called "TrustedInstaller". So, once you take ownership and grant admin permissions to a file oe folder, and later want to restore the TrustedInstaller account as the owner, you will notice that it is not shown in the list of accounts. Here is how to restore the TrustedInstaller ownership in Windows 10.
Advertisеment
To restore the TrustedInstaller ownership in Windows 10, do the following:
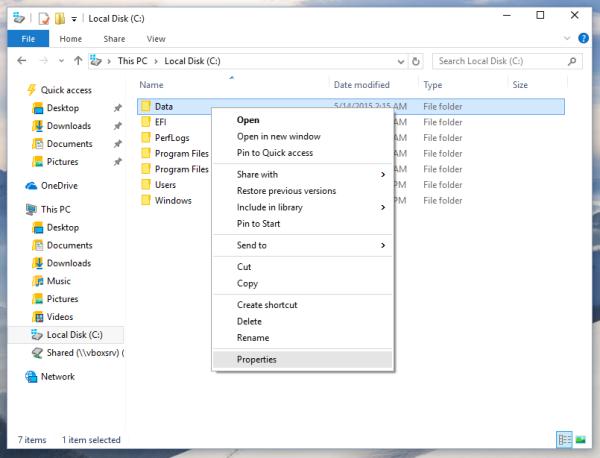
- Open File Explorer, and then locate the file or folder you want to take ownership of.
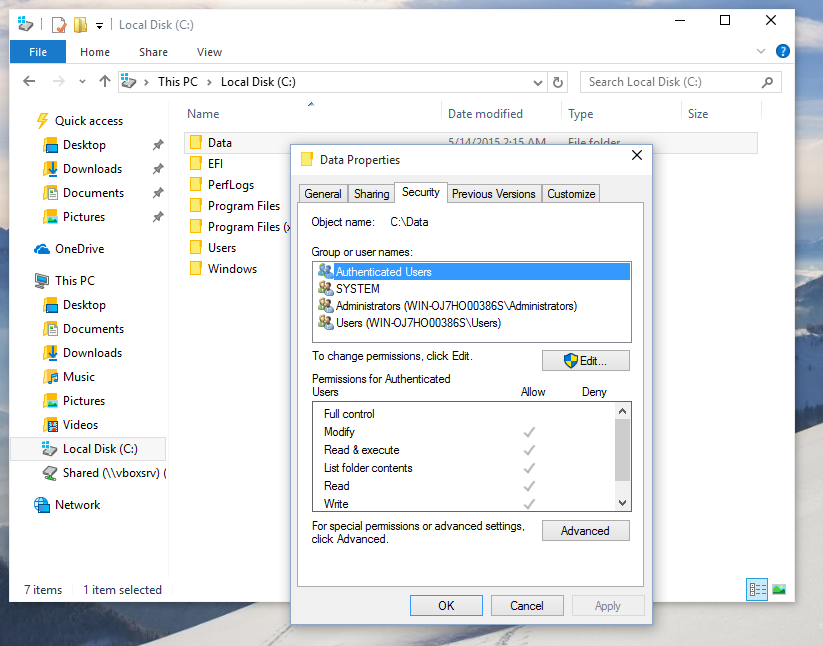
- Right-click the file or folder, click Properties, and then click the Security tab.

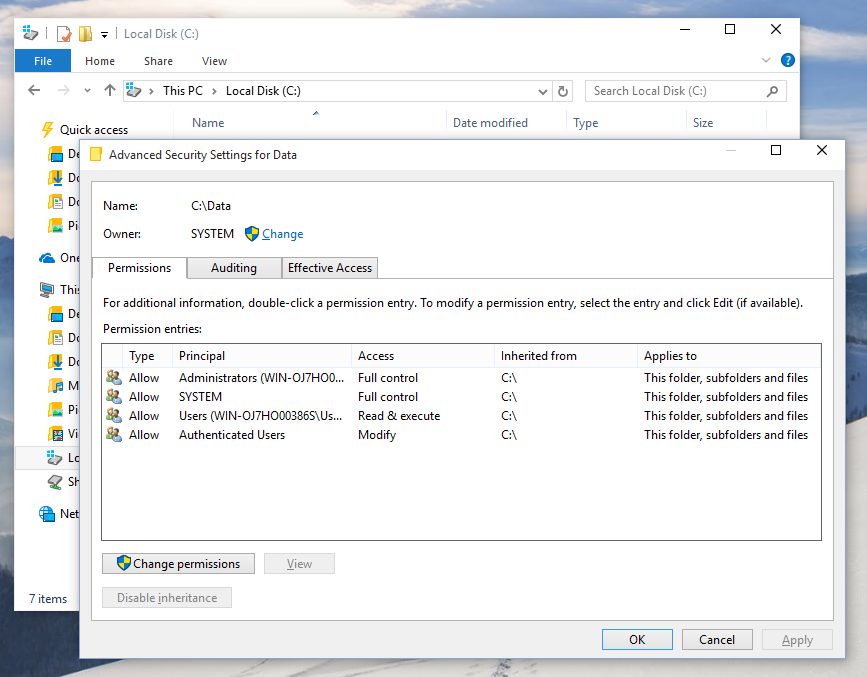
- Click the Advanced button. The "Advanced Security Settings" window will appear. Here you need to change the Owner of the key.
Click the Change link next to the "Owner:" label
- The Select User or Group window will appear.Type here "NT Service\TrustedInstaller" as the new owner name:
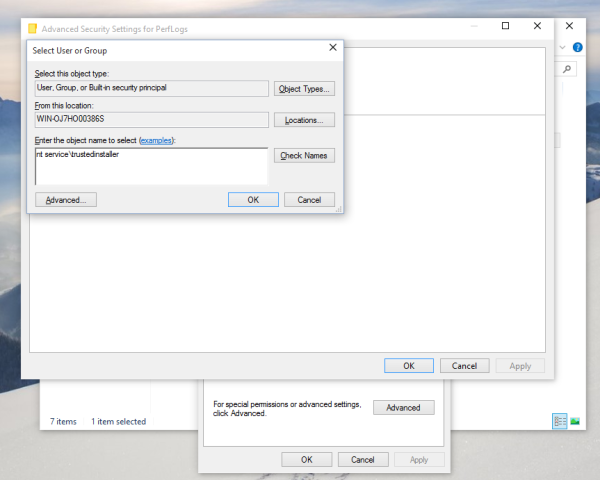
- Click OK to change the ownership.


You are done.
Also, you may want to add a special context menu to File Explorer to save your time.
Change Owner Context Menu
You can save significant amount of time by adding the Change owner command to the right-click context menu in File Explorer.
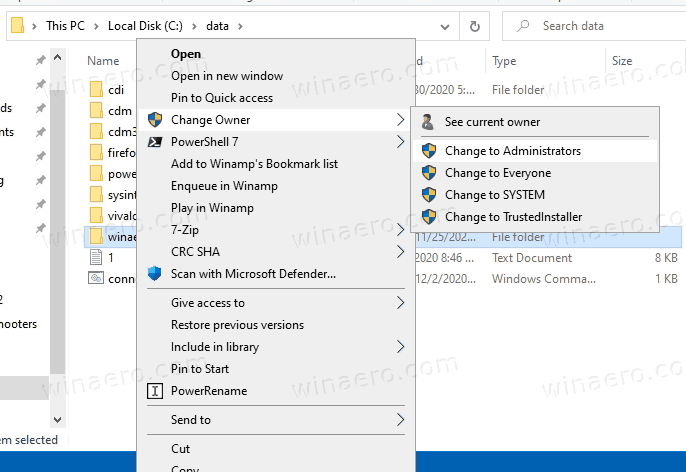
This will allow you to change the file, folder, or drive owner with one click. The context menu provides useful options to quickly change the owner to one of the built-in system accounts, including the Administrators group, the Everyone, SYSTEM, and TrustedInstaller system accounts. No extra steps required in this case. To learn more about the Change owner context menu, please refer to the following post.
How to Add Change Owner Context Menu in Windows 10
There, you will find ready-to-use Registry files, detailed instructions, and clarifications about how every context menu entry works.
That's it. Using this trick, it is possible to easily restore ownership of the file or folder back to the TrustedInstaller account in Windows 10. You might be interested to read how to take ownership and get full access to files and folders in Windows 10.
Support us
Winaero greatly relies on your support. You can help the site keep bringing you interesting and useful content and software by using these options:

didnt work..
Then you did something wrong.
I dont understand since I dont know what you’re pressing and t=you cant see the mouse
I did nothing wrong. I did step by step and this did not work. It still shows the same notification that I cannot delete it I do not have permission
Didn’t work for me either….. :(
Poor folks, read this:
To reset the security settings back to default,
take a look at the following KB article:
http://support.microsoft.com/kb/313222
• Click the Start orb.
• Under Start Search, type cmd, and then press enter.
• Type the following command, and then press enter:
secedit /configure /cfg %windir%\inf\defltbase.inf /db defltbase.sdb /verbose
You will receive a “Task is completed” message, and a warning message that something could not be done. You can safely ignore this message.
It all makes sense, but when I follow those instructions, I get the message: “NTService\TrustedInstaller is not from a domain listed in the Select Location dialog box, and is therefore not valid.”
k so
right click trusted installed locked folder
click properties
then go to security
advanced
where it says trusted installer, click change, and in the box at the bottom type Administrator. this gives you full control and you can excrete fecal matter on trusted installer. i am still working out on where the file is but when i find it i will return.
thanks to the way that gives permission to administrator instead of trustedinstaller, permission problems finally solved like not responding window store, calculator, etc which have relation with windowsapps folder.
permission seems to be messed up in my window account, so I changed the setting in administrator account which is enabled by typing ‘net user administrator /active:yes’ on elevated cmd.
I cannot change the name of the file GWX in the Trustedinstaller – when I get to the folder, (Windows\syswow64\GWX), via the way to alter the admin it wont allow me to change that name in ‘Owner’ section – NOTHING can change / alter the name ‘Trustedinstaller’. I think its OUTRAGEOUS of Microsoft to FORCE us to have W10! I did allow it a few weeks back but my PC just went awol! I didnt like it at all and so I HAD to re-install my W7 on my 64bit PC!!! I cannot get this dreadful GWX off of my taskbar! HELP!!!
Will not let me change. Where you say to add, the add list is not there and when I go into permission everything is grayed out and won’t let you allow or change anything.
This didn’t work whatsoever following your instructions.
Exactly what I was looking for; worked without any problem.
Thank you Sergey ! :-)
Great to be of help :)
When I enter in NT Service\TrustedInstaller and click Check Names I get an error: An object with the following name cannot be found: nt service\TrustedInstaller. I cannot get Windows to recognize it as a legitmate object.
Windows 10 Enterprise
Thanks it works
When we try to restore trustedinstaller, we do all the above. But when we click on ‘change’ for the owner, everything freezes….
For the C: drive.
This does work, but you have to also change the ‘From this location’ to your local PC.
Typically your domain is mentioned here.
This is what I was looking for…. thank you
Wow, worked perfectly as soon as I unzipped it. I have been working on this problem and search forums for help the past 2 hours. 30 seconds with this program and all 110 files were restored immediately. I was doing it by hand one at a time before I tried TakeOwnerShipEX app…. would have taken me for ever. THANK YOU FOR THIS PROGRAM WINAERO!!!!
Really need help. I did something stupid. I just installed windows 10 and I changed ownership of my main hard drive (C:) on my laptop from trustedinstaller to myself and that included all folders, subfolders and files, because it was denying me access. What i need to know is, is there any way of restoring back to trustedinstaller or would i have to downgrade to windows 7 to get it back the way it was?
Thanks !!
You saved my day, Thank you
you are welcome. Happy to hear it.
I am attempting your advice but my Win 10 will not allow me to change the Location field – it cannot find “trusted installer” in the user list. I type in “NTservice \trusted installer” but win 10 tries to compare it to the existing list and gives me error message. Unless I can can the location field. I am stuck.
You need a space after NT. it is “NT Service”.
Thank you! This solved the problem! I was typing NTService\TrustedInstaller instead of
NT Service\TrustedInstaller. That space between NT and Service made all the difference.
Excellent! My problem was solved!!
Okay so I am trying to delete some malwares that are protected by trustedinstaller, followed closely every step, but no luck :( Is now reinstalling Windows 10 the only option?
RE Win 10 and trustedinstaller: All I know about the whole thing is that I can’t get rid of Chrome. Every once in a while I’m working in Firefox and Chrome suddenly butts in without my noticing and I end up clicking things in Chrome and thinking I’m still in Firefox.
There are two file extensions at play: One is .webp and the other is .webm
.webp calls Chrome — .webm calls Firefox. I somehow managed to change 20 of the .webp files to the .webm extension, giving ownership of those files to Firefox. But there’s one left that still carries the .webp extension. It still calls Chrome and I CANNOT change it. I keep thinking there must be way. I certain there’s a way. I uninstalled Chrome in the Control Panel but even that didn’t help. Chrome pops up anyway, even though it’s uninstalled from my system.
Whaddya gonna do? I don’t have a clue.
Jimmy
The “Select User or Group window” doesn’t appear.
What happens when you click the “change” link?
just freezes…
Worked for me. Thank you.
You are welcome.
I already had myself as “Administrator”. Per this article
I set c:\windows.old as NT Service\TrustedInstaller,
deleted, saw many Gb pass before my eyes on way to recycle.bin,
then msg said I need permission of TrustedInstaller even though
that is now “owner”. GOTCHA!
I hate wasting disk space.
This is after Windows 10 update of 22 September 2017
Worked nicely. Thanks.
it just freezes and says i cannot access the file when i click on change :(
I have followed the steps correctly (checked multiple times) and it seems to have worked but when I try to delete the folder in question Windows still tells me that I need permission from TrustedInstaller. I even threw in a system restart for good measure and it still says the same thing :/
Didn’t work at all. Keeps me in a continuous loop of re-opening the previous windows and doesn’t respond to requests to change permissions, just starts over.
followed 100%, does not work
Nope, tried it again and again following exactly and does not work, please update
Great! It works.
In order to delete a file or folder which is owned by TrustedInstaller.exe, you have to take the rights of the files or folders with full authorization.
OK
Is there a way to do it through a command prompt? The thing with doing it through the Graphical User Interface is that you have to sit there to babysit all the dialogue boxes that come up.