Here's How to Remove JPEG Artifacts with GIMP.
The JPEG image format is decades old and has served compression needs very well for years, by producing very small images with reasonable quality. It is very popular on the Internet. When you specify a lower quality, the image size becomes small. However, distortions, or JPEG artifacts like colored dots, blur, a mosaic appear on the image. In this article, we'll take a look at how to remove JPEG artifacts in GIMP.
Advertisеment
Unfortunately, it is not possible to completely restore the original image's appearance from a JPG file with artifacts. However, it is possible to make them smooth and fix them using a tool like GIMP.
What is GIMP
GIMP (GNU Image Manipulation Program) is a popular graphics editor that was created for Linux and subsequently ported to other platforms. Hardly anyone will call it "simple" or "easy to use". Despite having a traditional user interface in recent versions, GIMP offers unique methods of working with it that are not obvious and which require special skills.

However, other programs on Linux are even worse. There is no real competitor to GIMP when it comes to image processing. GIMP is designed specifically for image processing, not painting. The positive things about GIMP are is that it is free, open source and stable.
GIMP works with layers, has support for effects, can be expanded with plugins, textures, brushes. Also it has a great filter set that can be applied to an image. Using the filters you can remove JPEG artifacts from an image.
To Remove JPEG Artifacts with GIMP
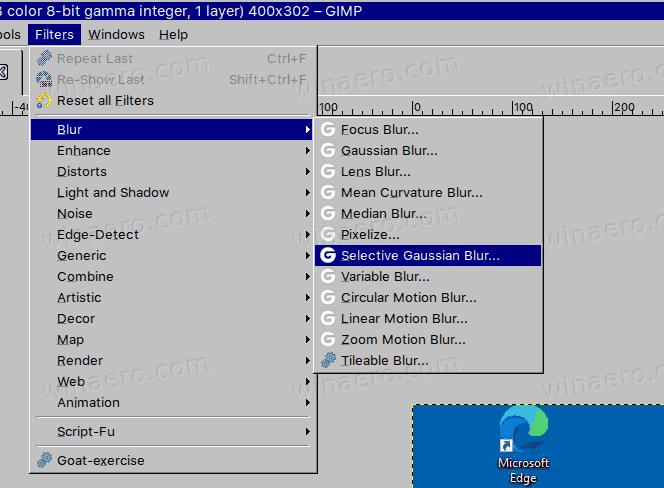
- Open the original JPG image in GIMP.
- Choose Filters > Blur > Selective Gaussian Blur from the main menu.
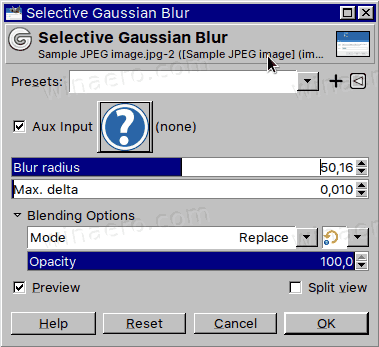
- Set a small "Max. delta" (~ 0.010 or so), but with a large blur radius (about 50), to carefully smooth out the most noticeable noise in the image.
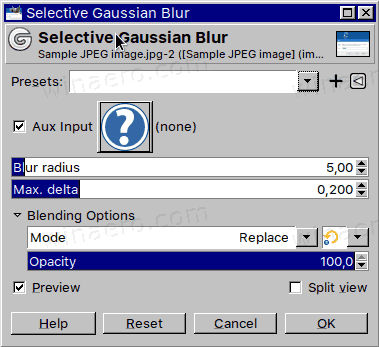
- Now use Selective Gaussian Blur again with a larger "Max. delta" (~ 0.200 or so), but a small blur radius (5-10), to smooth out the overall image noise a bit.
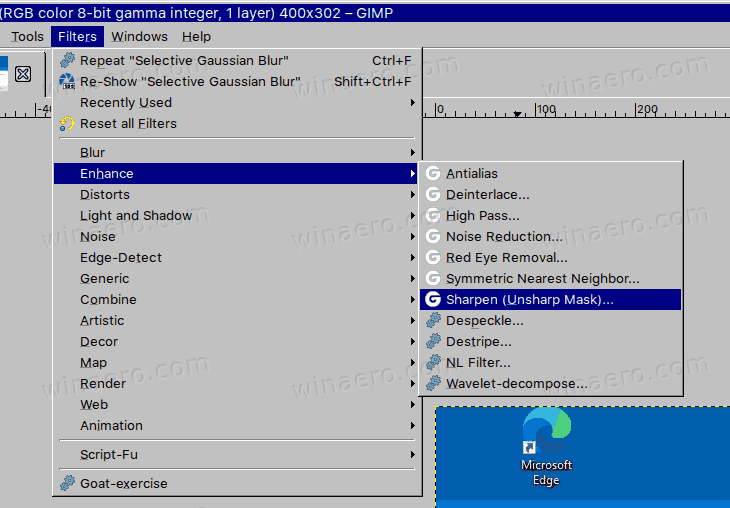
- Now sharpen the image with Filters > Enhance > Sharpen (Unsharp Mask).
- Set Radius to
0.010-0.020and Amount to0.050-0.100.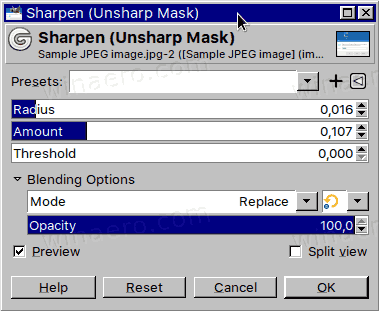
- You are done.
The image will now look acceptable with minimal visible JPEG artifacts.
Let's compare the images.
Here is the original image with distortion:

And here is the result.
As you can see, the second image looks better. It still lacks sharpness at the edges, but overall the result of the JPEG processing can be considered acceptable.
For each specific image, you can choose a better combination of filter values using the approach described in this article.
Support us
Winaero greatly relies on your support. You can help the site keep bringing you interesting and useful content and software by using these options:

If you use Paint.net, you can also try this plugin: https://forums.getpaint.net/topic/18490-noise-reduction-plugin/
I also use ImageMagick. It makes some things simplier.
Did you really copy it from here? How about crediting it?
http://plаsmasturm.оrg/lоg/124/
Nope. I didn’t copy.