When you click on the shutdown or restart command in the Start menu or Win + X menu of Windows 10, the operating system performs the selected action directly. While this is okay for regular users, there are instances like if you are a system administrator where you need to keep the system running for as long as possible without any downtime. If there's a reason to restart or shutdown, it's handy for many IT companies to log and document these reasons so over time they may analyze why the restart or shutdown was required to maximize their Windows session uptime. For this, you can enable the Shutdown Event Tracker feature.
Advertisеment
The Shutdown Event Tracker is a special dialog that prompts users to record a reason why they restart or shut down the computer. This information can be retrieved later from the Event Log. This tool collects all the reasons for the shutdown into the operational log so system administrators can reduce the need to restart or shutdown their company PCs. It also adds an extra layer of confirmation for the shutdown commands, so the user won't do so accidentally. For example, if the Event Log reveals that the majority of restarts or shut downs are after installing updates or certain apps, they can combine update and app installation and restart once after finishing all of them.
The following dialog will appear if you press Alt + F4 on the Desktop.
![]()
The Start menu and Win+X menu shut down commands will have the following prompt:
When Shutdown Event Tracker is enabled, you can't shut down or restart the operating system without the dialog for providing a reason popping up. If the computer is shut down or restarted unexpectedly, either as a result of power interruption or hardware failure, the user is prompted to enter the reason in Shutdown Event Tracker when the computer starts again.
Let's see how to enable Shutdown Event Tracker in Windows 10. Before proceeding, ensure that your user account has administrative privileges. Now, follow the instructions below.
To enable Shutdown Event Tracker in Windows 10, do the following.
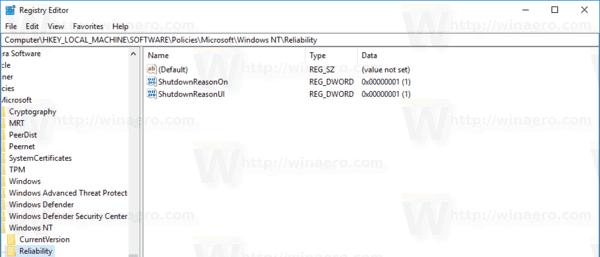
- Open the Registry Editor app.
- Go to the following Registry key.
HKEY_LOCAL_MACHINE\SOFTWARE\Policies\Microsoft\Windows NT\Reliability
See how to go to a Registry key with one click.
- On the right, create a new 32-Bit DWORD value ShutdownReasonOn.
Note: Even if you are running 64-bit Windows you must still create a 32-bit DWORD value.
Set its value to 1. - Now, create a new 32-bit DWORD value ShutdownReasonUI, and set its value data to 1.

- To make the changes done by the Registry tweak take effect, restart Windows 10.
To revert the changes you made, just delete the values ShutdownReasonOn and ShutdownReasonUI.
You can download ready-to-use Registry files.
The undo tweak is included.
If you are running Windows 10 Pro, Enterprise, or Education edition, you can use the Local Group Policy Editor app to configure the options mentioned above with a GUI.
Enable Shutdown Event Tracker with Local Group Policy Editor
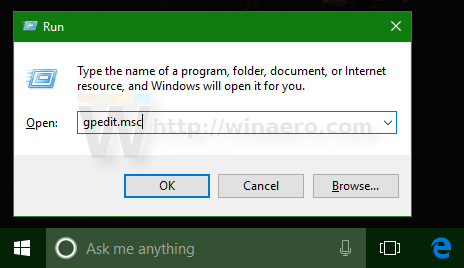
- Press Win + R keys together on your keyboard and type:
gpedit.msc
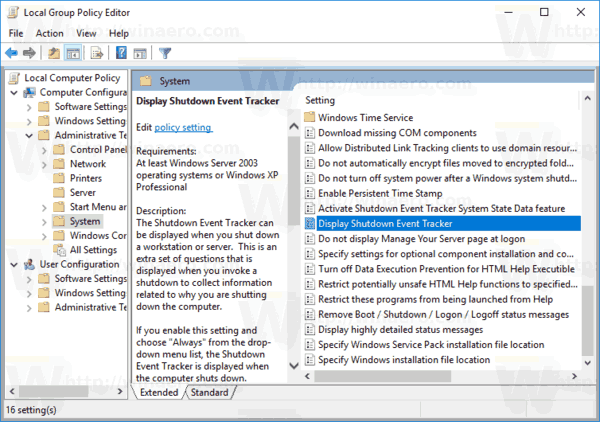
- Group Policy Editor will open. Go to Computer Configuration\Administrative Templates\System.
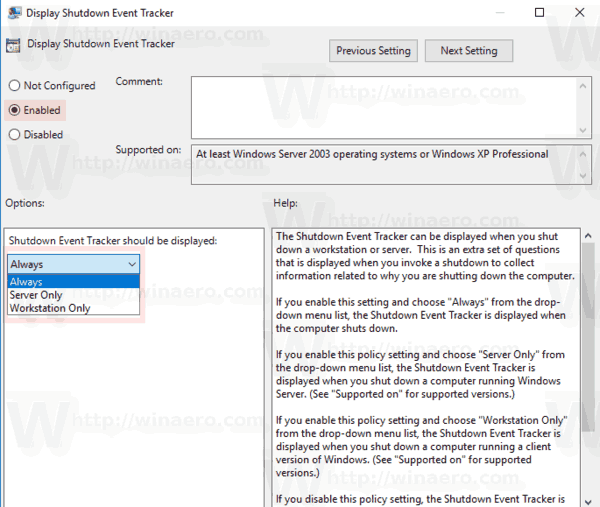
- Double-click the policy option Display Shutdown Event Tracker to configure it.

- Enable the policy and select "Always" from the drop down list.

That's it!
Support us
Winaero greatly relies on your support. You can help the site keep bringing you interesting and useful content and software by using these options:

