How to Stop Windows 10 from Disconnecting Network in Sleep
As you may already know from our previous articles, devices that support Modern Standby are able to keep a network connection active when in sleep mode. Here's how to enable or disable this feature.
Advertisеment
Windows 10 Modern Standby (Modern Standby) expands the Windows 8.1 Connected Standby power model. Connected Standby, and consequently Modern Standby, enable an instant on / instant off user experience, similar to smartphone power models. Just like the phone, the S0 low power idle model enables the system to stay up-to-date whenever a suitable network is available.
Although Modern Standby enables an instant on/off user experience like Connected Standby, Modern Standby is more inclusive than the Windows 8.1 Connected Standby power model. Modern Standby allows for market segments previously limited to the S3 power model to take advantage of the low power idle model. Example systems include systems based on rotational media and hybrid media (for example, SSD + HDD or SSHD) and/or a NIC that doesn’t support all of the prior requirements for Connected Standby.
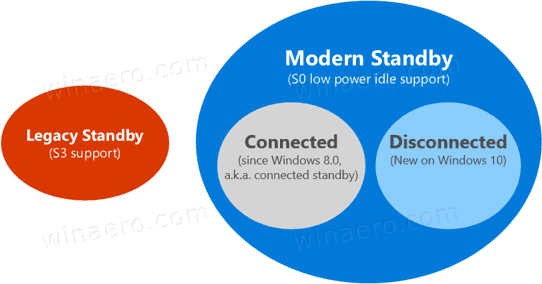
Devices that support Modern Standby can connect or disconnect from Wi-Fi or a wireless local area network while in standby.
Connected Modern Standby will allow the device to remain connected to Wi-Fi while in standby. It will be able to receive and process notifications about new email messages, incoming calls. This is convenient, but makes the device drain the battery power faster.
Disconnected Modern Standby allows longer battery life, but the device won't notify you about new events.
To Enable or Disable Network Connectivity in Standby In Windows 10,
- Open the Settings app.
- Go to System > Power & sleep.
- On the right, navigate to the Network connection section.
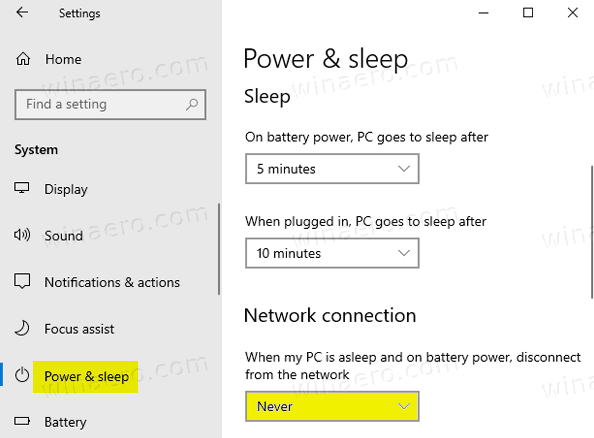
- In the drop down list below, select one of the following values.
- Never - Never disconnect from the network when the device is asleep and on battery power. This enables Connected Modern Standby Mode.
- Always - Always disconnect from the network when the device is in sleep mode on battery power. This switches the device to Disconnected Modern Standby.
- Managed by Windows - only select apps that are allowed to run in the background can access to the network. This include any app that the user have allowed to run background tasks, and also VOIP apps.
You are done!
Alternatively, you can use the classic power applet to configure the option. If you do not see Networking Connectivity in the Power Options applet, it is easy to add it. See Add Networking Connectivity in Standby to Power Options in Windows 10.
Configure Networking Connectivity in Standby In Power Options
- Press Win + R keys together on your keyboard to open the Run dialog.
- Type or copy-paste the following into the Run dialog:
control.exe powercfg.cpl,,3. Press Enter.
- Advanced settings for your Power plan will open directly.
- Expand the group with the same name as the currently selected power plan, e.g. Balanced.
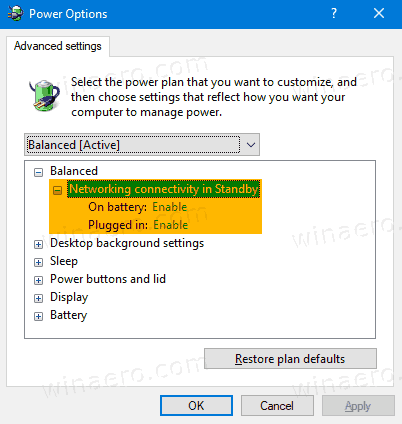
- Set Networking connectivity in Standby to either Enable, Disable, or Managed by Windows.
You are done!
Note: The values for the option are as follows.
- Enable - Never disconnect from the network when the device is asleep and on battery power. This enables Connected Modern Standby Mode.
- Disable - Always disconnect from the network when the device is in sleep mode on battery power. This switches the device to Disconnected Modern Standby.
- Managed by Windows - only select apps that are allowed to run in the background can access to the network. This include any app that the user have allowed to run background tasks, and also VoIP apps.
Also, you can configure this feature in the command prompt.
Configure Network Connectivity in Standby In Command Prompt
- Open a new command prompt.
- To change the Network Connectivity in Standby option when on battery, use one of the following commands.
- Enable:
powercfg /setdcvalueindex scheme_current sub_none F15576E8-98B7-4186-B944-EAFA664402D9 1 - Disable:
powercfg /setdcvalueindex scheme_current sub_none F15576E8-98B7-4186-B944-EAFA664402D9 0 - Managed by Windows:
powercfg /setdcvalueindex scheme_current sub_none F15576E8-98B7-4186-B944-EAFA664402D9 2
- Enable:
- To change the Networking Connectivity in Standby option when plugged in, use one of the following commands.
- Enable:
powercfg /setacvalueindex scheme_current sub_none F15576E8-98B7-4186-B944-EAFA664402D9 1 - Disable:
powercfg /setacvalueindex scheme_current sub_none F15576E8-98B7-4186-B944-EAFA664402D9 0 - Managed by Windows:
powercfg /setacvalueindex scheme_current sub_none F15576E8-98B7-4186-B944-EAFA664402D9 2
- Enable:
You are done.
Finally. Windows 10 comes with two group policies to configure this feature. the Local Group Policy Editor app. You can use the Local Group Policy Editor app if you are running Windows 10 Pro, Enterprise, or Education edition. Otherwise, you can apply a Local Group Policy Registry tweak. Both methods are explained below.
Change Network Connectivity in Standby with Group Policy
- Open the Local Group Policy editor app, or launch it for all users except Administrator, or for a specif user.
- Navigate to Computer Configuration > Administrative Templates > System > Power Management > Sleep Settings on the left.
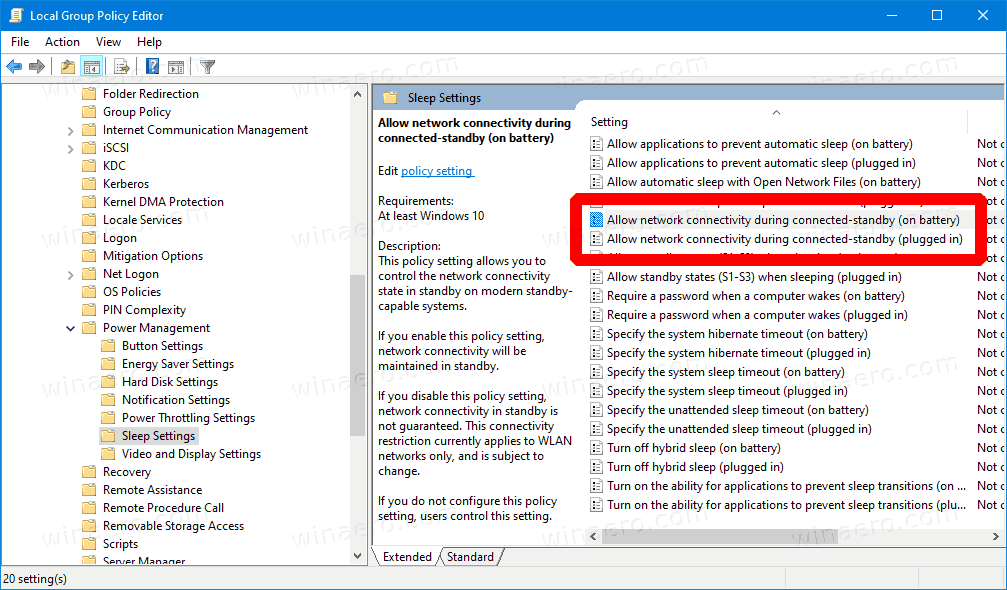
- On the right, find the policy setting Allow network connectivity during connected-standby (plugged in).
- Double-click on it and set the policy to Enabled to always enable Network Connectivity when plugged in.
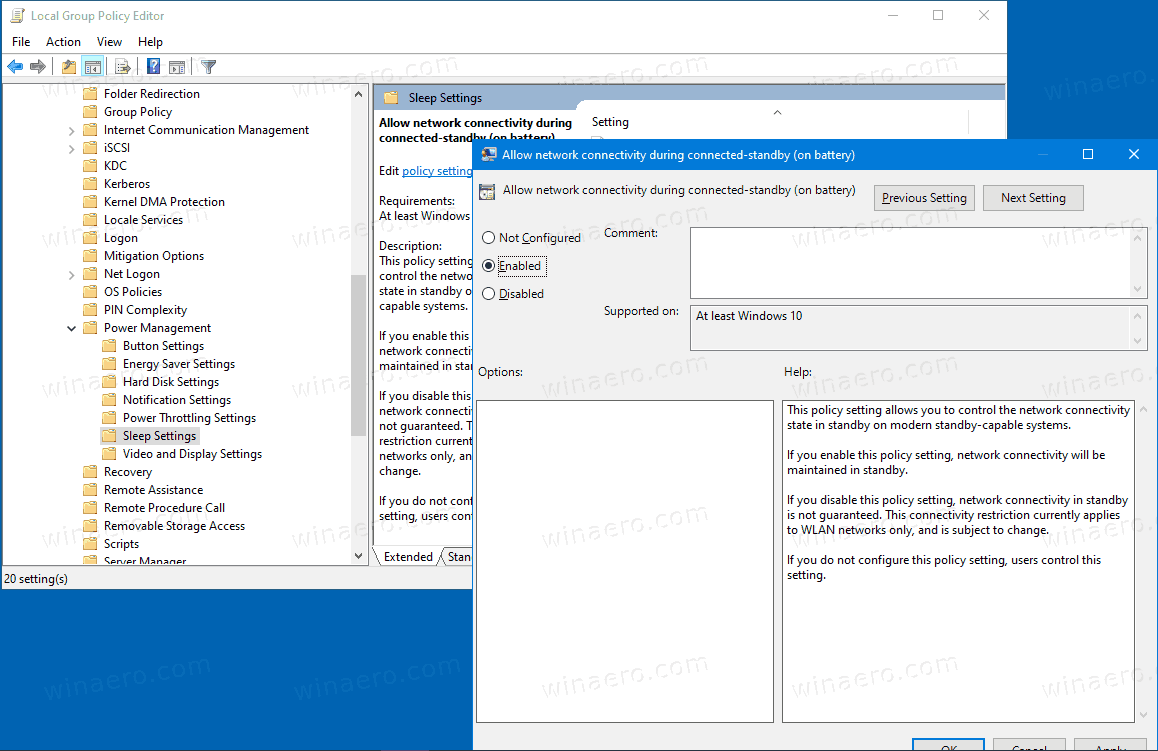
- Set it to Disabled to always disconnect from network when plugged in.
- Similarly, configure the next policy, Allow network connectivity during connected-standby (on battery).
- Set it to either Enabled to make your device remain connected to a network in standby when on batter, otherwise set it to Disabled.
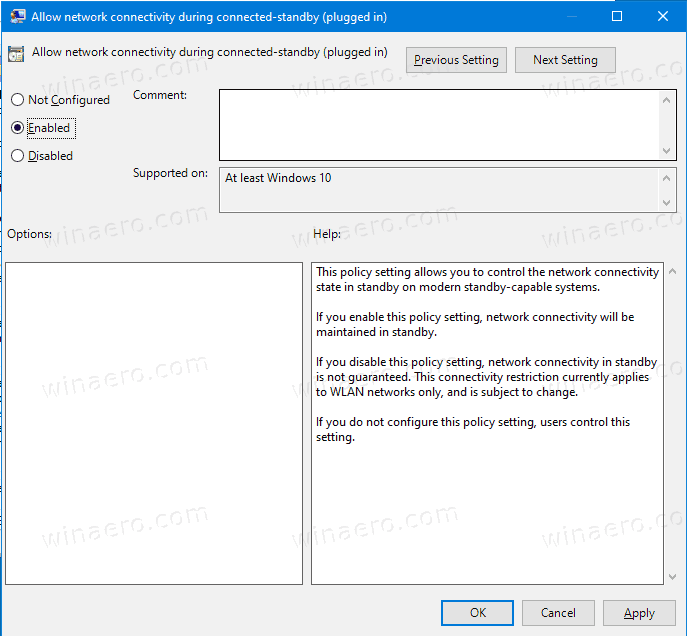
You are done.
If your Windows 10 edition doesn't include the gpedit.msc app, you can use a Registry tweak. Here is how.
Configure Network Connectivity in Standby with Registry Tweak
- Download the following ZIP archive: Download ZIP archive.
- Extract its contents to any folder. You can place the files directly to the Desktop.
- Unblock the files.
- Double click on one of the following files to merge it, according to what you want.
- On Battery - Enable Network Connectivity In Standby.reg
- On Battery - Disable Network Connectivity In Standby.reg
- Plugged In - Enable Network Connectivity In Standby.reg
- Plugged In - Disable Network Connectivity In Standby.reg
- To undo the changes, use the provided files
On Battery - UNDO CHANGES for Network Connectivity In Standby.regandPlugged In - UNDO CHANGES for Network Connectivity In Standby.reg.
The Registry files above modify the following Registry keys and values:
When on battery:
HKEY_LOCAL_MACHINE\SOFTWARE\Policies\Microsoft\Power\PowerSettings\f15576e8-98b7-4186-b944-eafa664402d9

DCSettingIndex 32-bit DWORD
0 = Disabled
1 = Enabled
When plugged in:
HKEY_LOCAL_MACHINE\SOFTWARE\Policies\Microsoft\Power\PowerSettings\f15576e8-98b7-4186-b944-eafa664402d9

ACSettingIndex 32-bit DWORD

0 = Disabled
1 = Enabled
Tip: See how to go to a Registry key with one click.
Deleting the ACSettingIndex and DCSettingIndex values will set the Group Policy options to their default (not configured) state.
That's is.
Related articles:
- Check if Modern Standby is Supported in Windows 10
- Check if Connected or Disconnected Modern Standby in Windows 10
- Add System Unattended Sleep Timeout to Power Options in Windows 10
- Add Allow Sleep with Remote Opens Power Option in Windows 10
- Create Sleep Study Report in Windows 10
- How to Find Sleep States Available in Windows 10
- Disable Sleep Password in Windows 10
- Create Shutdown, Restart, Hibernate and Sleep Shortcuts in Windows 10
- Find which hardware can wake up Windows 10
- How to prevent Windows 10 waking from sleep
Support us
Winaero greatly relies on your support. You can help the site keep bringing you interesting and useful content and software by using these options:
