Microsoft has silently added a couple of improvements to the Reserved Storage feature in Windows 10 version 2004. From now, changing the Registry is no longer required to enable or disable it, there are new DISM commands for that.
Advertisеment
Starting in Windows 10 19H1, version 1903, Microsoft made a few changes to how Windows 10 manages disk space. Some disk space, reserved storage, is now used by updates, apps, temporary files, and system caches.
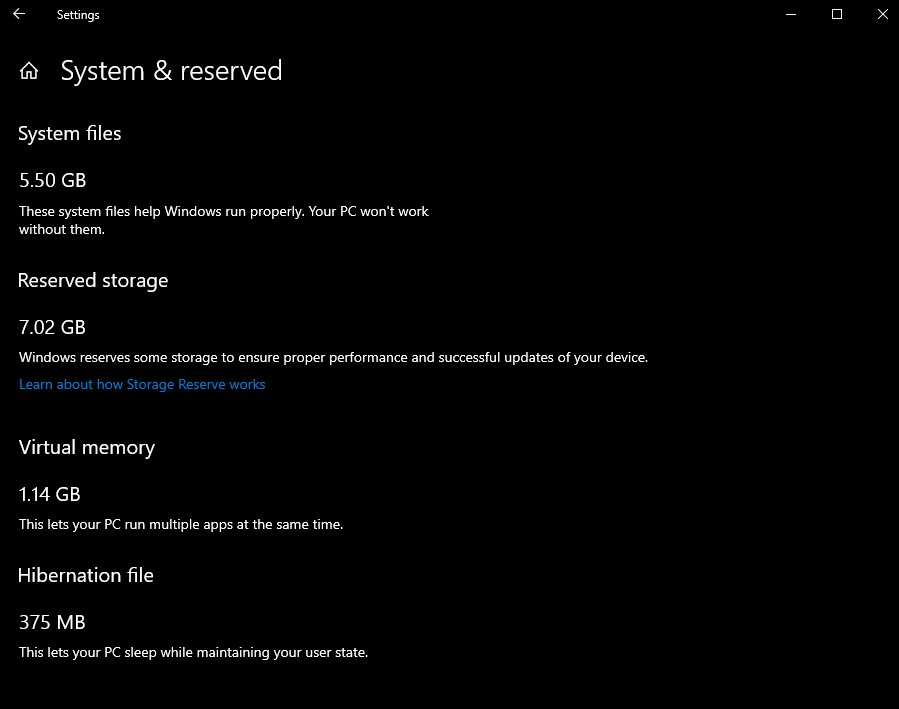
Windows 10 will reserve some disk space to ensure that critical OS functions always have access to disk space. If a user almost fills up his storage, several Windows and application scenarios become unreliable. For example, Windows Update may fail to download new update packages. Reserved storage solves this issue. It is enabled out of the box on devices that come with Windows 10 pre-installed or those where Windows 10 was clean installed.
Tip: Find Reserved Storage Size in Windows 10
Starting in Windows 10 '20H1', version 2004, Microsoft has added three new commands to enable or disable the Reserved Storage feature. As you may recall, you had to apply a Registry tweak prior to 20H1 builds. Now, you can use the following commands.
DISM Commands To Enable or Disable Reserved Storage in Windows 10
- Open a new elevated command prompt.
- Type
DISM.exe /Online /Get-ReservedStorageStateto see if the Reserved Space feature is enabled or disabled.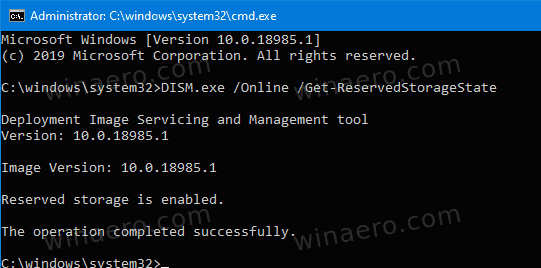
- Execute the following command to enable Reserved Storage:
DISM.exe /Online /Set-ReservedStorageState /State:Enabled.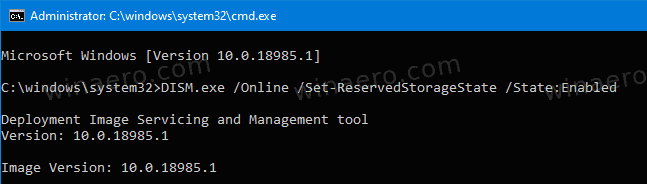
- Run the following command to disable Reserved Storage:
DISM.exe /Online /Set-ReservedStorageState /State:Disabled.
You are done. The change will be applied instantly, no restart required.
Also in version 2004, you can use PowerShell to manage Reserved Storage.
Note: If Windows 10 is performing a servicing operation, e.g. it is installing an update, you won't be able to enable or disable the Reserved Storage feature. The operation will fail. You should try to execute the appropriate DISM command later.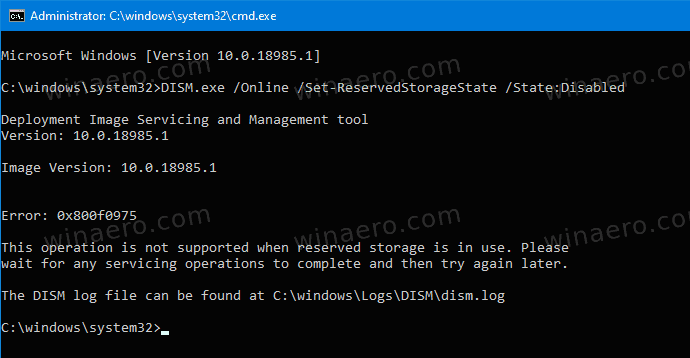
Note: The amount of reserved space will vary over time based on how you use your device. For example, temporary files that consume general free space today on your device may consume space from reserved storage in the future.
When enabled, reserved storage will instantly reserve its full allotment of disk space. However, on disk-space-constrained devices, enabling reserved storage will leave the user space and will only take the minimum—which is 2% of system volume capacity or 3GB of disk space, whichever is lower—to ensure that the device is functional and accessible to the user for further operations. Reserved storage will grow back to its original allocated size as space becomes available, such as when old Windows installations are removed or then Storage Sense cleanup tasks are conducted.
You can uninstall optional features and language packages to reduce the amount of space that Windows 10 will reserve for updates. Check out the post: Reduce Reserved Storage Size in Windows 10.
Thanks to deskmodder.
Support us
Winaero greatly relies on your support. You can help the site keep bringing you interesting and useful content and software by using these options:
