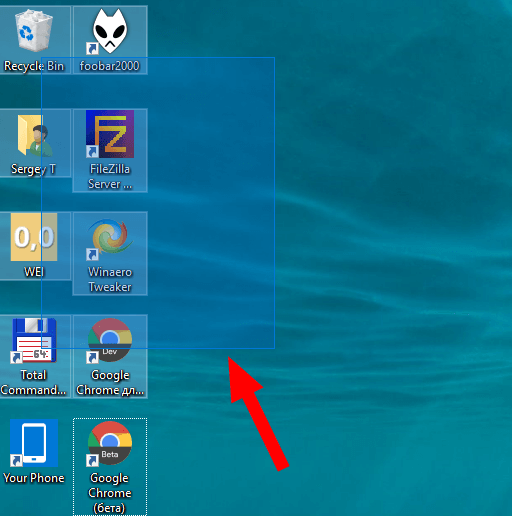
The translucent selection rectangle represents the selection when you left-click and hold the left mouse button, and then drag the mouse pointer over items in File Explorer or on the Desktop to select them. It has a border of a solid color, and filled by a translucent version of the same color.

You can disable the translucent selection rectangle on your Desktop if you want. If you disable it, you will see an outline selection rectangle instead of a rectangle filled with a color.
Advertisеment
Here are the two methods you can use to disable the translucent selection rectangle on Desktop in Windows 10.
To disable the translucent selection rectangle in Windows 10, do the following.
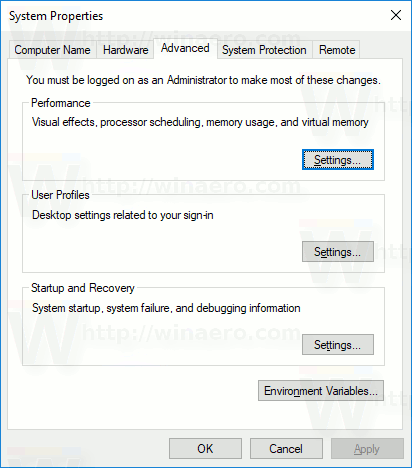
- Press Win + R hotkeys on the keyboard. The Run dialog will appear on the screen. Type the following into the text box and press Enter:
SystemPropertiesAdvanced
- Advanced System Properties will open. Press the Settings button in the Performance section on the Advanced tab.

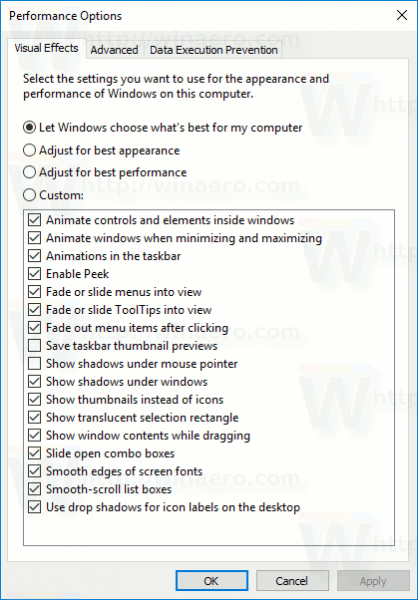
- The following dialog will be opened:
 There are a number of presets available at the top of the window.
- Let Windows choose what's best for my computer - the operating system will automatically enable and disable some visual effects that it determines will run fine on your hardware.
- Adjust for best appearance - This will enable all available visual effects.
- Adjust for best performance - All visual effects will be disabled.
- Custom - This will allow you to enable or disable visual effects manually. Once you change the check boxes in the list below, this option will be selected by default.
- Turn off (uncheck) the option named Show translucent selection rectangle.
You are done.
Before:

After:

Alternatively, you can apply a Registry tweak.
Disable the translucent selection rectangle with a Registry tweak
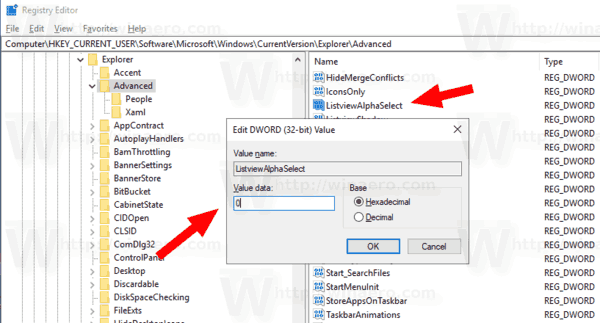
- Open the Registry Editor app.
- Go to the following Registry key.
HKEY_CURRENT_USER\Software\Microsoft\Windows\CurrentVersion\Explorer\Advanced
See how to go to a Registry key with one click.
- On the right, modify or create a new 32-Bit DWORD value ListviewAlphaSelect.
Note: Even if you are running 64-bit Windows you must still create a 32-bit DWORD value.
Set its value to 0 to disable the translucent selection rectangle. A value data of 1 will enable it.
- To make the changes done by the Registry tweak take effect, you need to sign out and sign in to your user account. Alternatively, you can restart the Explorer shell.
You can download the following ready-to-use Registry files
The undo tweak is included.
That's it.
Support us
Winaero greatly relies on your support. You can help the site keep bringing you interesting and useful content and software by using these options:


Win+R, SystemPropertiesPerformance.exe
or
Press Windows key, type “performance”, select SystemPropertiesPerformance.exe
thanks
That’s just for the desktop, what about explorer windows. Some will keep it if you specify a directories properties, i.e. “Documents”