You may want to disable power throttling in Windows 11 in order to get better app performance. While this requires a trade-off in terms of battery life, sometimes performance is a mission-critical thing.
Advertisеment
Microsoft first introduced Power Throttling in Windows 10 when aimed to improve the battery life of laptops and tablets. Being it successor, Windows 11 includes it too. If you aren't familiar with the feature, here's how it works.
The core concept of the feature is to restrict CPU usage by apps that are not actively in use. When an application is minimized or runs in the background, still it continues to consumes system resources. The operating system will manage these apps by switching the CPU to a low-power state, ensuring tasks are completed while conserving as much battery as possible. Its smart algorithm will identify tasks that the user actively interacting with, thus ensuring that those apps continue to run seamlessly. At the same time, it will be reducing the resource allocation to all other processes.
How to find apps with Power Throttling
To find processes with Power Throttling applied to, do the following.
- Open the Task Manager (Ctrl + Shift + Esc), and switch to the Details page.
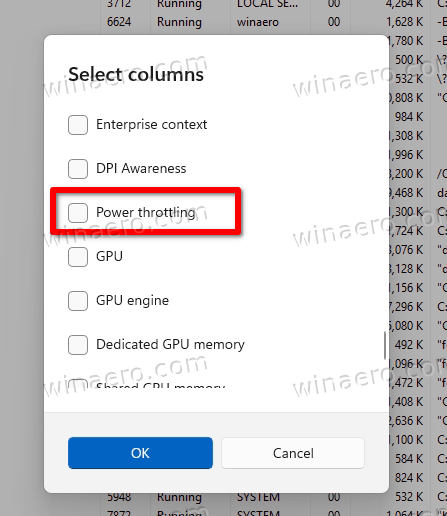
- Right-click on the header of any column, and select the Select columns option from the context menu.

- In the window that opens, find and enable the Power Throttling option, and click OK.
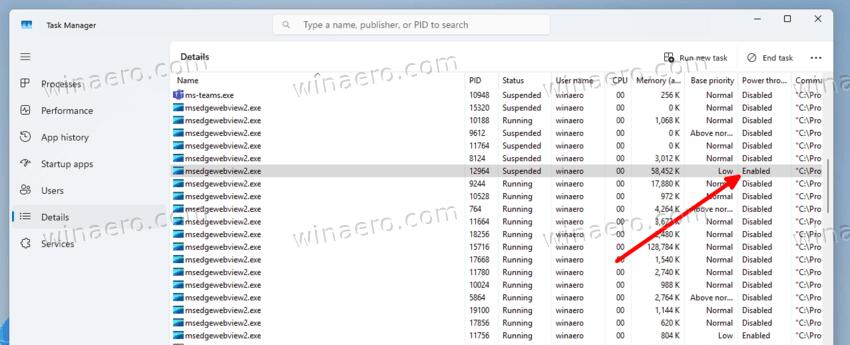
- Immediately, the new column will show the enabled or disabled status for each of the processes.
That's it.
💡Tip: You can add more useful columns to almost any tab of the Task Manager. Check out the Customize Task Manager Columns and Settings
post for more details.
If a process is misbehaving with Power Throttling applied to it, you can try to disable the latter and see if that makes a difference. There is a dedicated Group Policy option which can be used to disable Power Throttling for all apps. Besides, you can disable it for specific apps individually using several different methods. Let's review them.
Disable Power Throttling
To disable Power Throttling in Windows 11 for all apps, do the following.
- Open the Registry Editor by pressing Win + R and typing regedit in the Run dialog.
- In the left pane, expand open the tree to the HKEY_LOCAL_MACHINE\SYSTEM\CurrentControlSet\Control\Power key.
- Right-click the Power key in the left pane, and select New > Key from the menu.
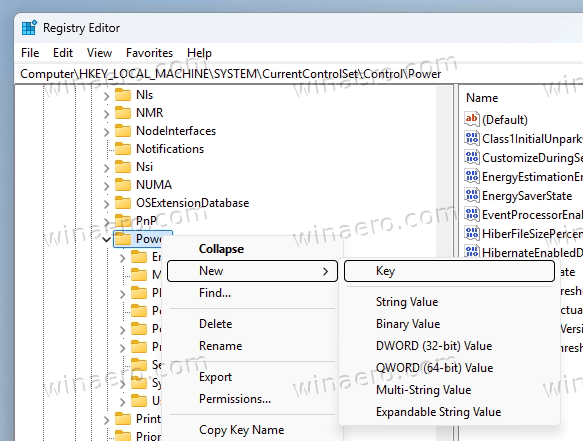
- Name the new key PowerThrottling.
- Now right-click the PowerThrottling key, and select New > DWORD (32-bit) value from the menu.
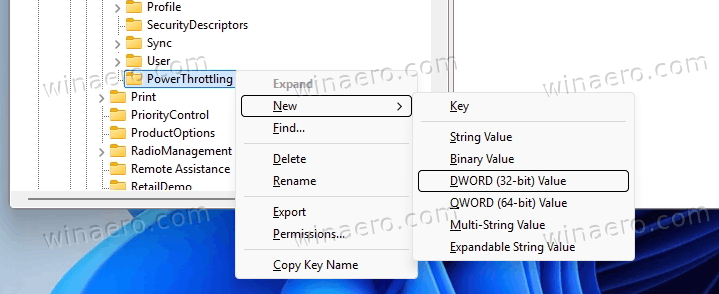
- Name it PowerThrottlingOff and double-click it to change its value data. Set it to 1.
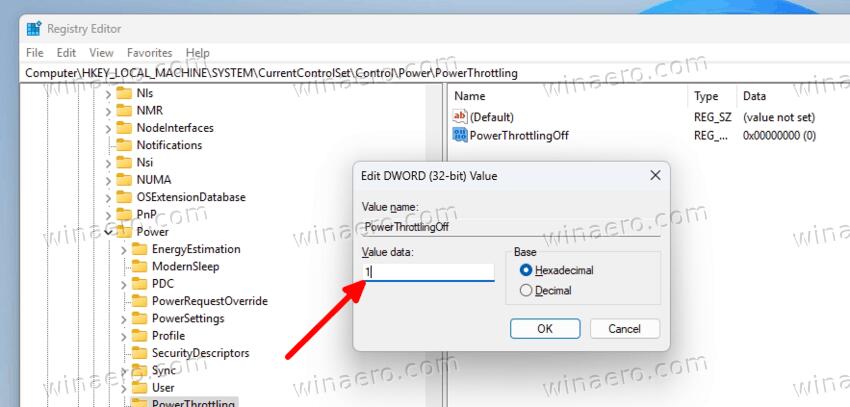
- To make the changes done by the Registry tweak take effect, you need to restart you computer.
This is how you disable Power Throttling for all apps.
✍ To undo the change at any moment later, you can delete the PowerThrottlingOff value you created by following the steps above.
To save your time, I have created ready-to-use REG files.
Download REG files
To avoid the manual registry editing, you download the following two REG files.
Extract it to any folder of your choice. Open the disable power throttling.reg file to apply the change, and restart Windows. You will need to confirm the User Account Prompt, and the Registry prompt to import the REG file values. Click on the OK button in both dialogs.
The undo tweak is included. Use the enable power throttling.reg file.
If you are running Pro, Enterprise, or Education edition of Windows 11, you can use the Local Group Policy Editor app to configure the options mentioned above with a GUI.
Disable Power Throttling in Group Policy
- Press Win + R and type
gpedit.mscin the Run dialog, then press Enter.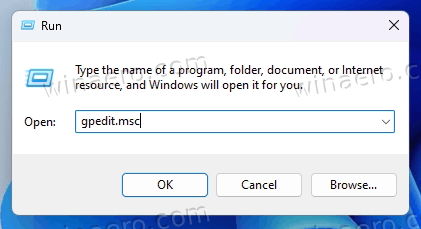
- In the Local Group Policy Editor app expand open the Computer Configuration\Administrative Templates\System\Power Management\Power Throttling Settings folder.
- On the right, double-click the Turn off Power Throttling policy to edit it.
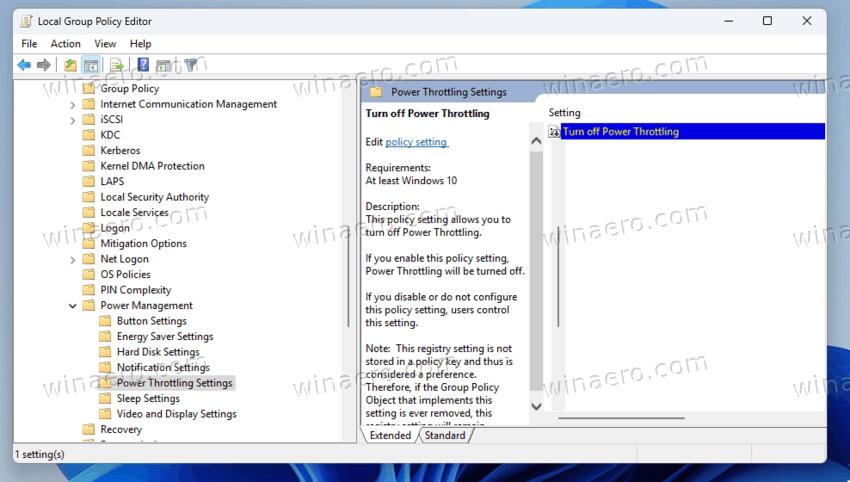
- Now, select Enabled in the next dialog, then click Apply and then OK.
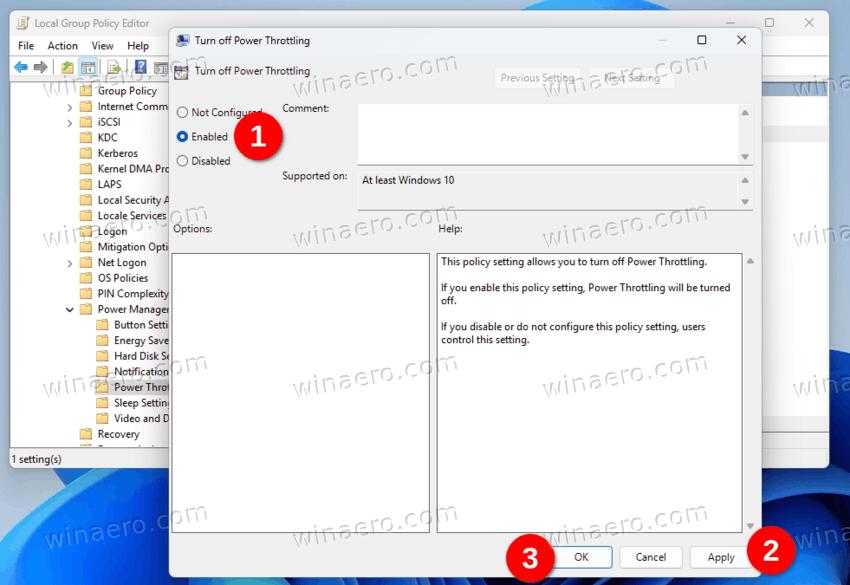
- You may need to restart the operating system for the policy to take the effect.
That's it.
Both reviewed methods will disable power throttling for all apps at once. But sometimes it may be not what you really want. Instead, you may prevent Windows from applying the restriction to a specific process.
Turn Off Power Throttling for a Specific App
To disable power throttling for a specific process, do the following.
- Right-click the Start button with the Windows logo in the taskbar.
- Select Terminal(Admin) from the menu.
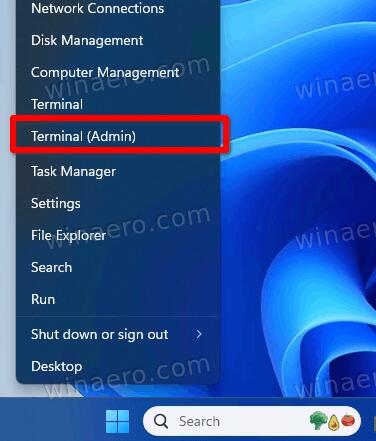
- In Terminal, select Command Prompt from its menu or with Ctrl + Shift + 2.
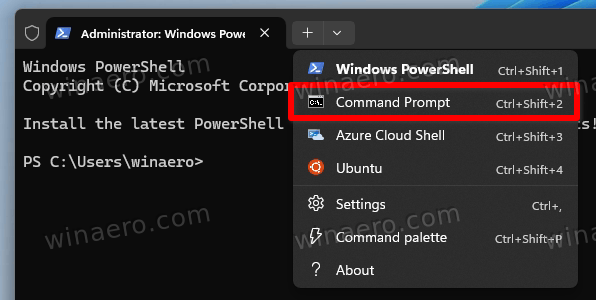
- Finally, in the command prompt, type
powercfg /powerthrottling disable /path "path to the app executable path". Substitute the path with the actual path to the app that you want to exclude from power throttling. For example:powercfg /powerthrottling disable /path "c:\Program Files (x86)\Kensington\KensingtonWorks2\KensingtonWorks2.exe".
- Repeat the command for all other apps you want to exclude from Power Throttling.
That's how you can turn off the power reduction for individual apps.
Besides the command prompt method, there is a related option in Settings. While it has nothing to do with the throttling itself, it allows prioritizing apps when they run in the background. Such apps may survive the built-in optimization and continue to run actively for little but longer.
Turn Off CPU Throttling for Individual Apps in Windows 11
- Open the Settings app by pressing Win + I or with any other method.
- Select Apps on the left, and then click Installed Apps on the right.
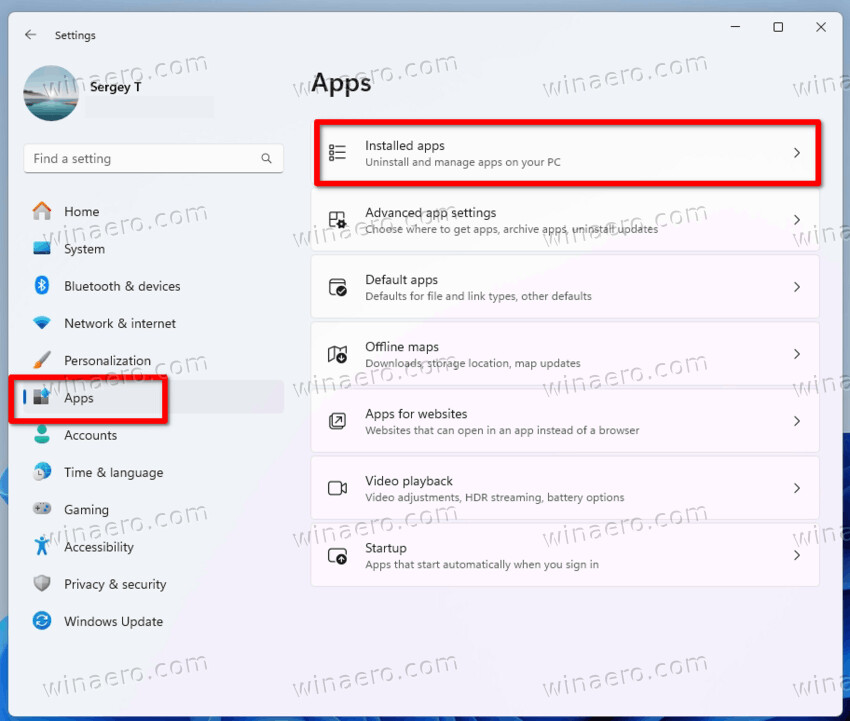
- In the list of the installed applications find the one you want to disable CPU Throttling for, and select Advanced options from the thee-dot menu next to the app name.
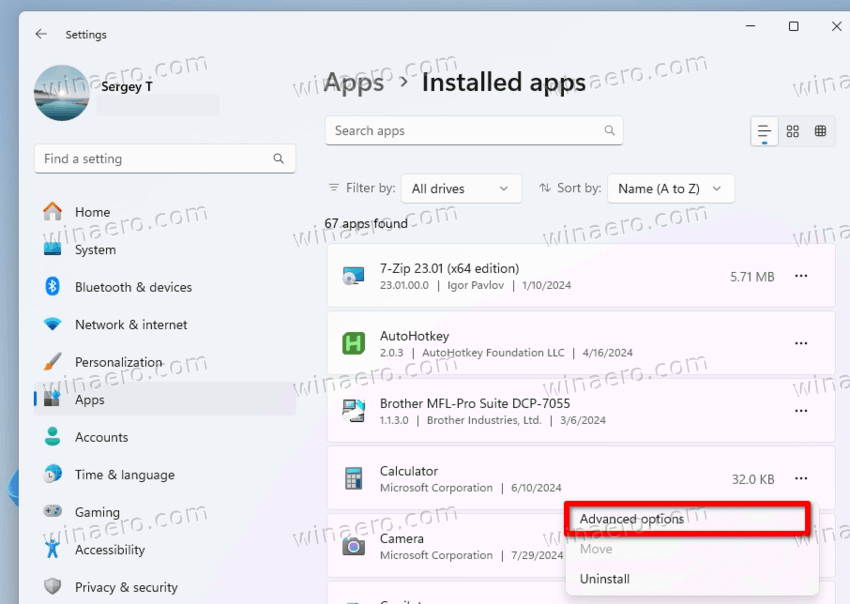
- Move to the Background apps permissions section, and set the Let this app run in background option to Always.
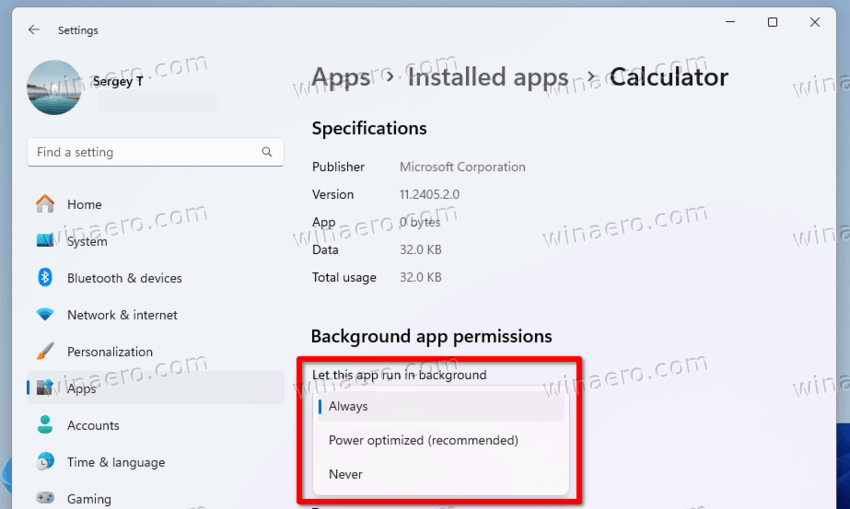
That's it. Right after you make the change, Windows will not try to suspend the background process for the selected app. So this reduces its chance for getting throttled.
Finally, you can achieve nearly the same by changing the process by raising its runtime priority. The higher the priority, the lower the change for the Windows to apply power throttling to the app.
Prevent CPU Throttling for a process in Task Manager
Do the following to disable CPU Throttling for a process by changing its priority.
- Open Task Manager using the Ctrl + Shift + Esc keyboard shortcut.
- Now switch to the Details page.
- To prevent Power Throttling from being applied to a particular process, find it in the list and right-click it.
- Finally, select Set priority from the menu.
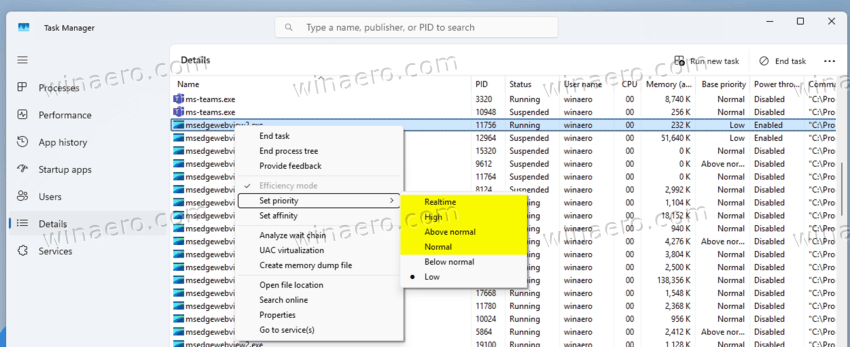
- Click on Normal, Above Normal, High, or Realtime to raise the process priority and exclude it from CPU optimization.
That's it.
Finally, you can adjust a few CPU throttling settings with help of the Settings app and its classic Control Panel counterpart.
Managing Power Throttling Settings
- Open the Settings app (Win + I).
- Navigate to System > Power and Battery.
- In the Power section on the right, find the Power Mode option.
- Set it one of the following values:
- Best Power Efficiency – Power Throttling mode is enabled.
- Balanced – This mode applies power limiting only to the most power-hungry background apps.
- Best Performance – Power Throttling mode disabled.
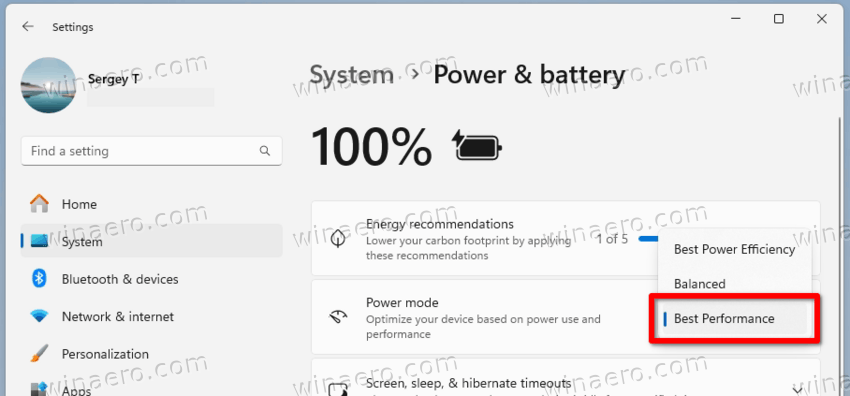
That is an easy to use option, but it may not suite for advanced users who wants to fine grain tune the CPU values. For that purpose, the classic Power Options feature does the trick, as it offers more options.
Using Power Options
- Open the Start menu and start typing 'edit power plan'. Click on the eponymous entry.
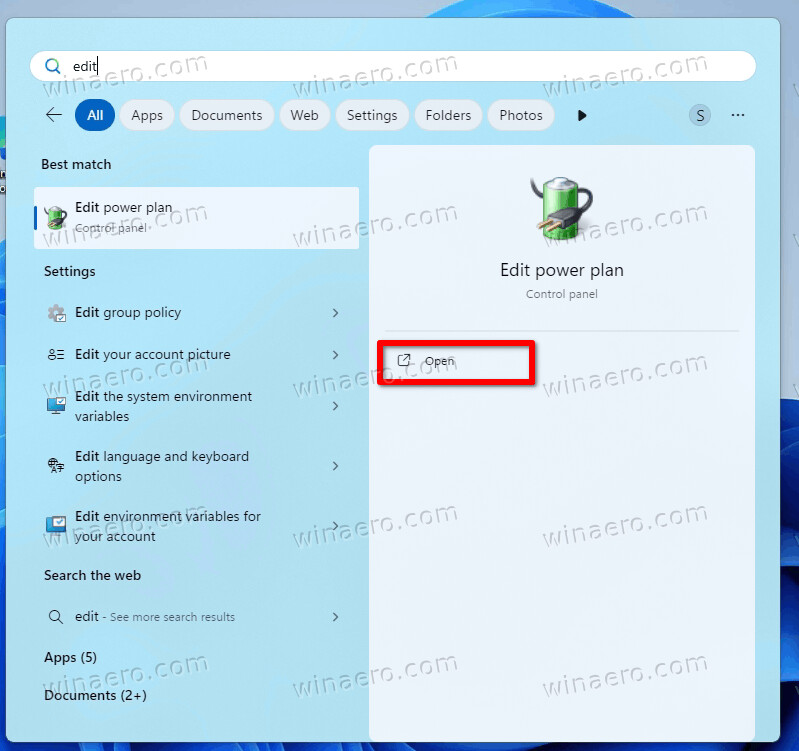
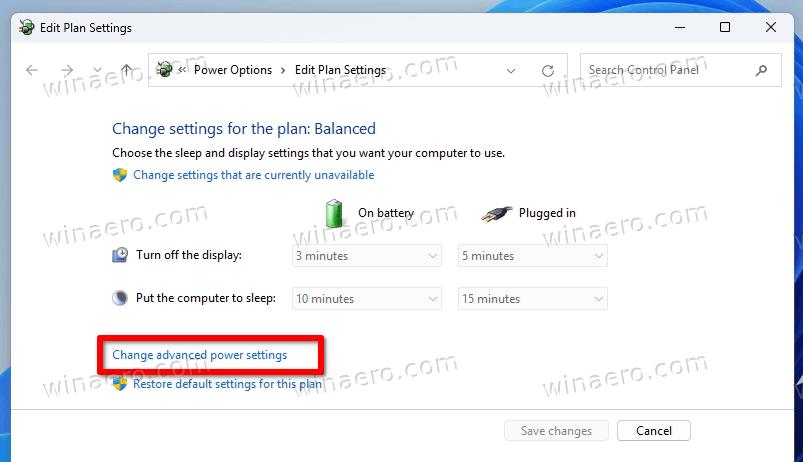
- In the Edit Plan Settings window, click Change Advanced power settings.
- On the next page, click on the link Change settings that are currently unavailable.
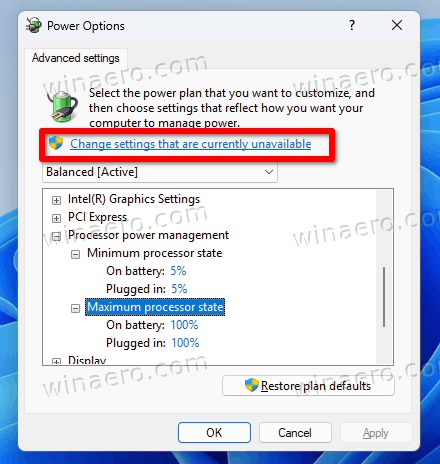
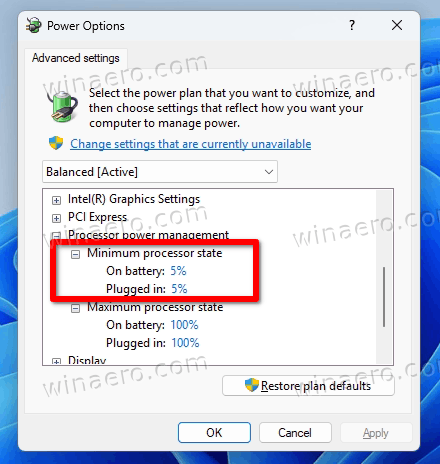
- In the settings tree, expand the Processor power management section.
- Set the Minimum Processor State to 100% to make it work the full power. This will not save you the battery (if present), but will disable CPU throttling.
That's it.
Closing words
Turning off Power Throttling may allow you to achieve greatly improved performance in some scenarios. But the price you pay is increased energy consumption, battery drain, and, in some cases, too active background processes. So the recommended scenario is to disable it only when you really need a performance boost. Keep in mind that the increased computing power always comes with extra heat produced by hardware components. So ensure that the cooling system of your device is capable to handle the extra load.
Support us
Winaero greatly relies on your support. You can help the site keep bringing you interesting and useful content and software by using these options:

Disabling throttling for an app in Powershell doesn’t work for me.
Powershell says I don’t have permission to perform action.
Also, there is no “advanced options” for the app (Google Chrome) in Settings > Apps > Installed Apps.
Now, what?
“Download REG files” does not work, either. It used it, selected to turn off throtling, re-started my computer, and . . . Task Manager/Details shows that Windows has just re-enabled it.
Now, what?