How to change System Cooling Policy for Processor in Windows 10
In Windows 10, you can specify the System cooling policy setting for active or passive cooling. Starting with Windows 8, devices that have thermal management capabilities can expose these capabilities to the operating system with a special driver. A driver that has passive-cooling capabilities implements the PassiveCooling routine. A driver that has active-cooling capabilities implements the ActiveCooling routine. In response to changes in computer usage or environmental conditions, the operating system calls one (or possibly both) of these routines to manage thermal levels dynamically in the hardware platform.
Advertisеment
Active cooling might be more straightforward to implement, but has several potential drawbacks. The addition of active cooling devices (for example, fans) might increase the cost and size of the hardware platform. The power required to run an active cooling device might reduce the time that a battery-powered platform can operate on a battery charge. Fan noise might be undesirable in some applications, and fans require ventilation.
Passive cooling is the only cooling mode available to many mobile devices. In particular, handheld computing platforms are likely to have closed cases and run on batteries. These platforms typically contain devices that can throttle performance to reduce heat generation. These devices include processors, graphics processing units (GPUs), battery chargers, and display backlights.
You can change CPU's system cooling policy in your current power plan. There are two methods you can use.
To change System Cooling Policy for Processor in Windows 10,
- Open advanced power plan settings.
- Expand open the following tree: Processor power management \ System cooling policy.
- For Plugged-in, select Active or Passive in the drop down list for what you want.
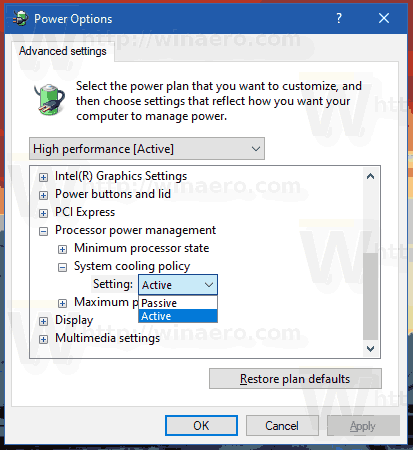
- If your device has a battery, repeat the same for "On battery".
You are done!
Alternatively, you can use the command prompt method which involves the powercfg built-in tool which must be familiar to regular Winaero readers.
Powercfg is a built-in console tool that allows managing power options from the command prompt. Powercfg.exe exists in Windows since Windows XP. Using the options provided by that app it is possible to manage various power settings of the operating system.
Change System Cooling Policy for Processor with powercfg
- Open a new command prompt
- To set "Plugged in" to "Passive", type the following command:
powercfg /SETACVALUEINDEX SCHEME_CURRENT 54533251-82be-4824-96c1-47b60b740d00 94d3a615-a899-4ac5-ae2b-e4d8f634367f 0 - To set "Plugged in" to "Active":
powercfg /SETACVALUEINDEX SCHEME_CURRENT 54533251-82be-4824-96c1-47b60b740d00 94d3a615-a899-4ac5-ae2b-e4d8f634367f 1
- Set "On Battery" to "Passive":
powercfg /SETDCVALUEINDEX SCHEME_CURRENT 54533251-82be-4824-96c1-47b60b740d00 94d3a615-a899-4ac5-ae2b-e4d8f634367f 0 - Set "On Battery" to "Active":
powercfg /SETDCVALUEINDEX SCHEME_CURRENT 54533251-82be-4824-96c1-47b60b740d00 94d3a615-a899-4ac5-ae2b-e4d8f634367f 1
That's it.
Related articles:
- Rename Power Plan in Windows 10
- Enable Ultimate Performance Power Plan in Windows 10 (Any Edition)
- How to Create a Power Plan in Windows 10
- How to Delete a Power Plan in Windows 10
- Restore Default Power Plans in Windows 10
- How to Export and Import a Power Plan in Windows 10
- How to Restore Power Plan Default Settings in Windows 10
- How to open advanced settings of a power plan directly in Windows 10
- Add Switch Power Plan context menu to Desktop in Windows 10
- How to change the power plan from the command line or with a shortcut
- Change Turn Off Display After Time in Windows 10
Support us
Winaero greatly relies on your support. You can help the site keep bringing you interesting and useful content and software by using these options:
