Your Desktop is a special folder which shows your background wallpaper that you have chosen and your files, folders, documents, shortcuts and all such items you have stored. It appears every time you sign in to Windows. In this article, will we learn how to disable the auto arrange desktop icons feature for your user account in Windows 10.
Advertisеment
Tip: In earlier Windows versions, the Desktop had important icons enabled by default - This PC, Network, Control Panel, and your User files folder. They were all visible by default. However, in modern Windows versions, Microsoft made most of these icons hidden. In Windows 10, only the Recycle Bin is present on the Desktop by default. Also, the Windows 10 Start Menu does not have links to these icons either. You can enable classic Desktop icons as follows:
Enable Desktop Icons in Windows 10
By default, Auto Arrange is disabled, so it is possible to place the desktop icons at any position you like on Desktop. If you enable it, all the Desktop icons will automatically be arranged in columns and sorted by their name. Here is how to enable this feature.
To enable icons auto arrange on desktop in Windows 10, do the following.
- Minimize all open windows and apps. You can use Win + D or Win + M shortcut keys. Alternatively, you can right-click the taskbar and select "Show the desktop" from the context menu or left click the far end of the taskbar.
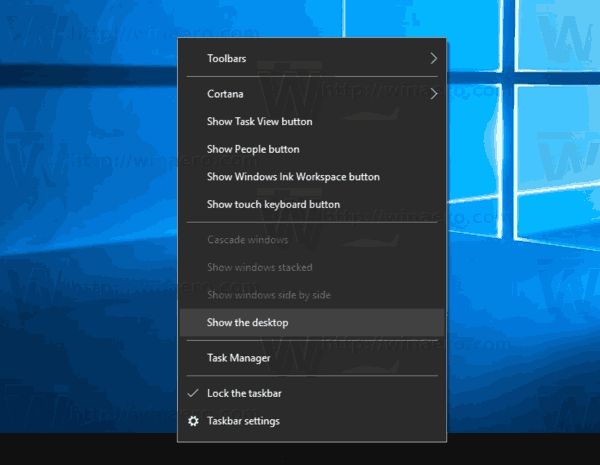 Tip: See What is the difference between Win + D (Show Desktop) and Win + M (Minimize All) keyboard shortcuts in Windows
 - Right click the empty space on your Desktop and select View - Auto arrange icons. This command will toggle the Auto arrange icons feature.
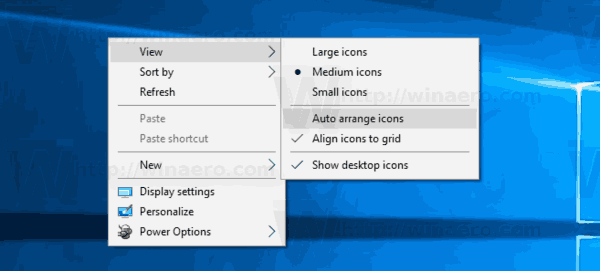 When Auto Arrange is enabled, a check mark will appear next to the context menu command's name.
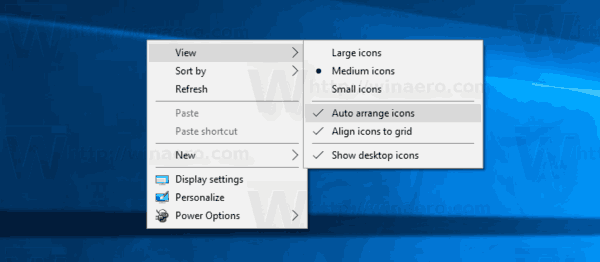
This is pretty simple.
This feature can be configured with a special Registry tweak. Here is how it can be done.
Enable Icons Auto Arrange on Desktop with a Registry tweak
- Open the Registry Editor app.
- Go to the following Registry key.
HKEY_CURRENT_USER\SOFTWARE\Microsoft\Windows\Shell\Bags\1\Desktop
See how to go to a Registry key with one click.
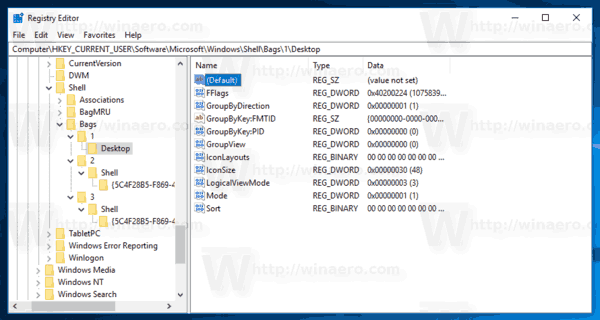
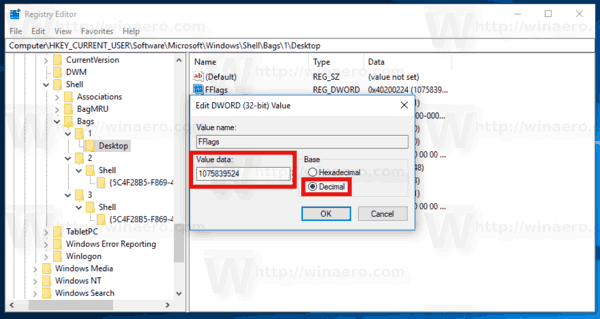
- On the right, modify or create a new 32-Bit DWORD value "FFlags". Set it to one of the following values in decimal.
1075839520 - disable Auto Arrange Icons and Align Icons to Grid
1075839525 - enable Auto Arrange Icons and Align Icons to Grid
1075839521 - enable Auto Arrange Icons and disable Align Icons to Grid
1075839524 - disable Auto Arrange Icons but enable Align Icons to GridNote: Even if you are running 64-bit Windows you must still create a 32-bit DWORD value.
- To make the changes done by the Registry tweak take effect, you need to restart the Explorer shell.
That's it.
Support us
Winaero greatly relies on your support. You can help the site keep bringing you interesting and useful content and software by using these options:

I want the icons on my desktop locked in place as I have chosen to arrange them. When automatically rearranged there is great confusion and loss of time.