Windows 10 comes with a new UI again to change the operating system's power related options. The classic Control Panel is losing its features and probably will be replaced by the Settings app. The Settings app has already got many settings which were exclusively available in the Control Panel. The battery notification area icon in the Windows 10 system tray was also replaced with a new Modern UI. If you want to switch power plans quickly, there is no way yet. So instead, you can add the appropriate options to change the power plan to the desktop context menu. It will provide you the ability to switch the power plan with one click in Windows 10.
Advertisеment
There is a powercfg.exe console utility which exists in Windows since Windows XP. Using the options provided by that app it is possible to manage various power settings of the operating system. For example, the following command can be used to disable hibernation:
powercfg -h off
It is possible to use this command to switch the current power plan. First, we need to get the list of available power profiles. This can be done with the following command:
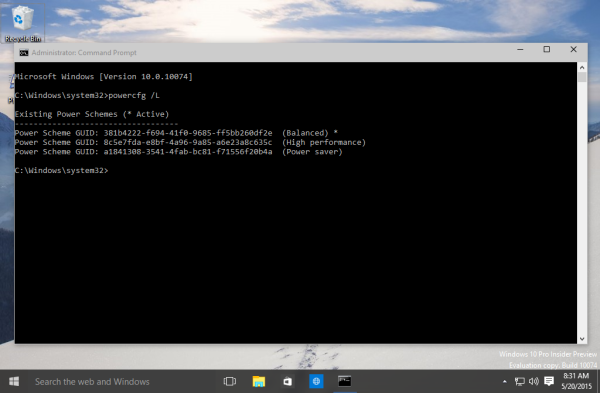
powercfg /L
It produces the following output: In the screenshot above, you can see that every power scheme in Windows has its own GUID. That GUID can be used to switch the power scheme from the command line. For example, to set the high performance power plan, you need to execute the following command:
powercfg /S 8c5e7fda-e8bf-4a96-9a85-a6e23a8c635c
The "/S" option stands for "set active" command and takes the power plan GUID as its argument.
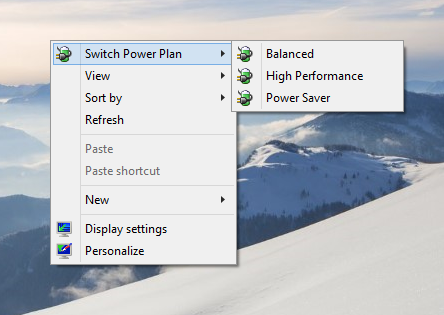
Using this information, it is possible to add the powercfg command into the Desktop context menu in Windows 10 to get the following menu:
You need to merge the following Registry file:
Windows Registry Editor Version 5.00

; Created by https://winaero.com

[HKEY_CLASSES_ROOT\DesktopBackground\Shell\Switch Power Plan]
"Icon"="powercpl.dll"
"MUIVerb"="Switch Power Plan"
"Position"="Top"
"SubCommands"=""

[HKEY_CLASSES_ROOT\DesktopBackground\Shell\Switch Power Plan\Shell\Balanced]
"MUIVerb"="Balanced"
"Icon"="powercpl.dll"

[HKEY_CLASSES_ROOT\DesktopBackground\Shell\Switch Power Plan\Shell\Balanced\Command]
@="powercfg.exe /S 381b4222-f694-41f0-9685-ff5bb260df2e"

[HKEY_CLASSES_ROOT\DesktopBackground\Shell\Switch Power Plan\Shell\High Performance]
"MUIVerb"="High Performance"
"Icon"="powercpl.dll"

[HKEY_CLASSES_ROOT\DesktopBackground\Shell\Switch Power Plan\Shell\High Performance\Command]
@="powercfg.exe /S 8c5e7fda-e8bf-4a96-9a85-a6e23a8c635c"

[HKEY_CLASSES_ROOT\DesktopBackground\Shell\Switch Power Plan\Shell\Power Saver]
"MUIVerb"="Power Saver"
"Icon"="powercpl.dll"

[HKEY_CLASSES_ROOT\DesktopBackground\Shell\Switch Power Plan\Shell\Power Saver\Command]
@="powercfg.exe /S a1841308-3541-4fab-bc81-f71556f20b4a"
So, using this menu you will be able to switch the power plan quickly without opening the Settings app.
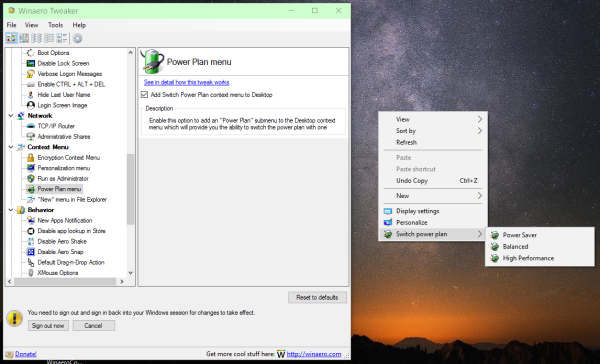
The same can be done using Winaero Tweaker. Go to Context Menu -> Power Plan Menu: Use this option to avoid Registry editing.
Also, I made ready-to-use Registry files so you can apply the tweak without manual Registry editing.
That's it. The Undo file is included to revert the changes to the Desktop context menu.
Support us
Winaero greatly relies on your support. You can help the site keep bringing you interesting and useful content and software by using these options:


Thanks for the tweak! Been searching for a way to quickly switch between power plans in windows 10 and this works perfect!!
Heh, you are welcome
Sweet! Thanks!
Anyone who has a samsung laptop can add this for the “Samsung Optimized” power plan:
[HKEY_CLASSES_ROOT\DesktopBackground\Shell\Switch Power Plan\Shell\Samsung Optimized]
“MUIVerb”=”Samsung Optimized”
“Icon”=”powercpl.dll”
[HKEY_CLASSES_ROOT\DesktopBackground\Shell\Switch Power Plan\Shell\Samsung Optimized\Command]
@=”powercfg.exe /S 928fd5ce-251c-4d6f-862c-f06d22ffdfa4″
Thank you.
Fonctionne aussi sous Windows 7 :-)
Ma version :
Windows Registry Editor Version 5.00
; Created by https://winaero.com ; revised AlainS (mars 2016)
[HKEY_CLASSES_ROOT\DesktopBackground\Shell\Switch Power Plan]
“Icon”=”powercpl.dll”
“MUIVerb”=”Sélection Plan d’alimentation”
“Position”=”Top”
“SubCommands”=””
[HKEY_CLASSES_ROOT\DesktopBackground\Shell\Switch Power Plan\Shell\Power4Gear High Performance]
“MUIVerb”=”Power4Gear High Performance”
“Icon”=”powercpl.dll”
[HKEY_CLASSES_ROOT\DesktopBackground\Shell\Switch Power Plan\Shell\Power4Gear High Performance\Command]
@=”powercfg.exe /S 512a6ac6-efc1-4441-85c9-cccf29b69cd2″
[HKEY_CLASSES_ROOT\DesktopBackground\Shell\Switch Power Plan\Shell\Power4Gear Entertainment]
“MUIVerb”=”Power4Gear Entertainment”
“Icon”=”powercpl.dll”
[HKEY_CLASSES_ROOT\DesktopBackground\Shell\Switch Power Plan\Shell\Power4Gear Entertainment\Command]
@=”powercfg.exe /S 78dfeb2f-e5a8-40dd-80b5-d35c5dd37a26″
[HKEY_CLASSES_ROOT\DesktopBackground\Shell\Switch Power Plan\Shell\Power4Gear Battery Saving]
“MUIVerb”=”Power4Gear Battery Saving”
“Icon”=”powercpl.dll”
[HKEY_CLASSES_ROOT\DesktopBackground\Shell\Switch Power Plan\Shell\Power4Gear Battery Saving\Command]
@=”powercfg.exe /S df011ed9-9131-49b9-8090-46963cfb65ce”
I wanted to thank you for this so cool feature but didn’t find a thanks or like button so i just commented here.
nice work
Hi Sergej,
Can you add to your Reg code a visual hint, like a different color or style icon, for a Power Plan currently active?
Unfortunately, this is not possible.
I thinks its easy to do when using a command sequence instead of one command, or starting a batch file from command in Registry.
Here’s one possible solution allowing to change icon for Active plan in Context Menu:
https://www.dostips.com/forum/viewtopic.php?p=56788#p56788