Windows 10 includes a new Mail app which is simplistic and allows you to send and receive e-mail from multiple accounts. Recently, Microsoft added Ink support to the app, so it now allows you to insert drawings in your letters.
Advertisеment
Windows 10 comes with a Universal app, "Mail". The app is intended to provide basic email functionality to Windows 10 users. It supports multiple accounts, comes with preset settings to quickly add mail accounts from popular services, and includes all the essential functionality to read, send and receive emails.
Tip: One of the features of the Mail app in Windows 10 is the ability to customize the app's background image. See the following article:
Change Mail App Background to Custom Color in Windows 10
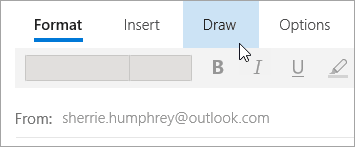
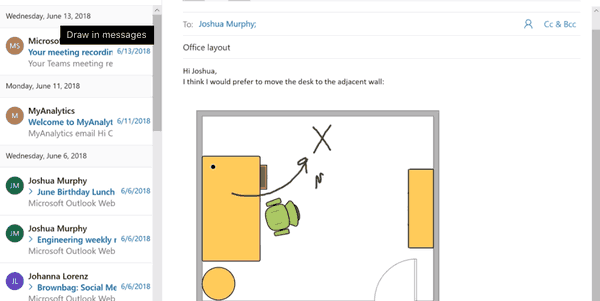
Mail for Windows 10 now allows taking notes on pictures or adding a drawing using a pen or your finger. Go to the Draw tab in the ribbon to get started.
- Insert a Drawing Canvas from the ribbon anywhere in your email to add a sketch.
- Annotate any picture by drawing on or next to it.
- Use ink effects like galaxy, rainbow, and rose gold colored pens.
This feature works best with any pen that supports Windows Ink. If your device has no pen, you can use the Draw with Touch feature that can be found on the Draw tab of the ribbon to start using ink with your finger.
To add sketches to messages in Mail in Windows 10, do the following.
- Open the Mail app. You can find it in the Start menu. Tip: Save your time and use the alphabet navigation to quickly get to the Mail app.
- Create a new letter.
- At the top of the window, select the Draw tab.

- Put the cursor anywhere inside the message body.
- Select Drawing Canvas.

- Start writing or sketching inside the Drawing Canvas.
Also, you can take notes on images. Here is how it can be done.
Take Notes on Images with Windows 10 Mail
- In the Mail app, create a new message or reply to a message.
- Select the Insert tab and insert a picture into the message.
- Start writing or sketching on top of or next to any picture.

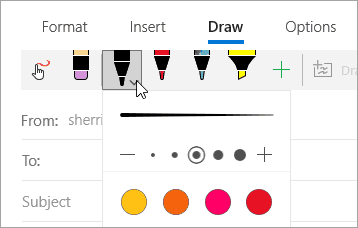
Tip: It is possible to customize the Pen thickness and color. On the Draw tab of the ribbon, click on the green + button, select Pen or Highlighter, then select the desired color and thickness from the drop down list. See the screenshot.

That's it.
Related articles.
- Pin Email Accounts to Start Menu in Windows 10
- Change Spacing Density in Windows 10 Mail app
- Disable Auto-Open Next Item in Windows 10 Mail
- Disable Mark as Read in Windows 10 Mail
- How to Disable Message Grouping in Windows 10 Mail
Source: Microsoft
Support us
Winaero greatly relies on your support. You can help the site keep bringing you interesting and useful content and software by using these options:
