How to System Unattended Sleep Timeout to Power Options in Windows 10
Windows 10 comes with a hidden power option called System Unattended Sleep Timeout. It specifies a period of time before the system automatically enters sleep after waking from sleep in an unattended state. Here's how to make it visible and accessible from Windows 10 Power Options.
Advertisеment
It is a well known fact that various hardware can wake your Windows 10 PC from sleep. Especially common are your Network (LAN) and Wireless LAN adapters. Human interface devices like mouse, keyboard, fingerprint and some Bluetooth devices can also wake your PC.
If the system wakes from sleep because of a timed event or a wake on LAN (WoL) event, the sleep unattended idle timeout value will be used. If you woke up your PC manually, the sleep idle timeout value will be used instead.
The option System Unattended Sleep Timeout is available in Windows Vista SP1 and later versions of Windows. Its value is the number of seconds starting from 0 (Never idle to sleep).
By default, it is hidden in Power Options, so you can enable it as described below. You can add or remove it from Power Options using either a Registry tweak or powercfg. In this article, we will review both methods.
To System Unattended Sleep Timeout to Power Options in Windows 10,
- Open an elevated command prompt.
- Type or copy-paste the following command:
powercfg -attributes SUB_SLEEP 7bc4a2f9-d8fc-4469-b07b-33eb785aaca0 -ATTRIB_HIDE.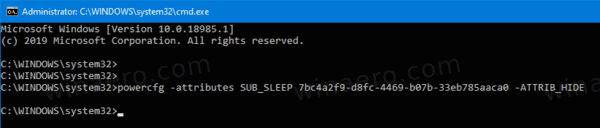
- The System Unattended Sleep Timeout option is now available in the Power options applet.
- To undo the change, use the following command:
powercfg -attributes SUB_SLEEP 7bc4a2f9-d8fc-4469-b07b-33eb785aaca0 +ATTRIB_HIDE.
You are done. On the following screenshot, the System Unattended Sleep Timeout option is added to Power Options.
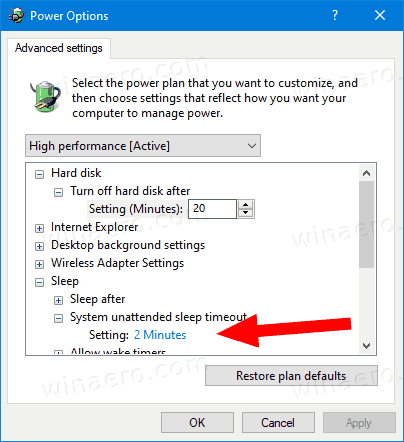
If you have a laptop, you will be able to set this parameter individually when on battery and when plugged in.
Alternatively, you can apply a Registry tweak.
Add System Unattended Sleep Timeout to Power Options in Registry
- Open Registry Editor.
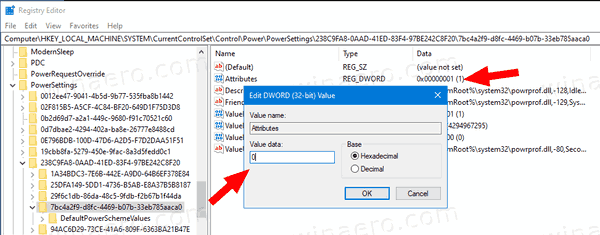
- Go to the following key:
HKEY_LOCAL_MACHINE\SYSTEM\CurrentControlSet\Control\Power\PowerSettings\238C9FA8-0AAD-41ED-83F4-97BE242C8F20\7bc4a2f9-d8fc-4469-b07b-33eb785aaca0. Tip: You can access any desired Registry key with one click. - In the right pane, change the Attributes 32-bit DWORD value to 0 to add it. See the following screenshot:
- Once you make these changes, the setting will appear in Power Options.
- A value data of 1 will remove the option.
You are done!
Tip: you can open advanced settings of a power plan directly in Windows 10.
To save your time, you can download these ready-to-use Registry files:
That's it.
Related articles:
- Add Allow Sleep with Remote Opens Power Option in Windows 10
- Create Sleep Study Report in Windows 10
- How to Find Sleep States Available in Windows 10
- Disable Sleep Password in Windows 10
- Create Shutdown, Restart, Hibernate and Sleep Shortcuts in Windows 10
- Find which hardware can wake up Windows 10
- How to prevent Windows 10 waking from sleep
Support us
Winaero greatly relies on your support. You can help the site keep bringing you interesting and useful content and software by using these options:

Cool! Our PC in the living room is running win10 home and the sleep timer is set to 2 hours because, it doubles as our media center.
Often it gets woken in the middle of the night, I’m sure by M$ (It’s my unmodified base reference system) and I find it on when I wake up.
I’ll be putting this little trick to work asap ;)