How to Add or Remove Primary NVMe Idle Timeout from Power Options in Windows 10
Modern PCs include NVMe devices to store your data instead of the classic HDD. NVMe stands for Non-Volatile Memory Express, which is often implemented as NAND flash memory that comes in several physical form factors, including solid-state drives (SSDs), PCI Express (PCIe) add-in cards, M.2 cards, and other forms. The technology allows parallel data reading and writing, thus giving incredible speeds.
Advertisеment
The default values for this option are connected to power schemes available in Windows 10.
| Power Scheme | On battery | Plugged in |
|---|---|---|
| Balanced | 100 milliseconds | 200 milliseconds |
| High Performance | 200 milliseconds | 200 milliseconds |
| Power Saver | 100 milliseconds | 100 milliseconds |
| Ultimate Performance | 100 milliseconds | 200 milliseconds |
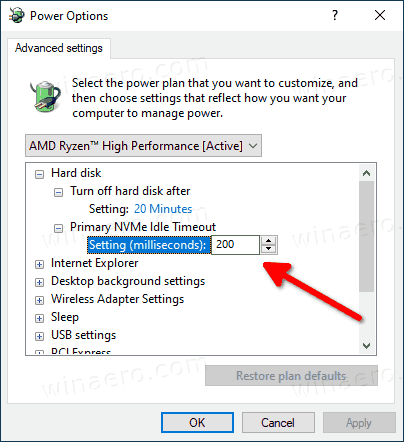
The Primary NVMe Idle Timeout setting is hidden and not visible by default, but you can easily make it available in Power Options of Windows 10. Here's how it can be done.
To Add Primary NVMe Idle Timeout to Power Options in Windows 10,
- Open an elevated command prompt.
- Type or copy-paste the following command:
powercfg -attributes SUB_DISK D639518A-E56D-4345-8AF2-B9F32FB26109 -ATTRIB_HIDE.
- The option is now available in the Power options applet.
You are done. The option will be available instantly, no reboot required.
To Add Primary NVMe Idle Timeout to Power Options in Windows 10,
- Open an elevated command prompt.
- Type or copy-paste the following command:
powercfg -attributes SUB_DISK D639518A-E56D-4345-8AF2-B9F32FB26109 +ATTRIB_HIDE.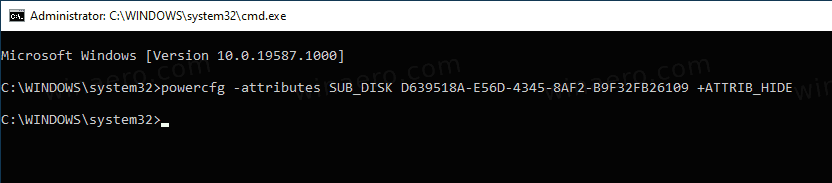
- The option is now hidden in the Power options applet.
If you have a laptop, you will be able to set this parameter individually when on battery and when plugged in.
Tip: you can open advanced settings of a power plan directly in Windows 10.
Alternatively, you can apply a Registry tweak.
Add Networking Connectivity in Standby to Open Options in Registry
- Open Registry Editor.
- Go to the following key:
HKEY_LOCAL_MACHINE\SYSTEM\CurrentControlSet\Control\Power\PowerSettings\0012ee47-9041-4b5d-9b77-535fba8b1442\d639518a-e56d-4345-8af2-b9f32fb26109. Tip: You can access any desired Registry key with one click. - In the right pane, change the Attributes 32-bit DWORD value to 0 to add it. See the following screenshot:
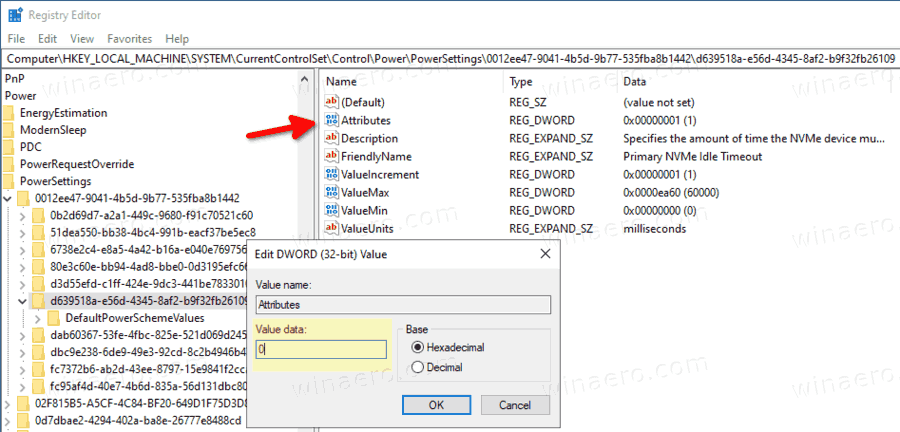
- Once you make these changes, the setting will appear in Power Options.
- A value data of 1 will remove the option.
You are done!
To save your time, you can download these ready-to-use Registry files:
That's it.
Related articles:
- Add Networking Connectivity in Standby to Power Options in Windows 10
- Add System Unattended Sleep Timeout to Power Options in Windows 10
- Add Allow Sleep with Remote Opens Power Option in Windows 10
- Create Sleep Study Report in Windows 10
- How to Find Sleep States Available in Windows 10
- Disable Sleep Password in Windows 10
- Create Shutdown, Restart, Hibernate and Sleep Shortcuts in Windows 10
- Find which hardware can wake up Windows 10
- How to prevent Windows 10 waking from sleep
Support us
Winaero greatly relies on your support. You can help the site keep bringing you interesting and useful content and software by using these options:
