How to Update from WSL to WSL 2 in Windows 10
Microsoft has ported WSL 2 to Windows 10 version 1909, and version 1903. Initially, it was exclusively available in Windows 10 version 2004. Now users who have installed two older releases of the OS can upgrade Windows Subsystem for Linux to the latest generation and get benefits from using it.
WSL 2 is a new version of the architecture that powers the Windows Subsystem for Linux to run ELF64 Linux binaries on Windows. This new architecture changes how these Linux binaries interact with Windows and your computer’s hardware, but still provides the same user experience as in WSL 1 (the current widely available version).
Advertisеment
It ships a real Linux kernel with Windows that will make full system call compatibility possible. This is the first time a Linux kernel is shipped with Windows. WSL 2 uses the latest virtualization technology to run its Linux kernel inside of a lightweight utility virtual machine (VM). In order to make it available for more Windows 10 users, Microsoft has made it available for two previous releases of the OS.
All its key features will be available, including
- File system performance now on par with Mac and Linux speeds
- Improved System Call Support for all Linux applications notably: Docker, FUSE, rsync, etc.
- Full Linux kernel
- Docker Desktop has added support to use WSL 2 as its engine
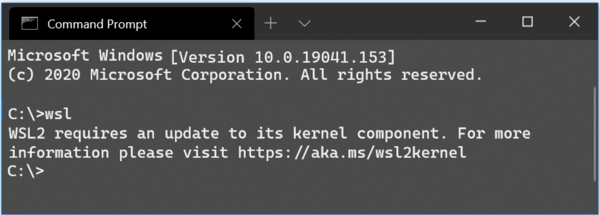
Builds 18362.1049 and 18363.1049 or higher are required to get WSL2 working. They are released with KB4571748.
Updating from WSL to WSL 2 will require you to perform these steps
- Enable the Windows Subsystem for Linux
- Enable the Virtual Machine Platform optional feature
- Download the Linux kernel update package
- Set WSL 2 as your default version
- Install a Linux distro inside it.
To update from WSL to WSL 2 in Windows 10,
- Open PowerShell as Administrator.
- To install WSL, run this command:
dism.exe /online /enable-feature /featurename:Microsoft-Windows-Subsystem-Linux /all /norestart. - Enable the Virtual Machine Platform optional feature by running the following command:
dism.exe /online /enable-feature /featurename:VirtualMachinePlatform /all /norestart - Restart Windows 10.
- Download the latest Linux kernel update package and install it: WSL2 Linux kernel update package for x64 machines
- Set WSL 2 as your default version. Open PowerShell as Administrator and run:
wsl --set-default-version 2. - You can now install WSL 2 distros from the Microsoft Store (see the note).
You are done!
Note: Some of the legacy WSL distros are not designed to run under WSL 2. You need to uninstall them manually. Here is the list of WSL 2 -compatible distros.
- Ubuntu
- Ubuntu 16.04 LTS
- Ubuntu 18.04 LTS
- Ubuntu 20.04 LTS
- openSUSE Leap 15.1
- SUSE Linux Enterprise Server 12 SP5
- SUSE Linux Enterprise Server 15 SP1
- Kali Linux
- Debian GNU/Linux
- Fedora Remix for WSL
- Pengwin
- Pengwin Enterprise
- Alpine WSL
Also, you try to convert a classic WSL distro to the newer platform as described in the post Install Windows Subsystem for Linux 2 in Windows 10. In short, run the command wsl --set-version <distro_name> 2 in the elevated PowerShell. Subsitute the distro name with the actual distro name, e.g. Ubuntu: wsl --set-version Ubuntu 2.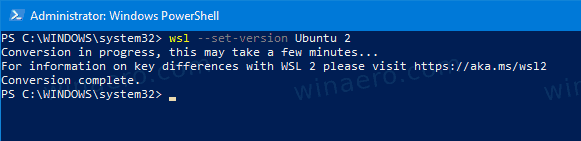 This will convert the specific distro to WSL 2.
The update from WSL 1 to WSL 2 may take several minutes to complete depending on the size of your targeted distribution.
Support us
Winaero greatly relies on your support. You can help the site keep bringing you interesting and useful content and software by using these options:
