There are multiple ways to change the display to turn off after a timeout in Windows 11. The timeout specifies how long your computer should be inactive before its monitor turns off automatically.
Advertisеment
Windows 11 includes the option to set a screen timeout period for when the PC remains inactive without user interaction, causing all connected displays to automatically power off.
ℹ️ When the display turns off, simply move the mouse, touch the touchpad or touchscreen, click a mouse or touchpad button, or press a key to reactivate the display.
The default screen timeout duration is 5 minutes when on battery power and 15 minutes when plugged in.
You actually have several options available to change the Turn Off Display After time for your computer stays idle before the connected display(s) goes into auto-off mode. You can make these adjustments using either Settings, the classic Control Panel, or the 'powercfg' tool. Let's review each of the methods.
Change Turn Off Display After Timeout in Settings
- Press Win + I to open the Settings app (you can use any other method).
- Click the System item in the left pane, and then click Power & battery on the right. Note: On desktop PCs, it may say just Power without battery.
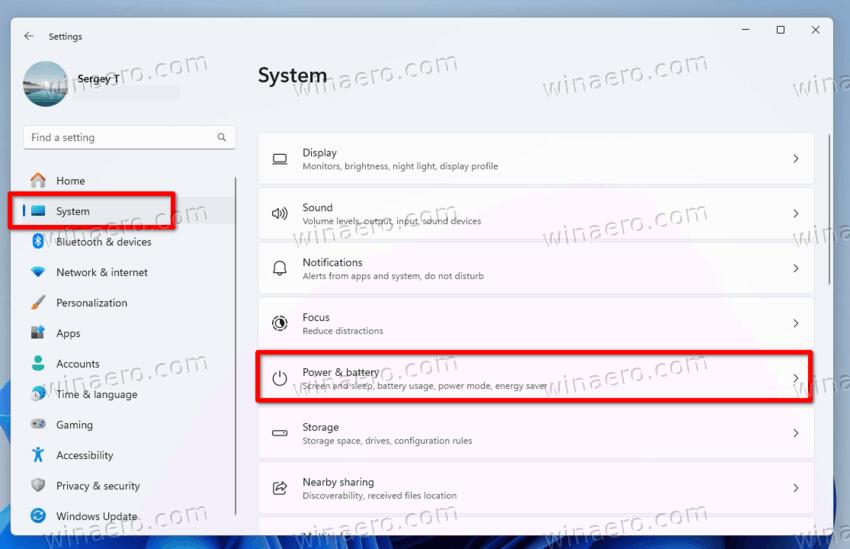
- On the next page, select Screen and sleep , i.e. expand it.
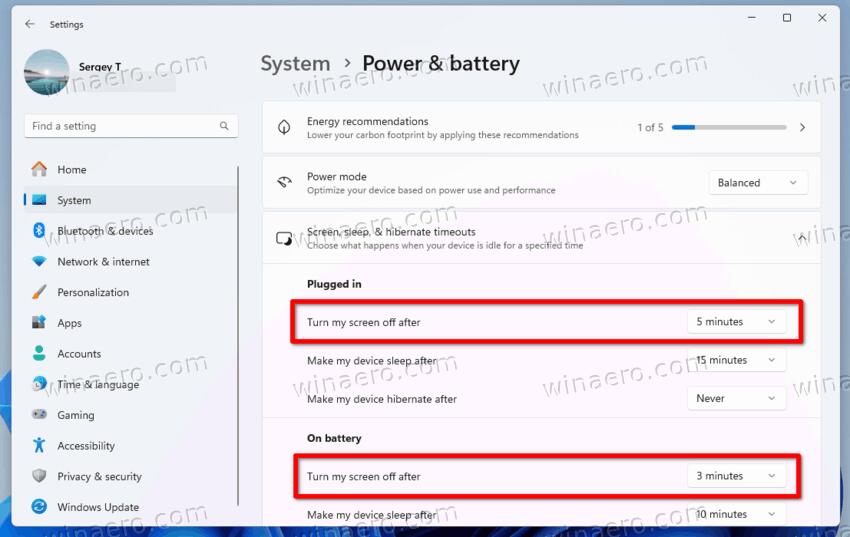
- Finally, select the desired value from Never to minutes or hours for the screen timeout you want. Specify it for both On battery power (where available) and Plugged in, in the Turn off my screen after drop-down menu.
- You can now close the Settings app.
You have successfully changed the timeout for the turn off display after option.
💡Tip: You can use the ms-settings:powersleep command to open the "Power and battery" Settings page faster.
Change Screen Timeout to Turn Off Display in Control Panel
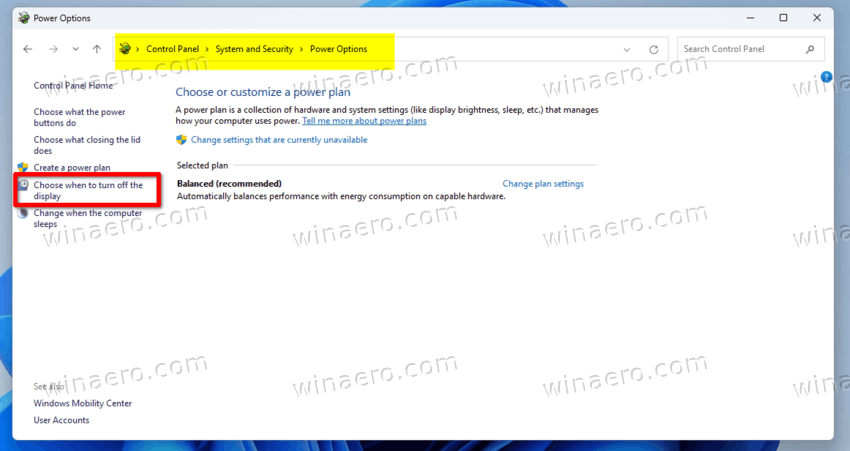
- Press Win + R and type control in the Run box to open the classic Control Panel.
- Navigate to Control Panel\System and Security\Power Options and click n the Choose when to turn off the display link on the left.
- Click on the link Change settings that are currently unavailable.
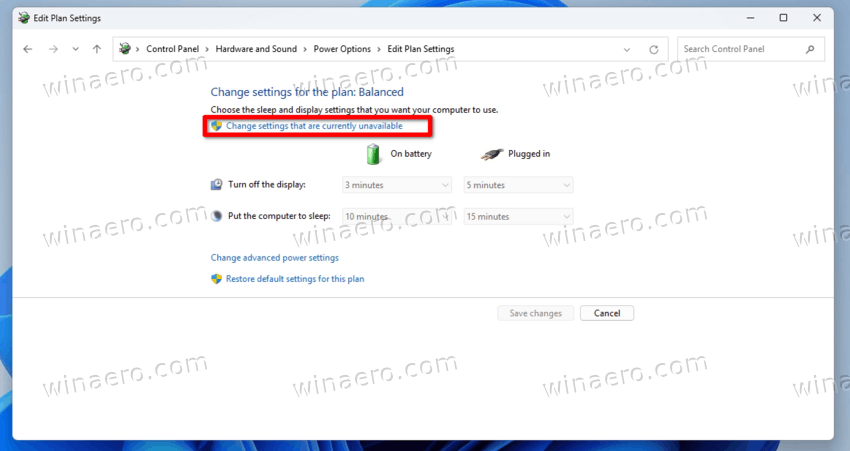
- Select a new value from Never to minutes or hours for the Turn off the display option. It has dedicated drop-down lists for battery and plugged-in modes.
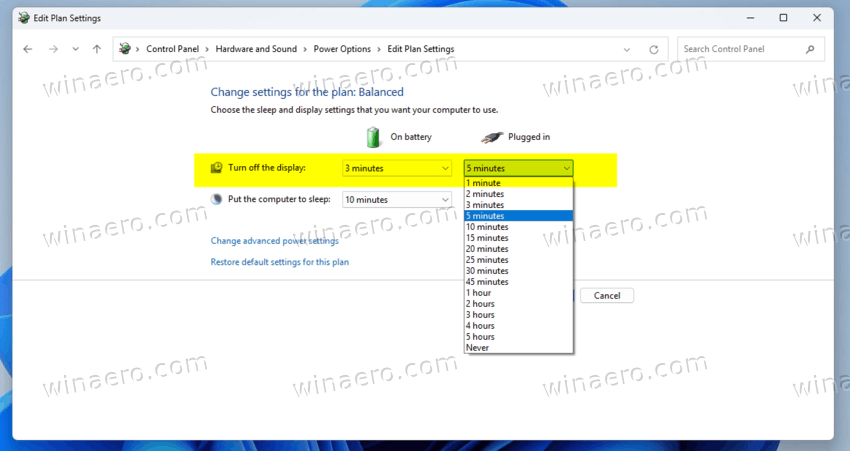
- Click on the Save changes button to apply the change, and you are finished.
This is how you change the display turn off timeout in the classic Control Panel.
Almost similarly, you can adjust the values in the advanced power plan settings. It is a set of options available in the legacy Control Panel and not yet available in the Settings app of Windows 11. Here are the steps.
The Advanced Power Plan Settings Method
- Press Win + R to open the Run dialog and type or copy-paste the following into the Run dialog:
control.exe powercfg.cpl,,3.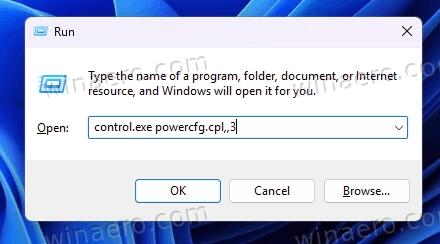
- Click on the link Change settings that are currently unavailable.
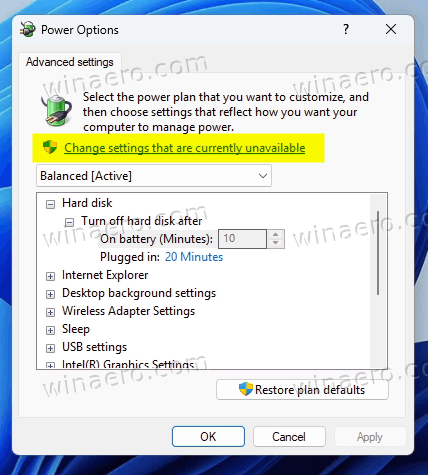
- In the Power options window that opens, expand open the Display section and then the Turn off display after section.
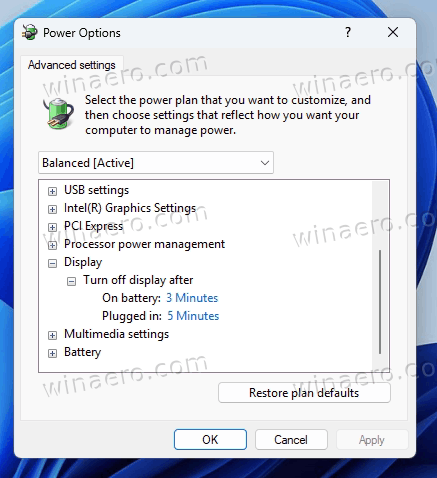
- Finally, specify a new value from Never to minutes or hours for both the On battery and Plugged-in options.
- You can now close the Power Options window.
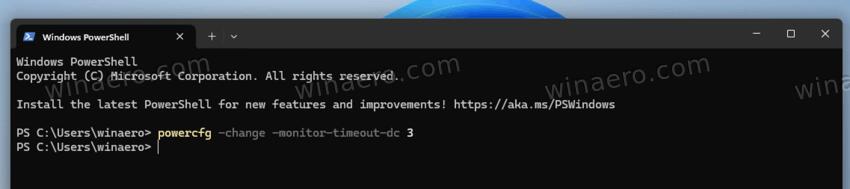
Finally, the last method involves the powercfg command, that is the officially supported method to configure power options in Windows 11.
Set the Display Turn Off After Time with Powercfg
- Open Terminal (Win + X > Terminal) to the Command Prompt or PowerShell tab.
- Type the following command to set the display turn off timeout for when on battery:
powercfg -change -monitor-timeout-dc <minutes>.-
 Alternatively, use this command:
powercfg /SETDCVALUEINDEX SCHEME_CURRENT 7516b95f-f776-4464-8c53-06167f40cc99 3c0bc021-c8a8-4e07-a973-6b14cbcb2b7e <seconds> - Substitute
<minutes>/<seconds>with actual values you need to set.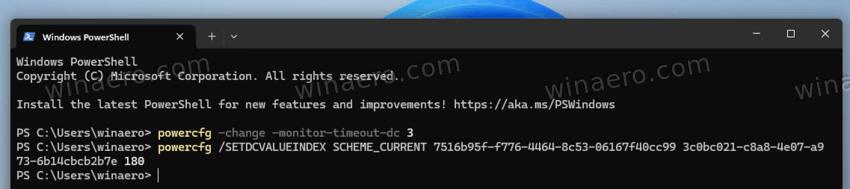
-
- To set the monitor turn off delay for when plugged in, use the following commands:
powercfg -change -monitor-timeout-ac <minutes>.- The alternative command is
powercfg /SETACVALUEINDEX SCHEME_CURRENT 7516b95f-f776-4464-8c53-06167f40cc99 3c0bc021-c8a8-4e07-a973-6b14cbcb2b7e <seconds>. - Replace <minutes> or <seconds> with with many time you the display should turn off after.
- The alternative command is
- Finally, you can close the Terminal console.
That's it.
Support us
Winaero greatly relies on your support. You can help the site keep bringing you interesting and useful content and software by using these options:

Changing laptop display cannot be done by ourselves. It requires experience. If opened then it will be difficult to put it back and that is where the problem begins so it is better to go through laptop service center.