Here is how to limit Windows Update Bandwidth in Windows 10.
As you may already know, it is possible to limit the Windows Update bandwidth and prevent Windows 10 from using all of your Internet connection to download huge updates. The option is available starting with Windows 10 Fall Creators Update. Windows 10 version 1803 "Redstone 4" features even more options to configure the bandwidth limit.
Advertisеment
As you may already know, there is a way to defer upgrades in Windows 10. The user can defer feature updates to prevent a new build from being installed, or postpone quality updates. There is also an option to switch the update branch from "Current Branch" to "Current Branch for Business" which receives updates much later. However, deferring updates does not change the fact that the updates are quite large and have to be installed sooner or later.
Windows 10 Fall Creators Update, known as version 1709, has been released with the ability to limit the bandwidth available for Windows Update. So, when updating, Windows 10 will not kill your Internet speed, and you will be able to browse web sites, stream videos and do everything that requires bandwidth. This option will be much appreciated by users with a slow Internet connection.
How Windows Update works
Windows Update has always used Background Intelligent Transfer Service (BITS) to download updates. BITS uses idle bandwidth to get them, so in theory, if you are actively using your internet for something else, the algorithm for downloading of updates should sense this and back off or lower its bandwidth consumption. However, due to the size and frequency of Windows 10 updates, this does not seem to actually work as well on the latest OS, compared to previous releases of Windows. Many users have been complaining that Windows 10 updates disrupt their online activities too much. The newly added option to control the bandwidth should appease some of these complaints.
If you are running Windows 10 build 17035 and above, you can set the background and foreground Windows Update limit separately. Tip: See how to find which build, version and edition of Windows 10 you have installed. Foreground downloads are downloads that you have started manually, for example by clicking on "Check for updates" or by starting the download of an app from the Microsoft Store. This post will show you how to limit the foreground update bandwidth in Windows 10.
To Limit Windows Update Bandwidth in Windows 10
- Open the Settings app.

- Go to Update & security -> Windows Update.
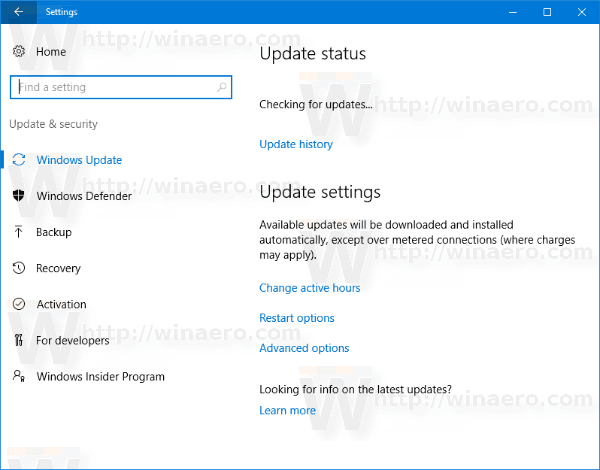
- On the right, click Advanced options.

- On the next page, click the link Delivery Optimization at the bottom. See the screenshot below:
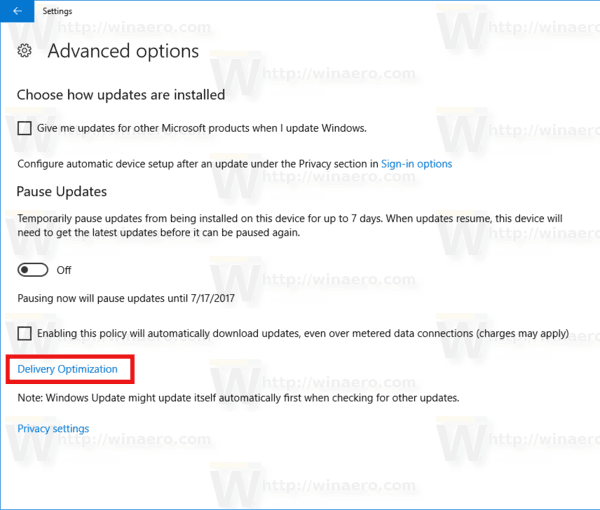
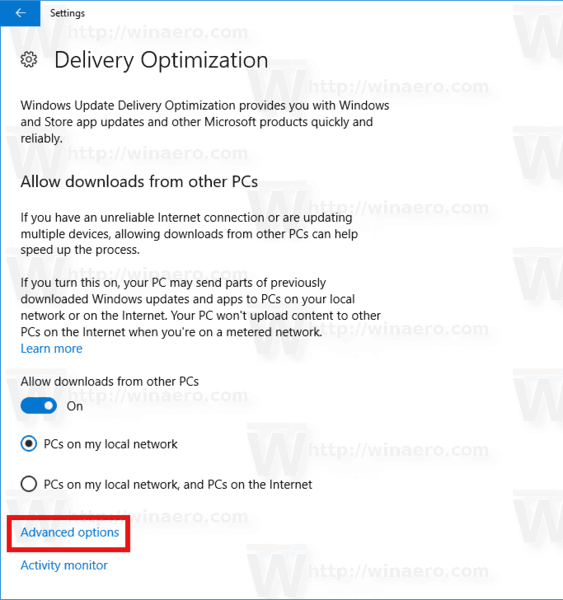
- At the bottom of the Delivery Optimization page, click the link Advanced options.
- On the page Advanced options, configure the options provided under Download settings. You can set the following options:
Limit how much bandwidth is used for downloading updates in the background Limit how much bandwidth is used for downloading updates in the foreground Limit how much bandwidth is used for uploaded updates to other PCs on the Internet Monthly upload limit
See the screenshot below.

You are done.
Additionally, you can view the traffic stats for Windows Update using the built-in Activity Monitor option.
View Traffic Stats for Windows Update with Activity Monitor
In Settings, go to Update & security > Windows Update > Advanced options > Delivery Optimization. There you will the Activity monitor link. See the following screenshot.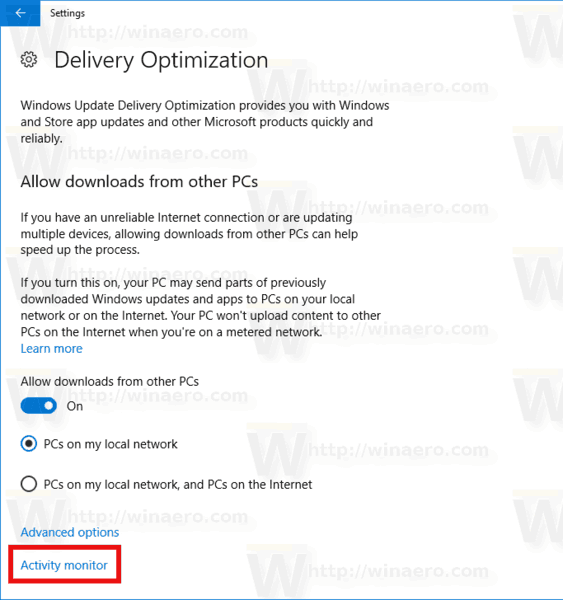 After you click on that link, you will see the following page:
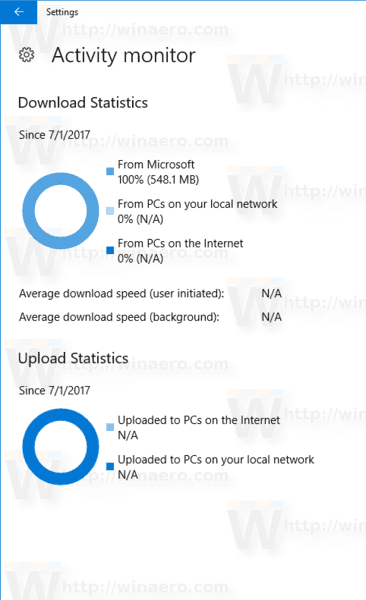
There, you can see a nice view of your traffic stats related to Windows Update.
Also, you can configure this feature with a Registry tweak.
Limit Windows Update Bandwidth in Registry
You need to sign in as Administrator before proceeding.
- Open the Registry Editor app.
- Go to the following Registry key.
HKEY_USERS\S-1-5-20\SOFTWARE\Microsoft\Windows\CurrentVersion\DeliveryOptimization\Settings
See how to go to a Registry key with one click.
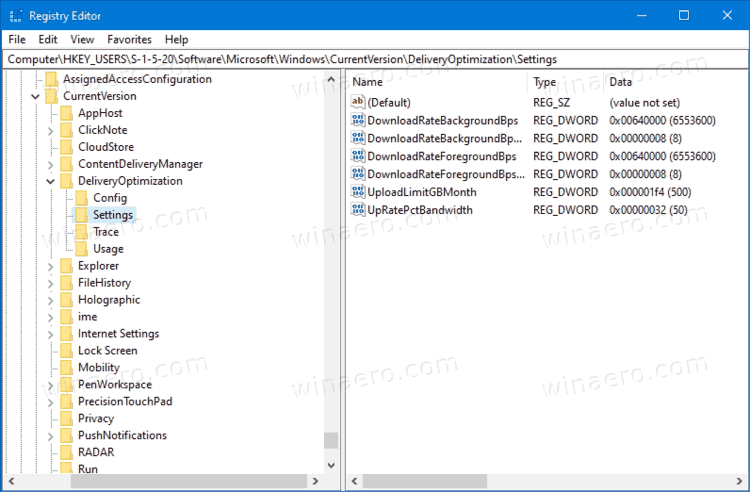
- On the right, modify or create a new 32-bit DWORD value DownloadRateBackgroundPct.
- Set its value data to a number between 5 and 100 for the percentage of bandwidth you want to limit the background bandwidth of Windows Update to.
- On the right, modify or create a new 32-bit DWORD value DownloadRateForegroundPct.
- Set its value data to a number between 5 and 100 for the percentage of bandwidth you want to limit the foreground bandwidth of Windows Update to.
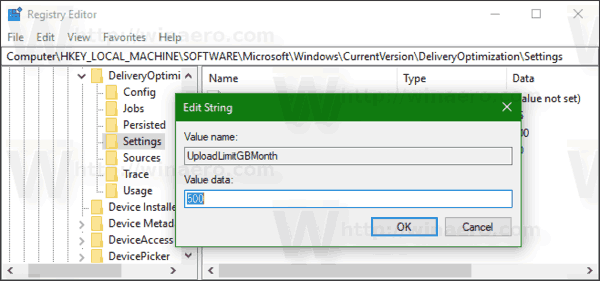
- To set the limit for the bandwidth used for updates uploaded to other PCs, modify or create a 32-bit DWORD value UpRatePctBandwidth. Again, set its value to a number between 5 and 100.
- To change the monthly upload limit, modify the 32-bit DWORD value UploadLimitGBMonth. Enter a number between 5 and 500 to set the amount of GBs as the monthly upload limit.
- Restart Windows 10.
You are done!
Note that in the steps above you must create 32-bit DWORD values even if you run a 64-bit Windows 10.
That's it.
Support us
Winaero greatly relies on your support. You can help the site keep bringing you interesting and useful content and software by using these options:
