TRIM is a special ATA command which was developed to keep the performance of your SSD drives at peak performance for the duration of your SSD's life. TRIM tells the SSD controller to erase invalid and not used data blocks from the storage in advance, so when a write operation happens, it finishes faster because no time is spent in erase operations. Without TRIM automatically working at the system level, your SSD performance will degrade over time unless you manually use a tool which can send the TRIM command to it. So it's always a good idea to check if TRIM is correctly enabled for your SSD in Windows 10 and enable it, if it is disabled.
Advertisеment
So, thanks to TRIM, storage blocks which contain the deleted data will be wiped and the next time the same area is written to, the write operation will be performed faster.
How to see if TRIM is enabled for your SSD in Windows 10
To see if TRIM is enabled for your SSD in Windows 10, you need to run a single console command in an elevated command prompt. Do it as follows.
- Open an elevated command prompt instance.

- Type or copy-paste the following command:
fsutil behavior query disabledeletenotify
- In the output, take a look at the DisableDeleteNotify value. If it is 0 (zero), then TRIM is enabled by the operating system. If it is disabled, then the value of DisableDeleteNotify will be 1.

In the following example, TRIM is enabled for the disk drive where Windows 10 is installed: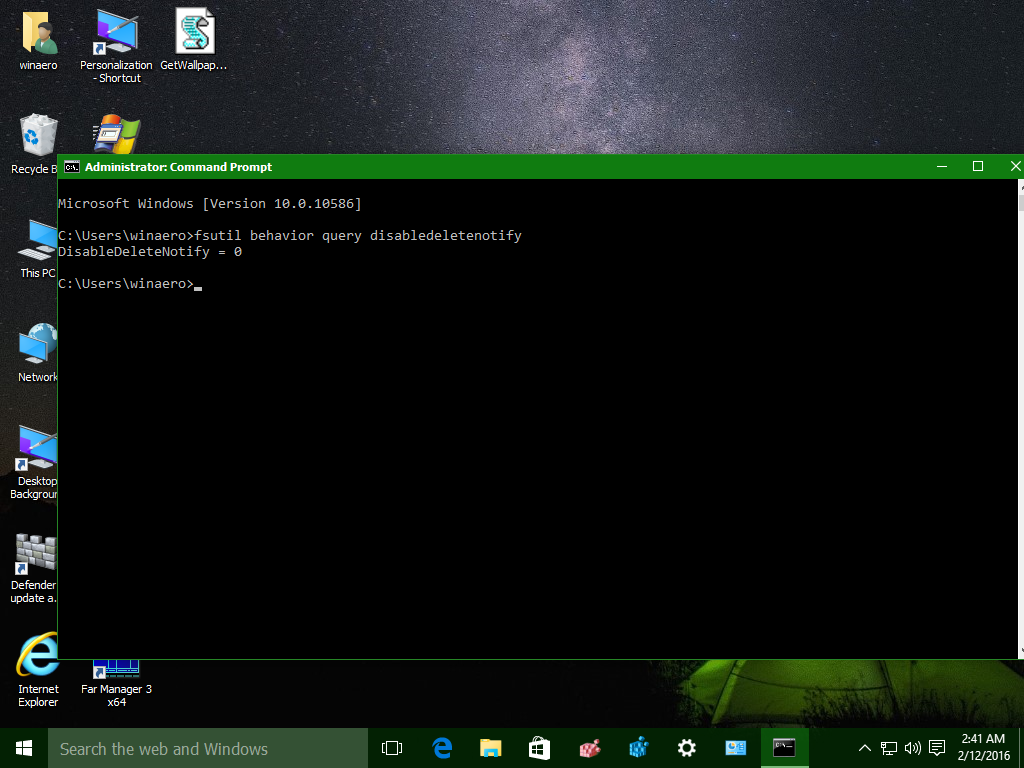
How to enable TRIM for SSD in Windows 10
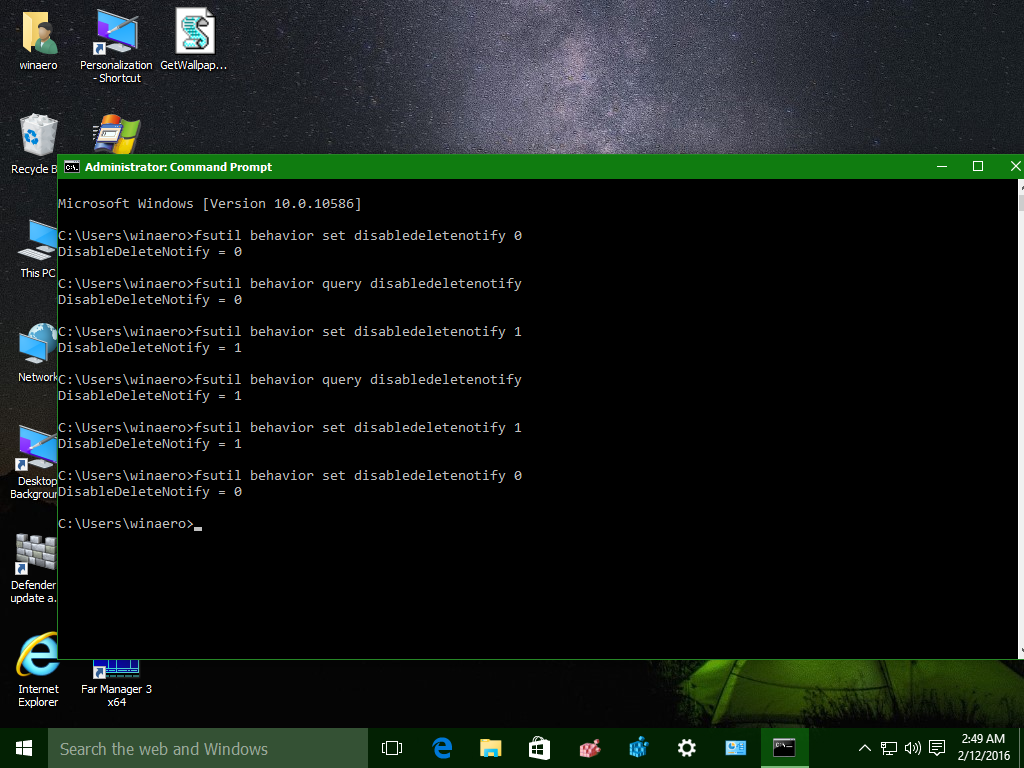
To enable TRIM for SSD in Windows 10, you need to do the following:
- Open an elevated command prompt instance.
- Type or copy-paste the following command:
fsutil behavior set disabledeletenotify 0
This will enable TRIM support for the solid state drive.
- If you decide to disable it in the future, you can do it with the following command:
fsutil behavior set disabledeletenotify 1
 Everything above is also applicable to Windows 8 and Windows 7.
That's it. You are done. Now, check your TRIM status and tell us which SSD you have and which TRIM status it has in Windows 10.
Support us
Winaero greatly relies on your support. You can help the site keep bringing you interesting and useful content and software by using these options:

Hi Sergey Tkachenko,
I have DisableDeleteNotify = 0 on the SSD that I have Win 10 installed. But I have another SSD for games..how can I check that DisableDeleteNotify is enabled as well for that SSD?
Can you show me your output?
The command should report the TRIM status for all drives.
The output is DisableDeleteNotify = 0. I just wanted to make sure if there is a way to check if other SSDs installed have it enabled as well.
DisableDeleteNotify corresponds to a single key in the Registry of the same name in HKEY_LOCAL_MACHINE\SYSTEM\CurrentControlSet\Control\FileSystem – this key doesn’t appear to make any distinction between drives.
If you really want to test, try trimcheck from https://github.com/CyberShadow/trimcheck#download. Run it from the non-system SSD, run Defragment and Optimise Drives (dfrgui.exe), optimise that drive and see if trimcheck reports success. Running dfrgui manually shouldn’t be a problem; as far as I know, Windows only TRIMs on a schedule.
when trying to enable TRIM on win10 with [too long text is removed]
by the way thanks for very useful and good tips.
Please use the following command:
fsutil behavior set disabledeletenotify 0I am very sorry for that typo!
besides TRIM, are there any other commands for SSD drives?
thanx
Interesting. I ran the command prompt to see if Trim was enabled and the results were “=0 (DISABLED)”. I followed up with the command prompt to include “=1” and the result came back “=1 (ENABLED). This is the opposite of your instructions. I am running Windows 10, latest updates as of 3/3/2019. I assume the words enabled and disabled are real-time results. What could be wrong?