Here's how you can install Windows 11 with a Local Account and omit the Microsoft Account requirement. It forces the latter by default if you have connected your device to the Internet. However, if it is not your plan, you can bypass the enforcement and set up Windows 11 with a traditional account type.
Advertisеment
Before proceeding, let's figure how one account type is different from another one.
Modern Windows versions allow the user to work with two different types of accounts. By default the operating system offers using a Microsoft Account. It is an online account which connects to Microsoft's own services and apps, and brings extra features like OneDrive, Office 365, and setting synchronization to users' hands. Microsoft Account debuted in Windows 8/
The local account is pretty limited. It is a classic account type, which have been available for ages in older releases of the OS. It can't be used to work with built-in online service, but it can use an empty password, it doesn't require PIN. However, many users still prefer this traditional way to sign in.
This post will show you different methods to install Window 11 with a Local Account.
Install Windows 11 with a Local Account
- Start installing Windows 11 until you see the Region settings screen (OOBE), then press Shift + F10.
- This will open a command prompt. In the console, type the following command:
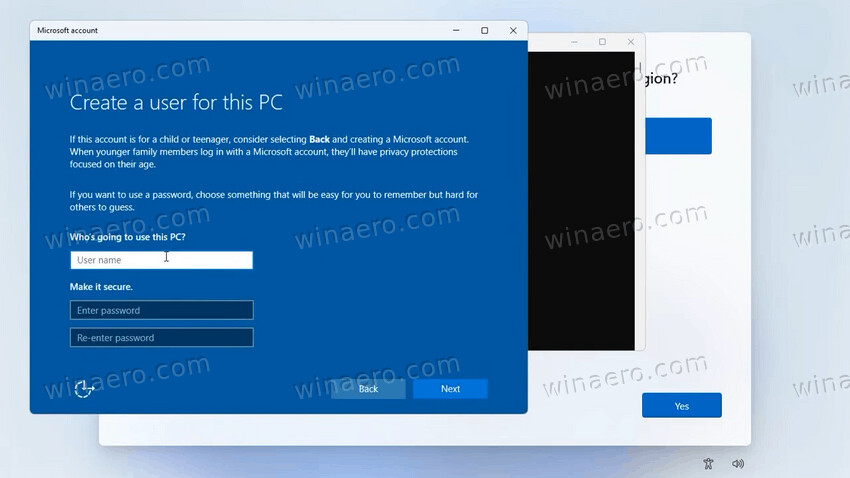
start ms-cxh:localonly.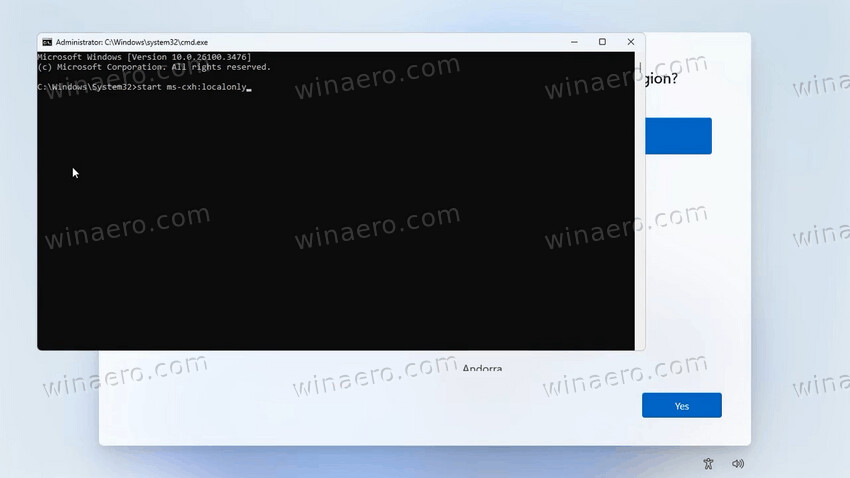
- The command will immediately open a dialog for a local account. Fill in your username and password.
- Proceed to finish the setup. There will be no difference from the regular one.
The reviewed trick does not require you to have an internet connection. Also, it works without restarting your PC or the Windows setup program, which is pretty convenient.
However, this is not the only way you can use. There's a couple more.
One more method is even more tricky than the reviewed above, as it involves editing the Registry right in the OOBE. But it is officially supported by Microsoft. Let's dive into the details.
Setup Windows 11 with a Local Account with a Registry Tweak
- Once you see the Select Region screen of OOBE, press Shift + F10 to open the command prompt.
- Type
regedit.exein the Command Prompt window, and press Enter to run the Registry Editor.
- Navigate to the HKEY_LOCAL_MACHINE\Software\Microsoft\Windows\CurrentVersion\OOBE key.
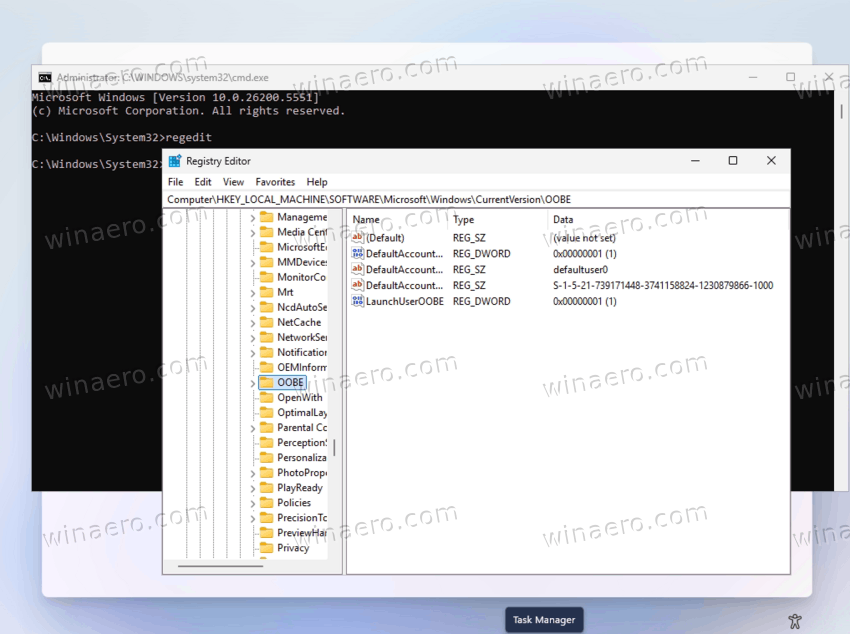
- Right-click the OOBE key in the left pane, and select New > DWORD (32-bit) value.
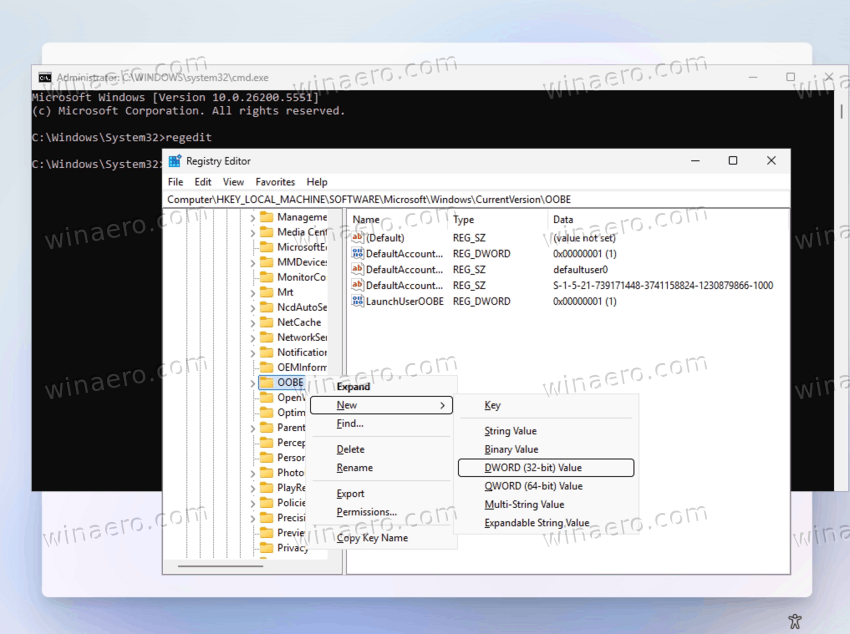
- Name the new value HideOnlineAccountScreens, and set its value data to 1.
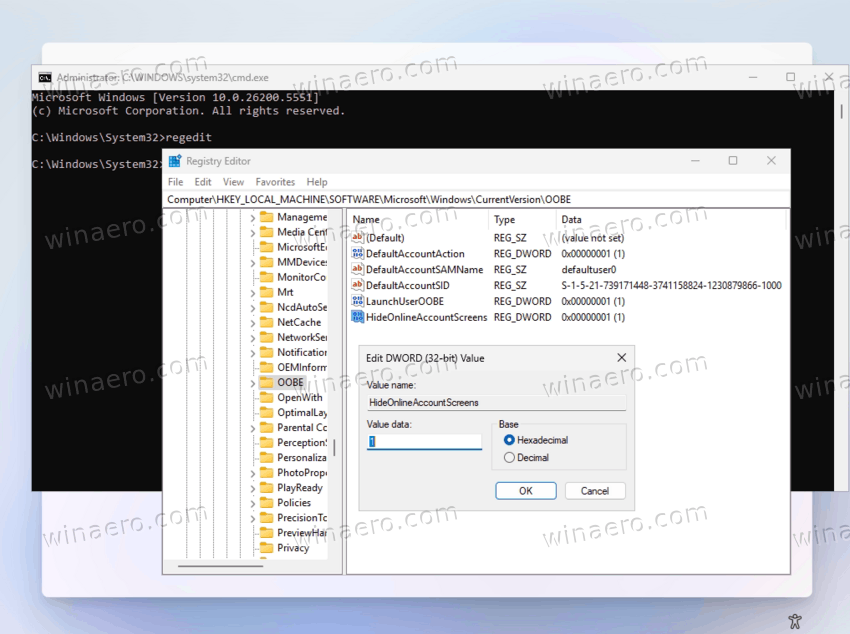
- may or may notCreate one more DWORD (32-bit) value named HideWirelessSetupInOOBE. Again, set it to 1.

- Close the Registry editor and Command Prompt windows. Continue setting up Windows 11 as usual. You will now be able to create a local account right from the setup program.
That's it. As said, Microsoft is officially supporting the two mentioned values.
Finally, one more method is to create a special answer file, autounattend.xml.
Install Windows 11 without a Microsoft Account using an answer file
The answer file, autounattend.xml, allows installing Windows 11 without Internet and with a Local Account.
☑️ I recommend this method the most. I use it myself.
It will do for you the following tasks.
- Will allow to select a Windows edition
- Perform the disk management
- Specify the desired password for a local account (but you can omit that)
- Set the time zone.
- It will skip connection Wireless network connection.
- It will skip privacy options (those Express settings).
The sample configuration file autounattend.xml that you can use looks as follows.
<?xml version="1.0" encoding="utf-8"?>
<unattend xmlns="urn:schemas-microsoft-com:unattend">
    <settings pass="oobeSystem">
        <component name="Microsoft-Windows-International-Core" processorArchitecture="amd64" publicKeyToken="31bf3856ad364e35" language="neutral" versionScope="nonSxS" xmlns:wcm="http://schemas.microsoft.com/WMIConfig/2002/State" xmlns:xsi="http://www.w3.org/2001/XMLSchema-instance">
            <InputLocale>0409:00000409/InputLocale>
            <SystemLocale>EN-US</SystemLocale>
            <UILanguage>EN-US</UILanguage>
            <UILanguageFallback>EN-US</UILanguageFallback>
            <UserLocale>EN-US</UserLocale>
        </component>
        <component name="Microsoft-Windows-Shell-Setup" processorArchitecture="amd64" publicKeyToken="31bf3856ad364e35" language="neutral" versionScope="nonSxS" xmlns:wcm="http://schemas.microsoft.com/WMIConfig/2002/State" xmlns:xsi="http://www.w3.org/2001/XMLSchema-instance">
            <OOBE>
                <HideOnlineAccountScreens>true</HideOnlineAccountScreens>
                <ProtectYourPC>3</ProtectYourPC>
                <HideWirelessSetupInOOBE>true</HideWirelessSetupInOOBE>
            </OOBE>
            <UserAccounts>
                <LocalAccounts>
                    <LocalAccount wcm:action="add">Анекдот №-9978326
                        <Description>Local user with admin privileges</Description>
                        <DisplayName>User</DisplayName>
                        <Group>Administrators</Group>
                        <Name>User</Name>
                    </LocalAccount>
                </LocalAccounts>
            </UserAccounts>
            <RegisteredOwner>User</RegisteredOwner>
        </component>
    </settings>
</unattend>
This file is for English version of Windows 11, and it will install the English (US) locale.
The best thing about it is that it will automatically install Windows 11 with a local account named User. It will have administrative privileges, and by default won't have a password.
You will be prompted to specify it during the install, but you can just click Next or hit the Enter key and proceed without it.
You can download the above file using this link. Extract it to any folder and put it as follows.
Install Windows 11 using autounattend.xml Answer File
- Prepare a bootable USB with your Windows 11 setup.
- Put your autounattend.xml file to the root of your bootable USB drive.
- Boot from the USB drive.
- Windows 11 will automatically use that file. It will not prompt you for a Microsoft Account and Internet connection.
- After setting up the OS, use the "User" account to sign in. It will be a classic local account.
Alternatively, you can use the autounattend.xml file "on demand". This may be a more flexible way for you, as one time you may use it, say on your own PC, and omit it on a friend's device.
How to apply the autounattend.xml file on demand
- Copy your answer to the root of the setup USB drive under a different name, say setup.xml.
- On the very first OOBE screen, which is Select Region, press Shift + F10 to open the command prompt.
- Now, in the command prompt window, enter the command:
C:\Windows\System32\Sysprep\sysprep.exe /reboot /oobe /unattend:D:\setup.xml, where D: is the letter of the setup drive (see the Note). - The setup program will restart and will use your file to take the parameters and settings from it.
Note: You can quickly find the drive letter with your setup.xml file by iterating through drive letters in the dir command in the Command Prompt. I.E. enter dir c:\ and check if you see the setup.xml file in the output. If not, try dir d:\. Repeat this until you see your answer file.
That's it.
Fake Domain Joining for Windows 11 Pro
If you are installing Windows 11 Pro, you can simulate domain joining steps. But it will create a local account for you!
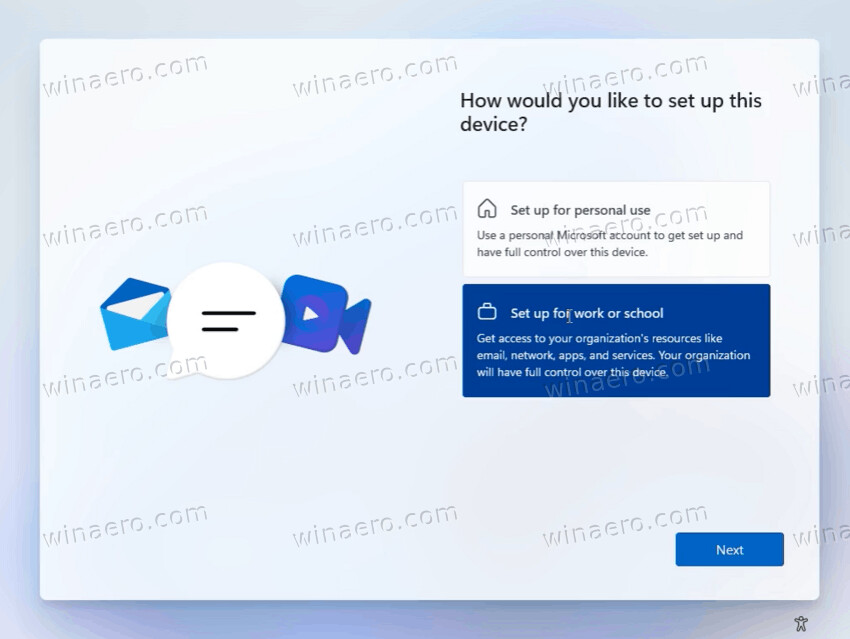
- Install Windows 11 as usual until you see the screen "How would you like to setup this device?". Click on "Set up for work or school".
- On the next page, click on the "Sign-in options" link below the email box.
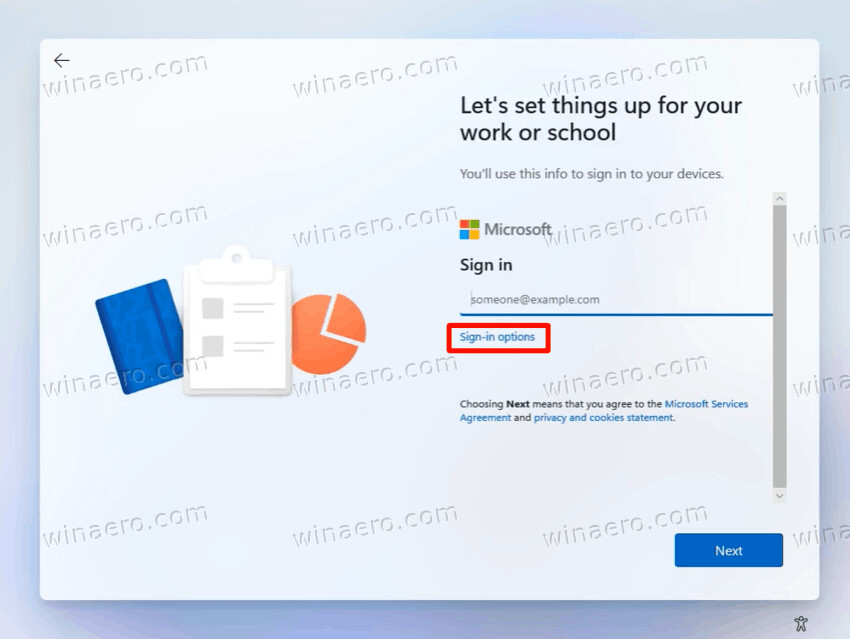
- Now, click on the Domain join instead button.
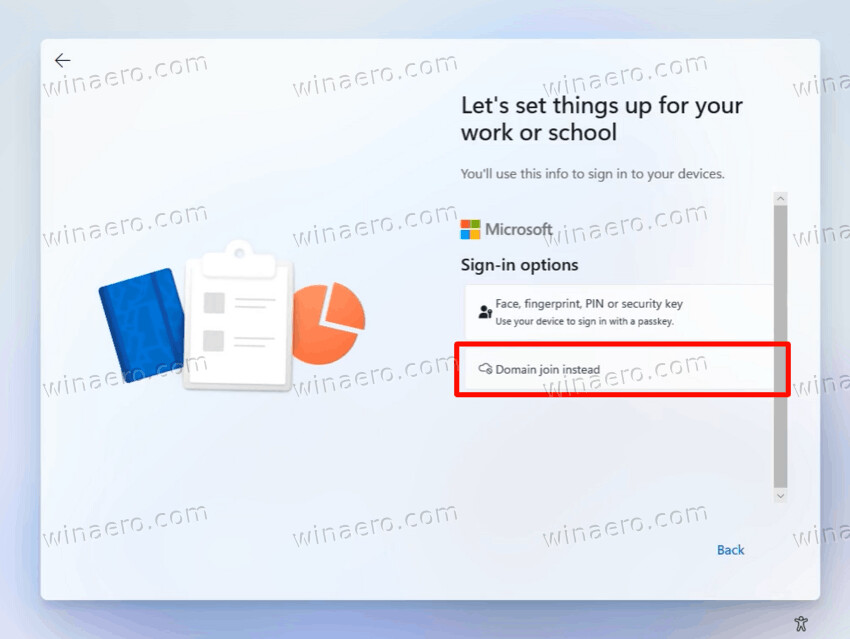
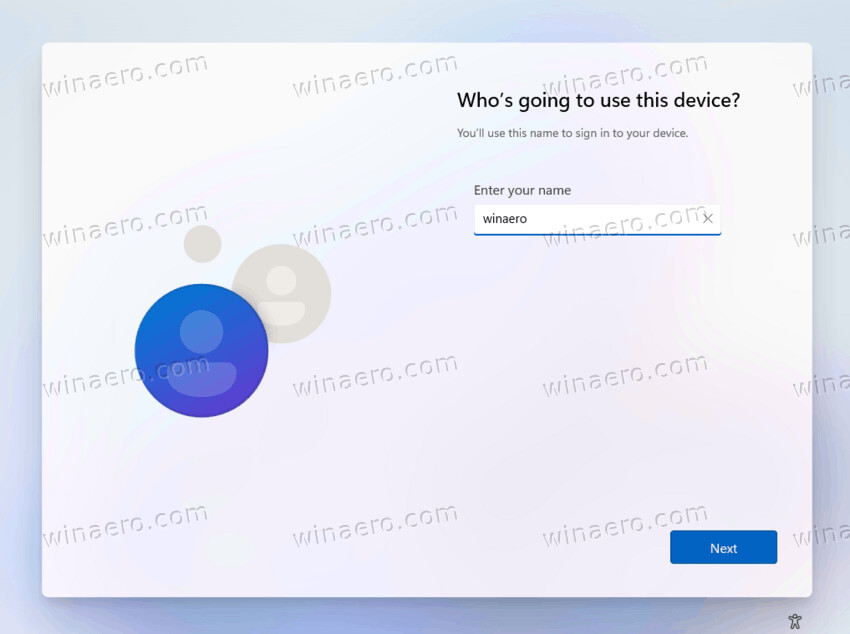
- Voila, you will now see the familiar user interface that allows creating a regular local account! Enter your user name.
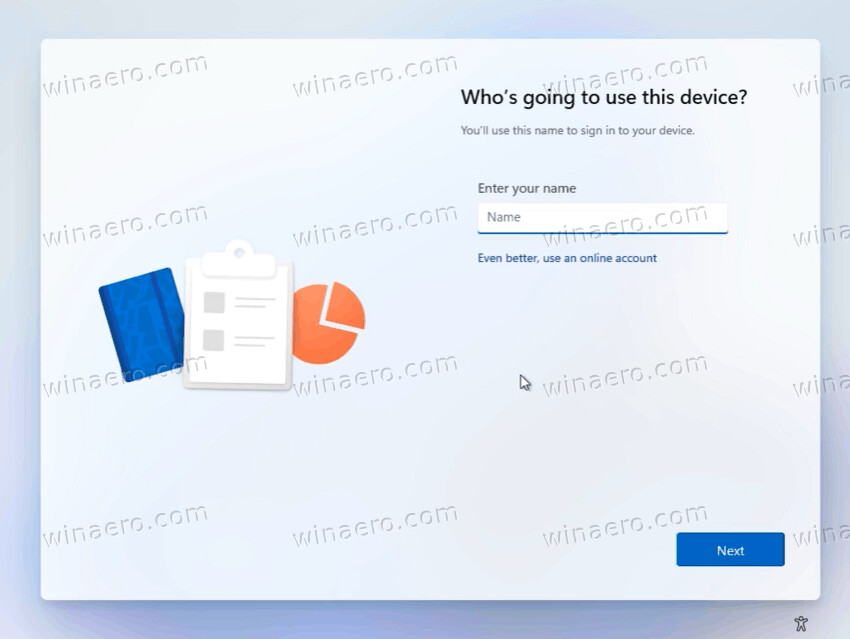
- And now provide your password if you need it. The password isn't even mandatory.

- Finally, finish the Windows 11 setup as usual.
That's how you install Windows 11 with a local account via a fake domain joining.
Using the OOBE\BYPASSNRO Command
Note: This method may or may not work in Windows 11 25H2. Microsoft randomly adds and removes this option from the setup media. This tweak more reliable and it always works.
- Once prompted to connect to the Internet to complete the initial setup, press Shift + F10 to launch Command Prompt.
- Enter the OOBE\BYPASSNRO command and press Enter.
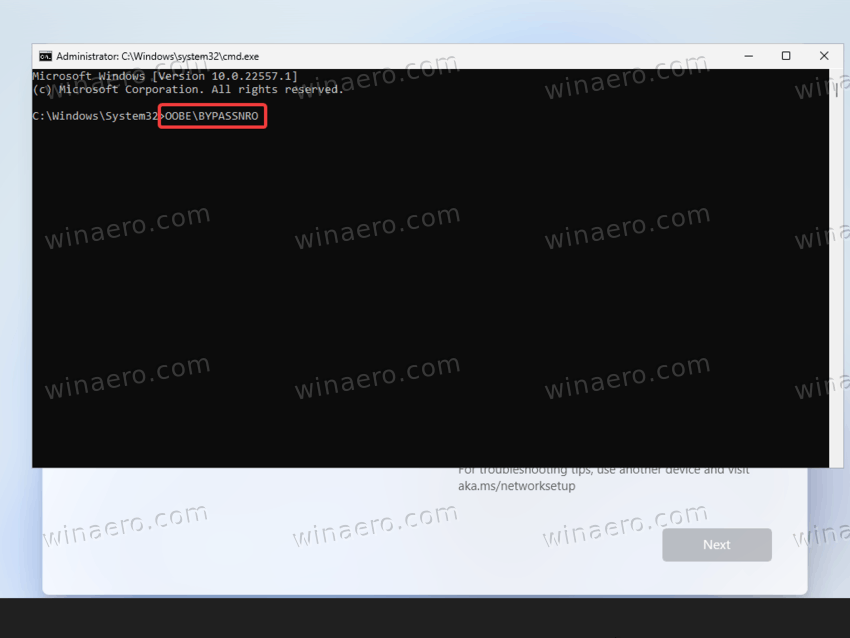
- Your computer will restart after executing the command. Windows 11 will boot back to the same window asking you to connect to the Internet. This time, you will see a button that allows bypassing the limitation.
- Click the "I don’t have Internet" link.
- Finally, click "Continue with limited setup."
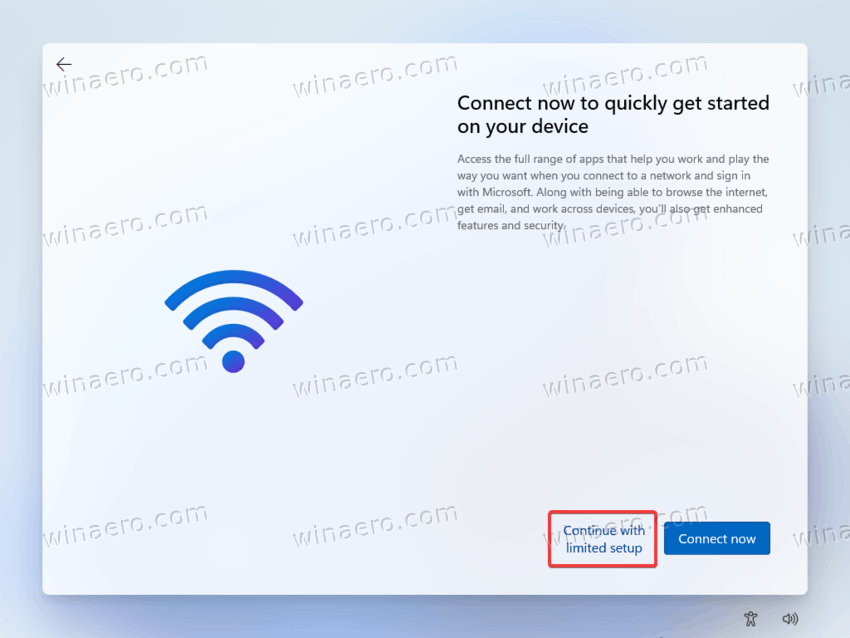
- Follow the on-screen instructions to set up Windows 11 without an active Internet connection.
Note that Microsoft already excluded the BYPASSNRO file in Spring 2025, but surprisingly restored it back! So the final Windows 11 25H2 ISO file still includes the file.
However, if in your case the file is missing, don't give up. Actually, the BYPASSNRO file is a simple batch file that adds one value to the Registry of the setup program/WinPE. This fact allows you to replicate its behavior manually, and install Windows 11 with a local account with ease. Here are the steps.
How to Enable BYPASSNRO
- Perform the installation of Windows 11 without connecting to a network.
- On the initial Out-of-Box Experience (OOBE) screen, press
Shift + F10to open the Command Prompt window. - In the Command Prompt window, enter the following command and press Enter:
reg add HKLM\Software\Microsoft\Windows\CurrentVersion\OOBE /v BypassNRO /t REG_DWORD /d 1 /f - Subsequently, enter the following command to restart the computer and resume the installation process:
shutdown.exe /r /t 1 - Finally, on the let's connect you to a network screen you will be able to skip the Internet requirement but clicking on a new link, "I don't have internet". You are now able to create a local account!
That's it.
Create a Local Account in Windows 11 Setup from the Console
- Start installing Windows 11 offline, i.e. do not connect to any network.
- On the first screen of the initial Out-of-Box Experience (OOBE), press Shift + F10 to open the Command Prompt window.
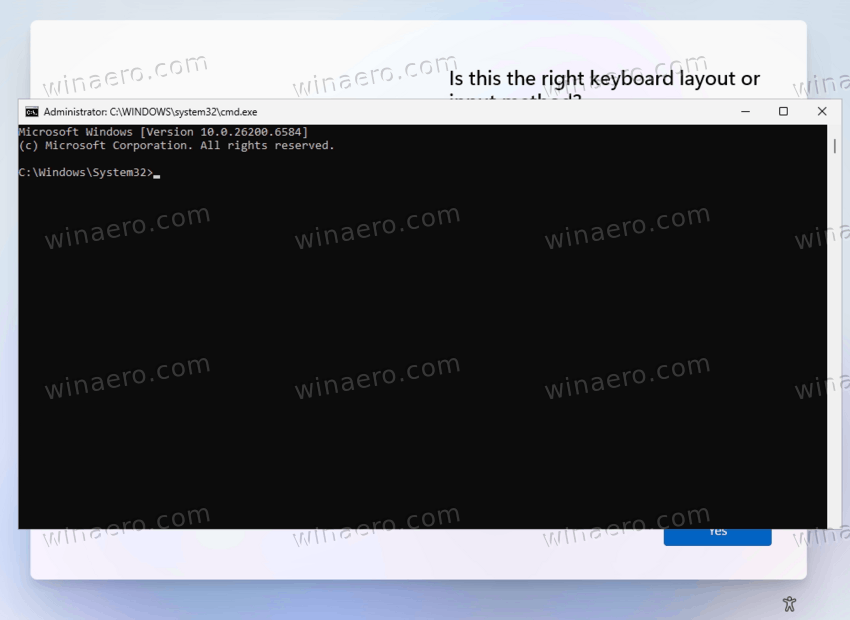
- Click in the Command Prompt console, and type the following commands. Press Enter after each command.
-
net user "LocalAdmin" /add. Substitute LocalAdmin with the desired name for your local account, say with your name.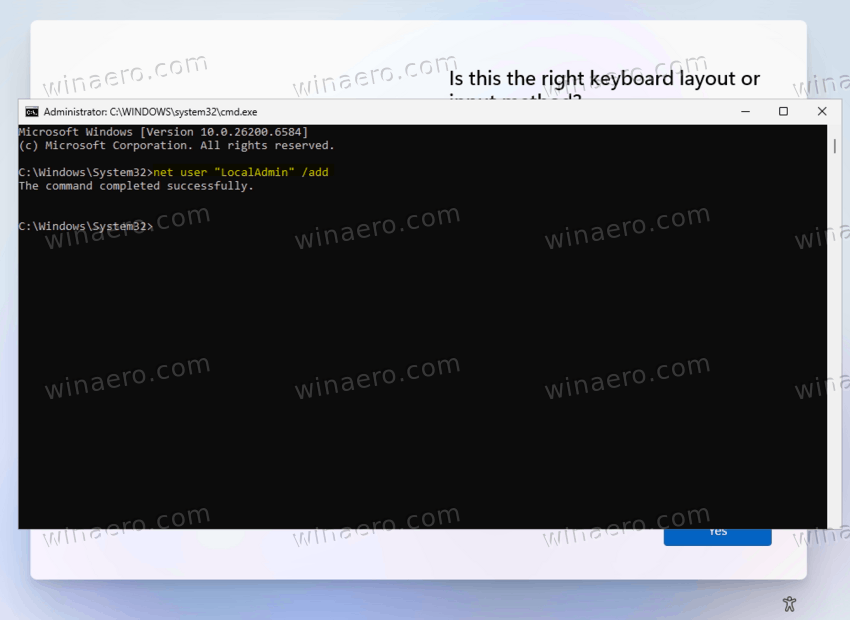
-
net localgroup "Administrators" "LocalAdmin" /add. Use the same name instead of LocalAdmin what you used in the previous step.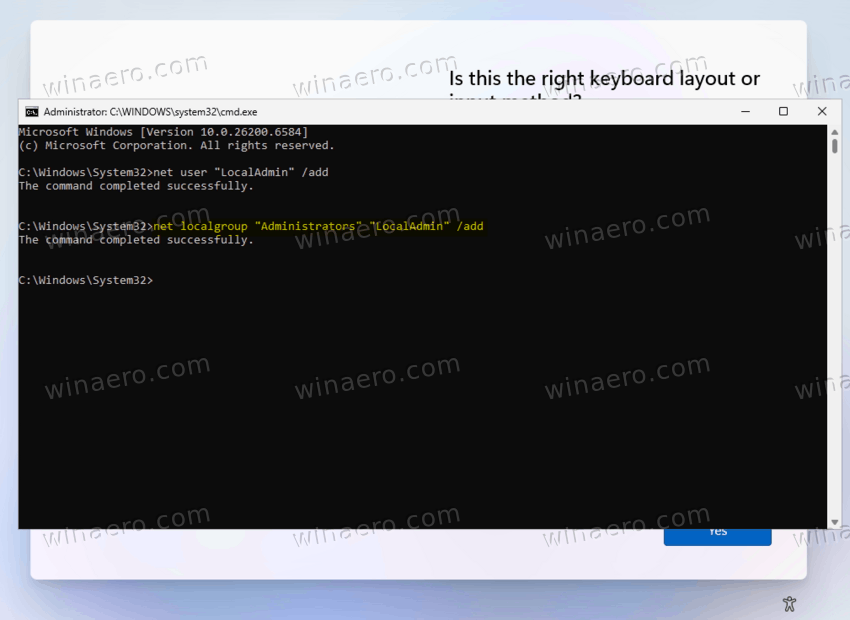
- Finally, type the last command:
oobe\msoobe.exe && shutdown -r -t 3.
-
- Setup will restart. You will see a message that the user name or password is not correct. Ignore it and click the OK button.
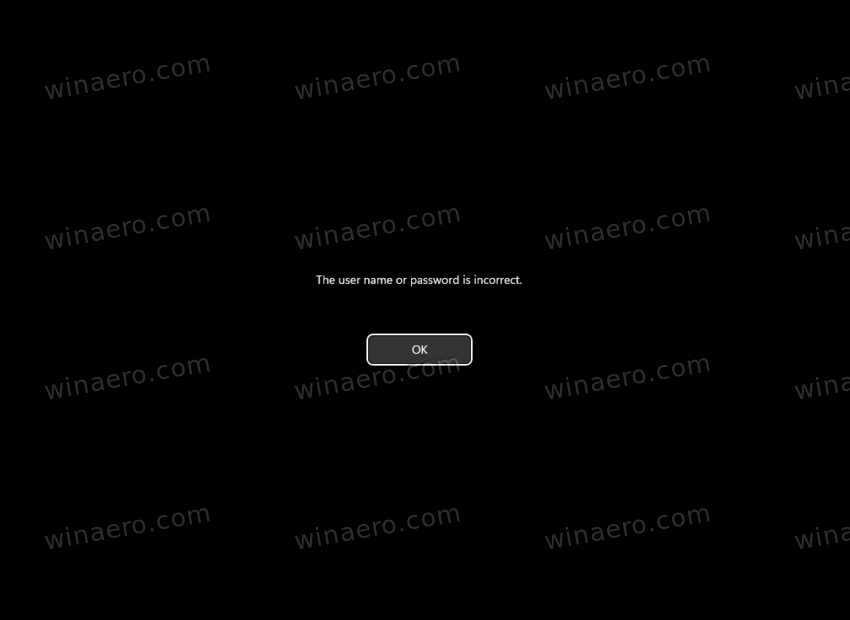
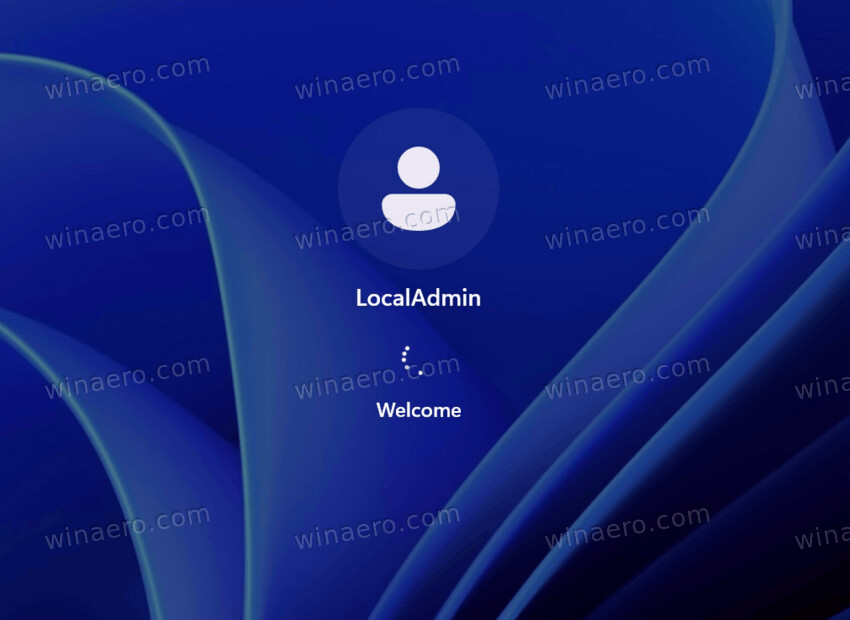
- Now you will see a login screen with the defaultuser0 account selected. You need to click on the LocalAdmin in bottom left corner.

- Windows will start booting to your account "LocalAdmin", which is a traditional local account!
That's it.
Note: The defaultuser0 account will be removed once you sign in to your "LocalAdmin" account.
Alternatively, you can use PowerShell instead of the net user commands.
PowerShell commands
- Initiate the Windows installation process without establishing a network connection.
- Upon reaching the initial Out-of-Box Experience (OOBE) screen, press Shift + F10 to open the Command Prompt window.
- In the Command Prompt, launch PowerShell by typing
powershelland pressing Enter. -
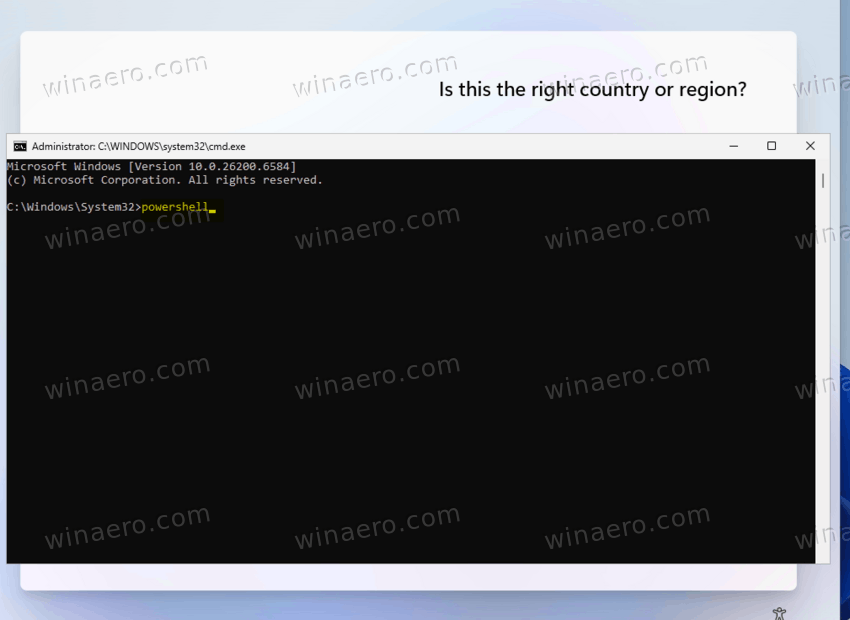 Then, execute the following commands sequentially:
 New-LocalUser LocalAdmin -AccountNeverExpires.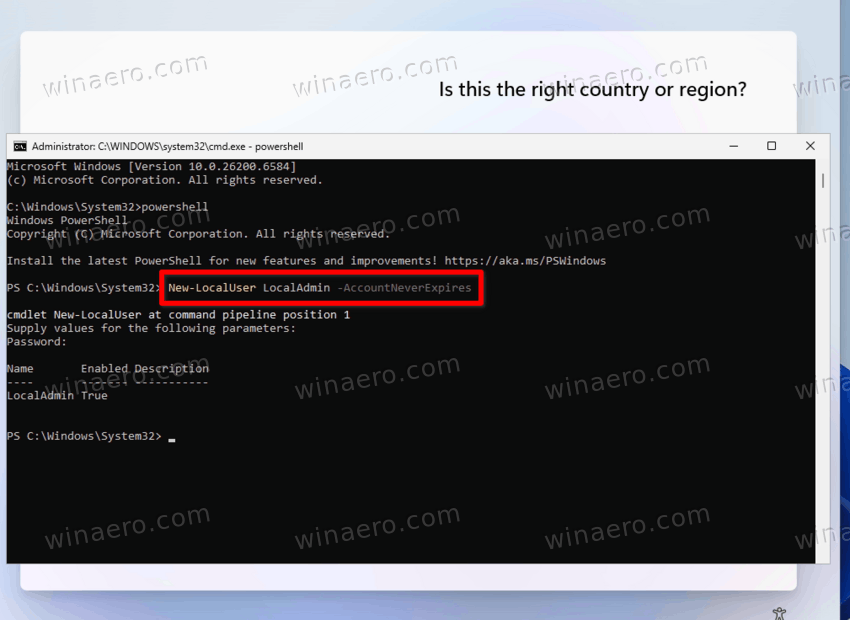
- When prompted for a password, simply press Enter to set a blank password.
- Now type:
Add-LocalGroupMember LocalAdmin -SID S-1-5-32-544. Once you press Enter, the command will add the newly created user to the built-in Administrators group. The SID value matches this group.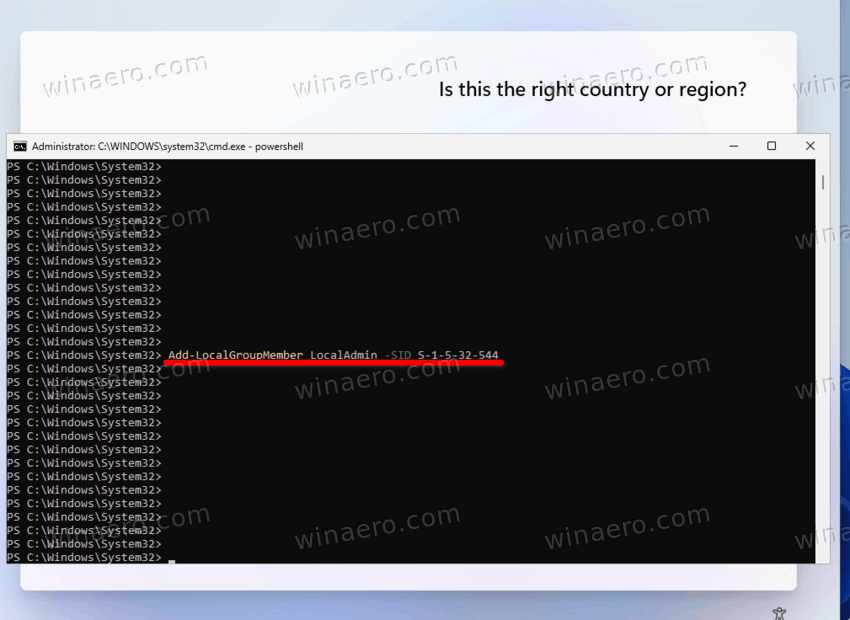
- Finally, type and run this:
.\oobe\msoobe.exe; .\shutdown -r -t 3. The setup will restart.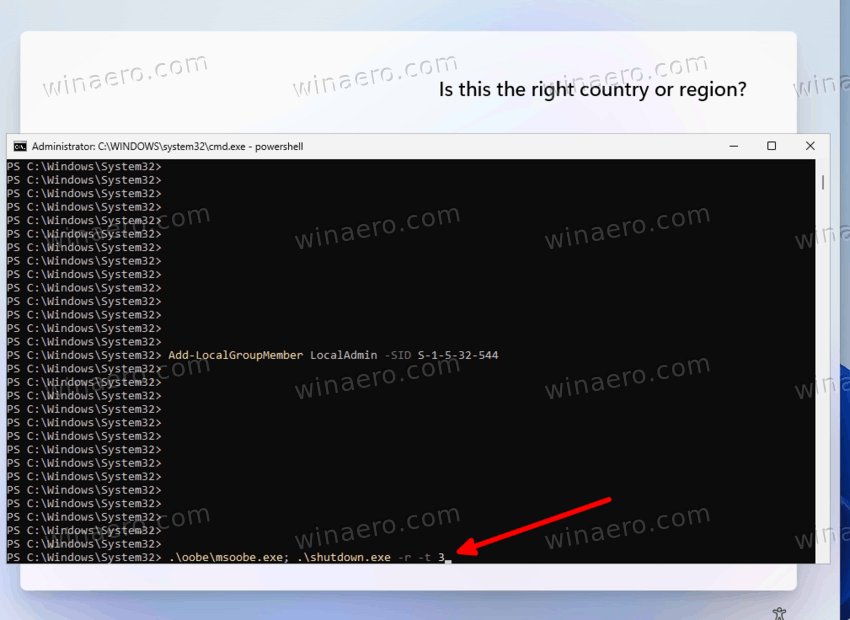
- After restart, you will see an error screen that the user name or password is incorrect. That's fine, ignore the message and click OK.
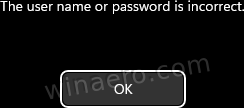
- On the next screen, you will see a user account named defaultuser0. Don't use it, instead select LocalAdmin from the bottom left corner to finish setup.

- Windows 11 will continue with the LocalAdmin account. It is a local account that doesn't require you connecting to the Internet.
That's it. Note that the defaultuser0 account is used by setup and will removed once you sign in into the LocalAdmin.
Below the line I keep a collection of the legacy methods that no longer work with recent Windows 11 version but still useful if you deal with an older ISO. Or when you need to install an unsupported Windows 11 version on your old hardware or in a virtual machine.
Legacy Methods
The Developer Console method
Note: This method is not effective in Windows 11 24H2 and onward
- Start installing Windows 11 as usual until you see the Secondary Keyboard Layout screen. It appears after two other screens, Select Region, and Select Keyboard Layout.
- Don't click Skip on the Secondary Keyboard Layout screen. Instead, press Ctrl + Shift + J. This will open a Developer Console with a > prompt blinking in the top left corner.
- Type the following command and hit Enter.
WinJS.Application.restart("ms-cxh://LOCALONLY"). - Press Esc to close the Developer Console. Windows setup program will open the screen where you will be able to create a local account.
That's it.
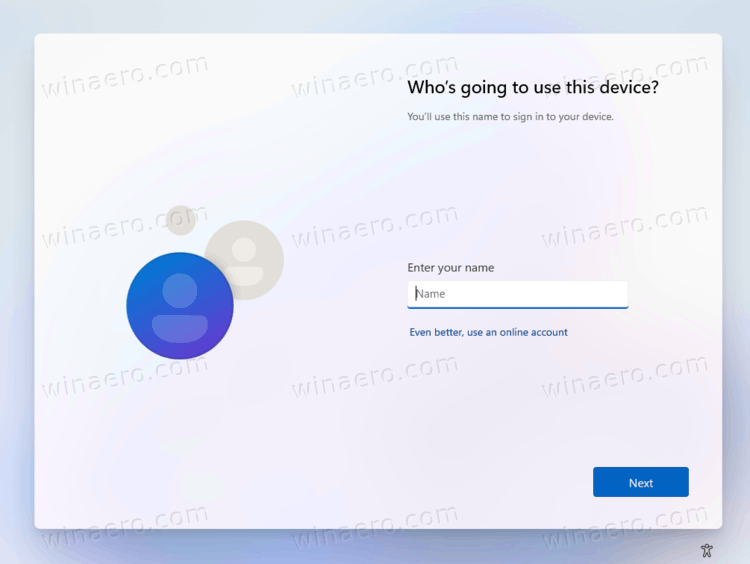
Prior to the Windows 11 24H2 release you could also fool the installer by providing non-existing Microsoft Account credentials in the user name and password fields in OOBE. Version 24H2 closes this bypass, but if you are installing an older version of Windows 11, check the below solution.
Non-existing Email Method
Note: This method is not effective in Windows 11 24H2 and onward
- Run the setup from a bootable media like USB stick.
- Follow the prompts on the screen until you reach the Account page.
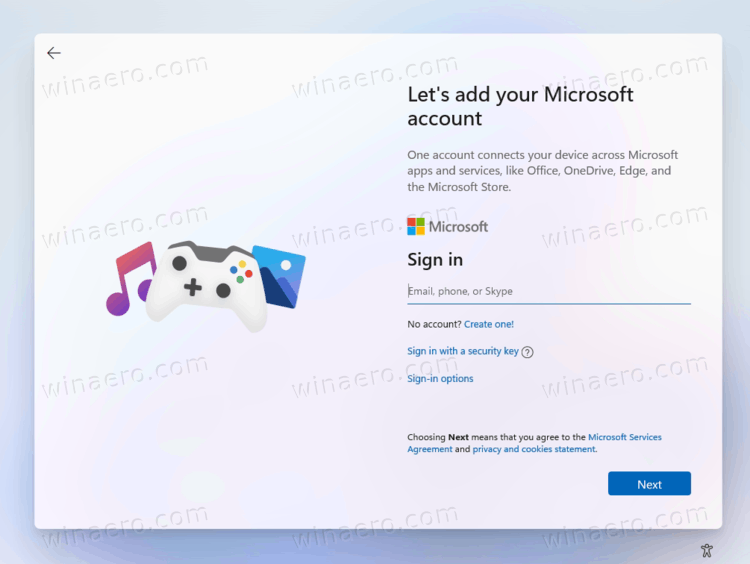
- In the email, phone or Skype box, type any non-existing address. I advise you to enter
1@1.comas the shortest suitable sequence.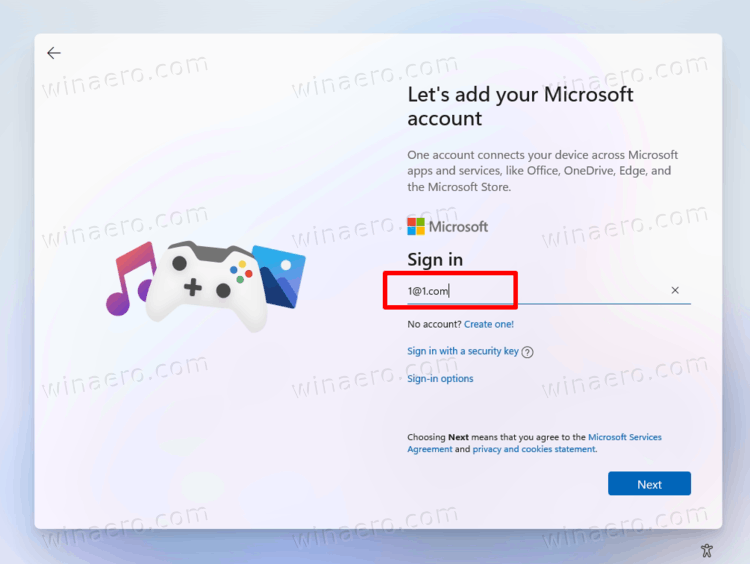
- Click Next, and specify any password. Again, you can simply type
1and hit Enter.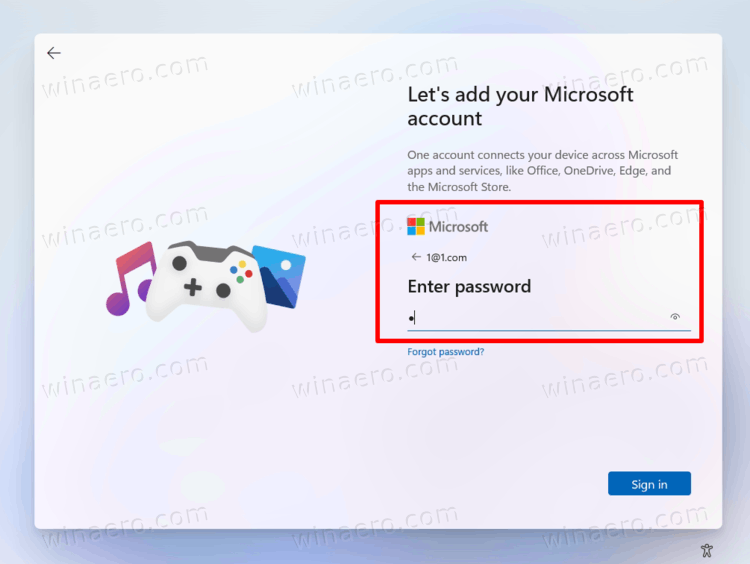
- Windows 11 will show you the "Oops, something went wrong page". Click on Next here.
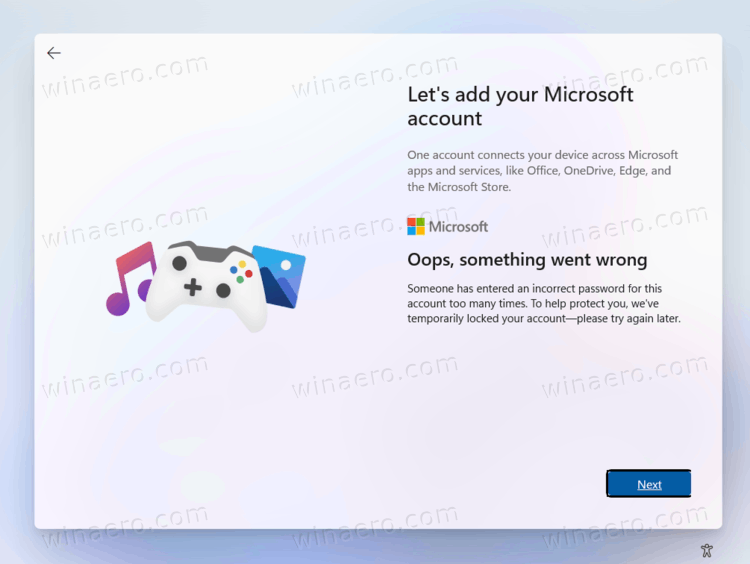
- Voila, you are now prompted to install Windows 11 with a local account!
That's the easiest and the fastest way to set up the OS without creating a Microsoft Account.
Install Windows 11 without Internet
Windows 11 requires the Internet connection to finish the setup. Initially, this requirement was only mandatory for Windows 11 Home edition. However, starting in build 22557, this also applicable to the Pro edition. If the above reviewed trick didn't help you, and the OS doesn't finish the setup without an Internet connection, try the solution below.
To install Windows 11 offline, do the following.
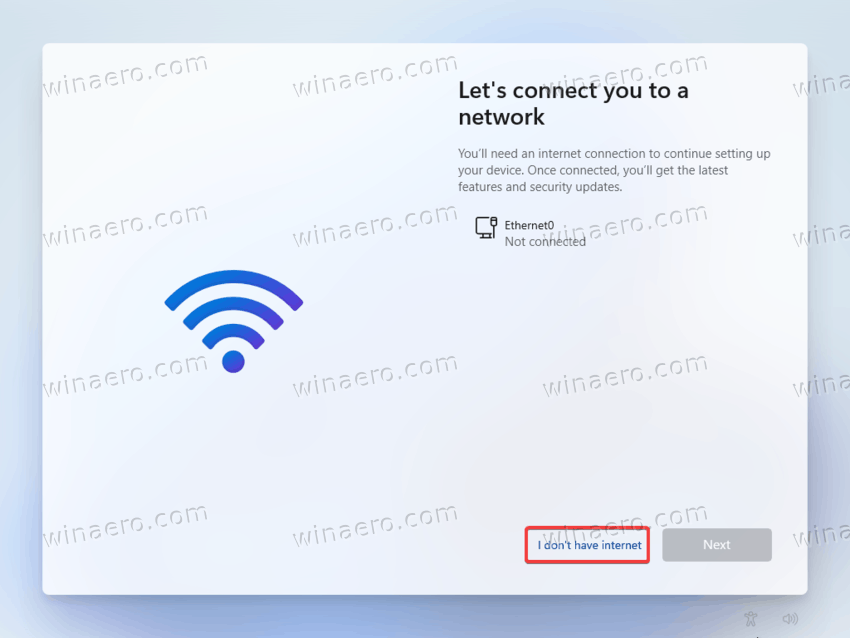
- Once you see the "Lets connect you to a network" screen, press the Shift + F10 shortcut keys.
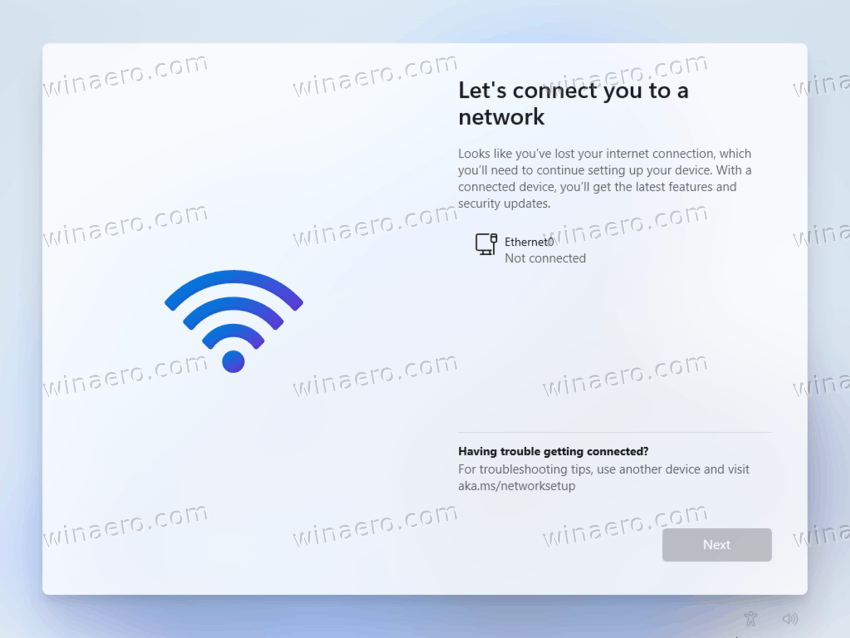
Windows 11 setup screen with no connection available - This will open the Command prompt window, where you need to type:
taskkill /F /IM oobenetworkconnectionflow.exe. - Now hit the Enter key and close the Command prompt window.
- Return to the setup program. You should be able to create a local account.
Disconnect the Internet connection
That's obvious that if you can simply disconnect the Internet and prevent Windows 11 from creating a Microsoft account. However, keep in mind that this should be done before the OOBE starts. Otherwise, the OS will remember that the connection was available. It will keep asking you to reconnect to the internet and proceed with a Microsoft Account.
That's it!
Support us
Winaero greatly relies on your support. You can help the site keep bringing you interesting and useful content and software by using these options:

The easiest method is to burn an iso to a usb using Rufus.
With Rufus you can create installion media that automatically installs windows with a local account with a username you choose.
There are many other useful options as well.
Once you see the “Lets connect you to a network” screen, press the Shift + F10 shortcut keys. Type “oobe\bypassnro”, the OOBE will restart. Then you can create a local account.