This article will show you how to install the Google Play Store on Windows 11.. You probably already know that you can now run Android apps on the latest OS. Officially, Microsoft allows downloading apps from the Amazon App Store. Many popular apps are not available there, so users naturally want to get the Google Play Store on their systems.
Advertisеment
Important: Proceed at your own risk. The following method is not officially supported. Also, you do not need to enroll in the Windows Insider program. We managed to get the Google Play Store on our systems with the stable version of Windows 11.
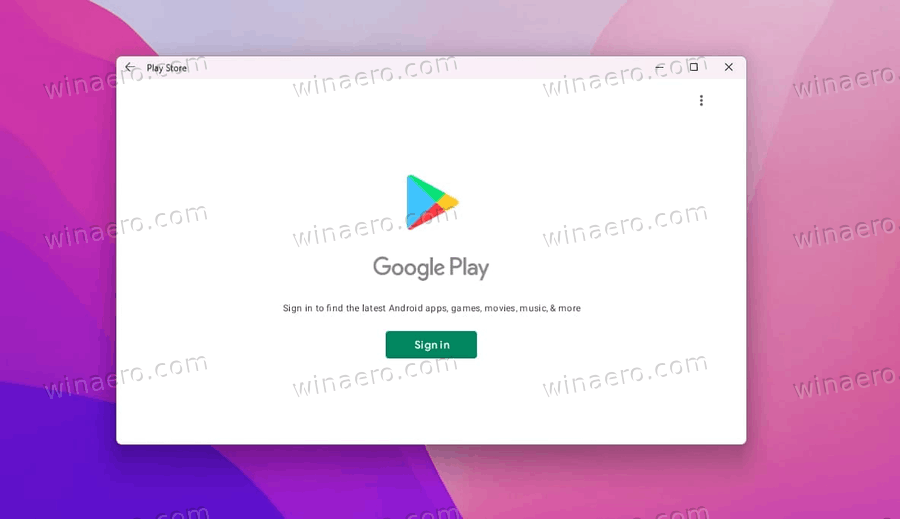
Install Google Play Store on Windows 11 WSA
The procedure involves several steps covered in detail below. First of all, you need to uninstall the existing Windows Subsystem for Android component if you have one installed. After that, you need to create a custom WSA instance which uses the Android kernel from Google Apps (GAPS). You will need WSL to complete this portion of the tutorial. Once this will be done, you will be able to run Google Play Store and install the apps from there.
Firstly, uninstall WSA. If you don't have it installed, go to the Step 2 directly.
Step 1. Uninstall existing Windows Subsystem for Android
- Open the Settings app (Win + I), and click the Apps item on the left.
- On the right, click on Apps & features.
- In the list of apps, find the Amazon Store app, and click the three dot menu button to the right of its name.
- Select Uninstall.
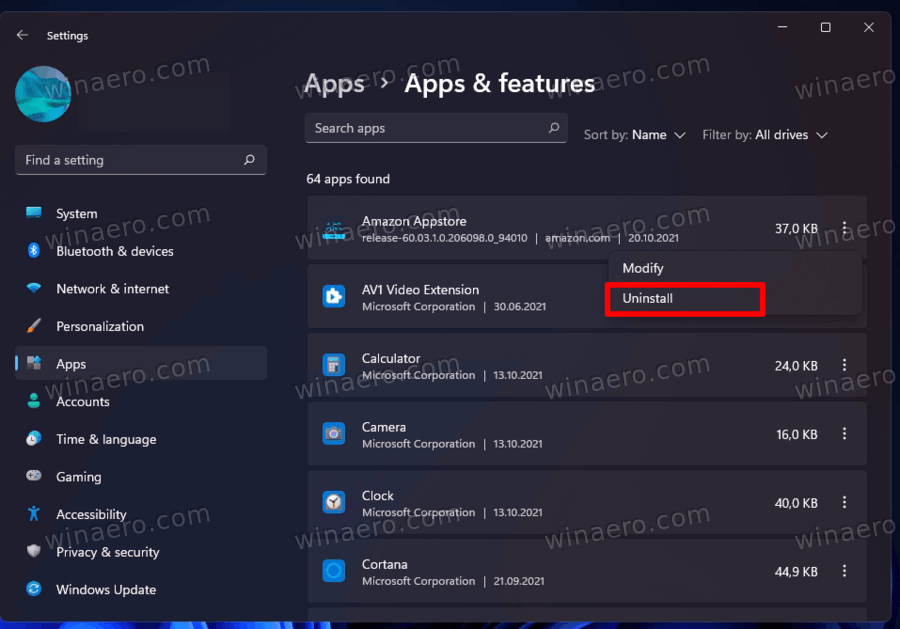
- Now, look for the Windows Subsystem for Android entry.

- If it is present, similarly uninstall it from Windows 11.
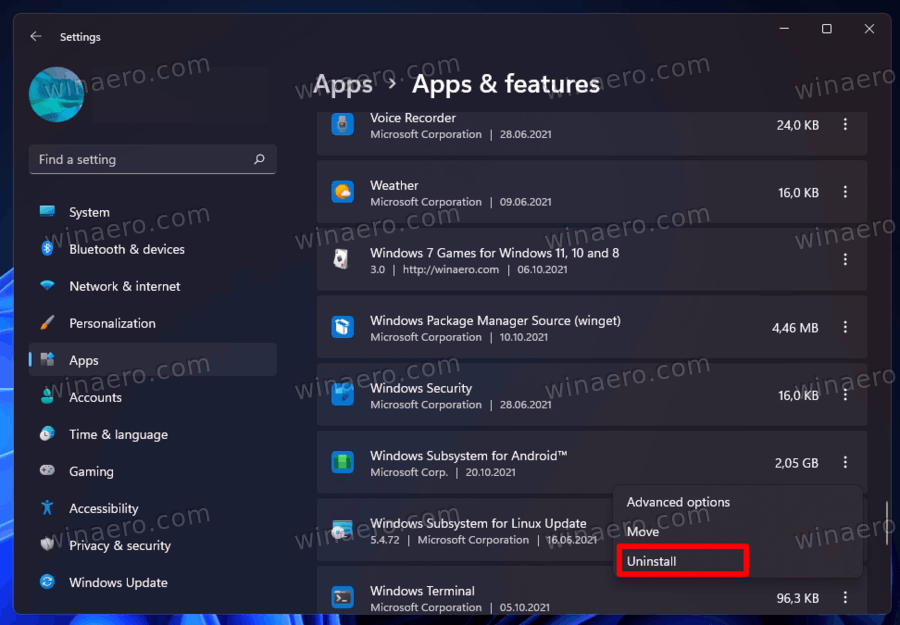
Wait for the removal to finish, and go to the Step 2.
Step 2. Enable Windows Subsystem for Linux and Virtual Machine Platform
- Open Windows Search (Win + S) and enter Turn Windows features on or off. Press Enter.
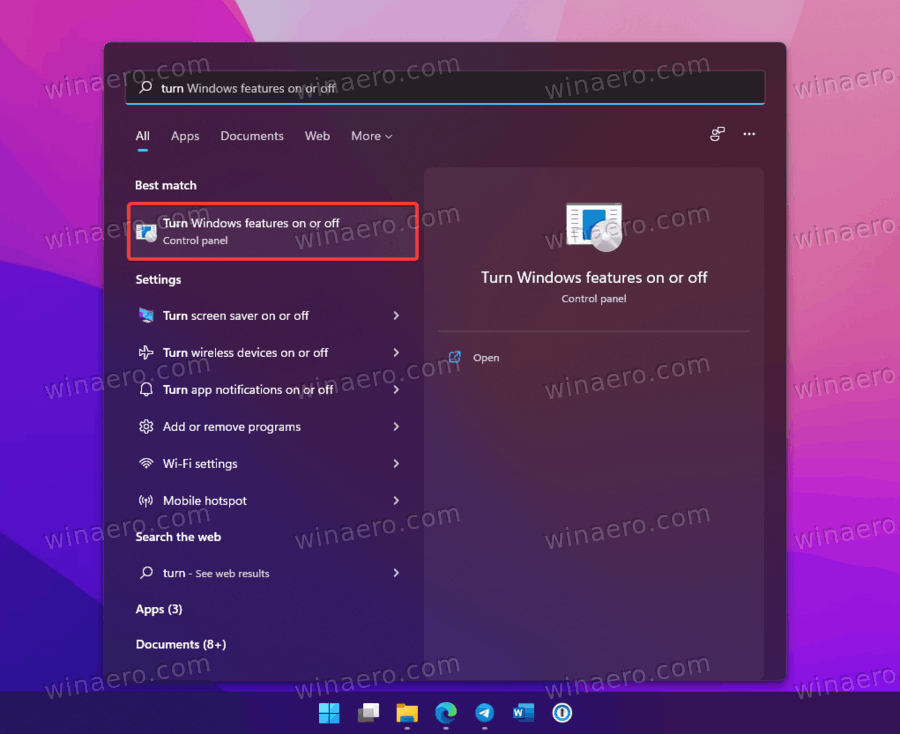
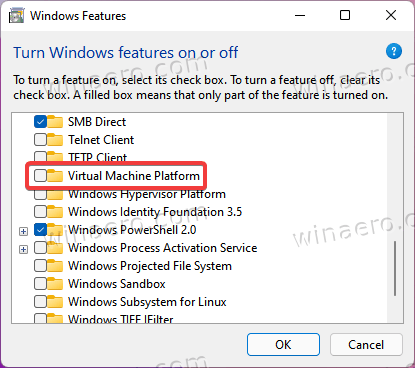
- In the new window, place a checkmark for Virtual Machine Platform.
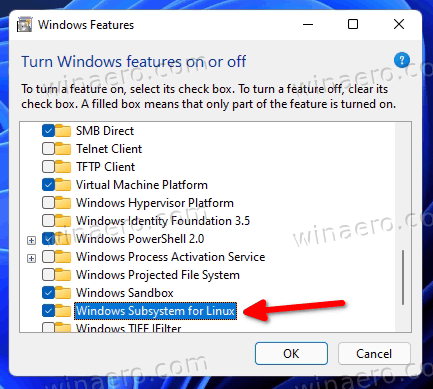
- Next, place a checkmark next to Windows Subsystem for Linux.
- Click OK and wait for Windows to download the required components.
- Restart your computer.
You are done at this point. Next, you need to modify the Windows Subsystem for Android component, so it will become compatible with GApps. This will allow you to Install Google Play Store on Windows 11 in Windows Subsystem for Android. Here we go.
Step 3. Add GApps to Windows Subsystem for Android
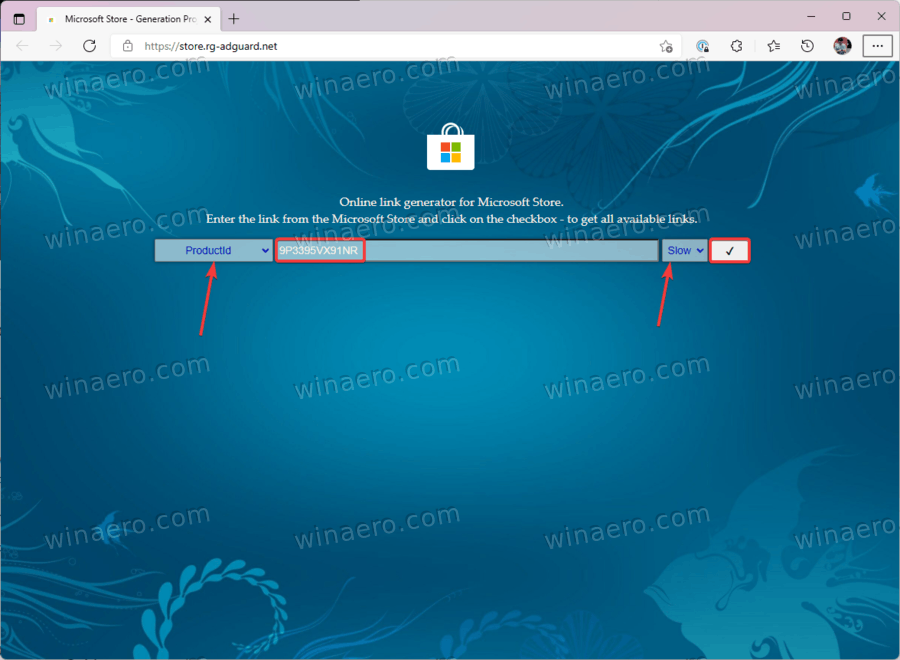
- Go to store.rg-adguard.net and select ProductID in the first drop-down list.
- Paste 9P3395VX91NR into the Sample Data field.
- Select Slow from the following drop-down list, then click the button with a checkmark.
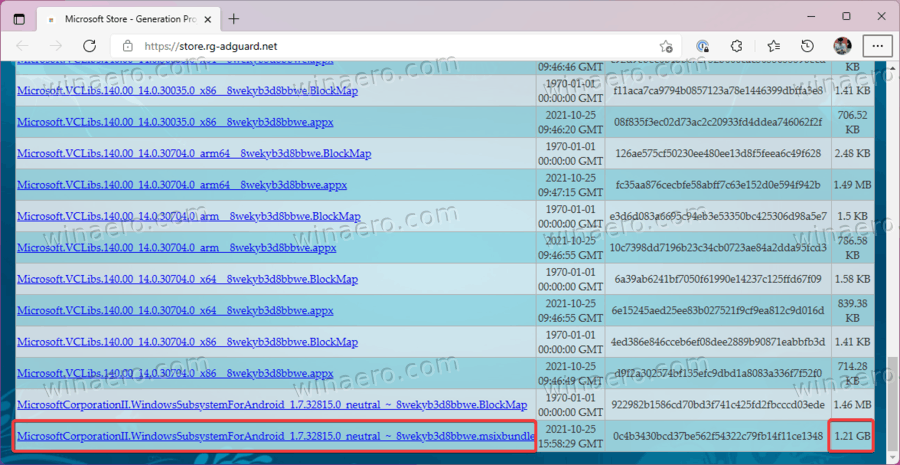
- Scroll down the list and find the largest MSIXBundle file (approximately 1.2GB). Download it.
- Also, download the Microsoft.UI.Xaml.2.6_2.62112.3002.0_x64__8wekyb3d8bbwe.appx file. It may be required if Windows 11 fails to register the modified WSA package we will create later.
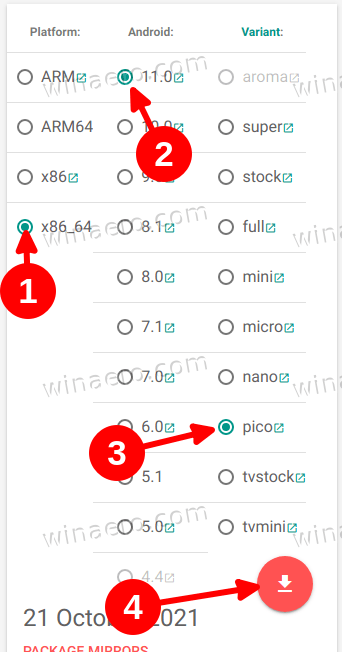
- Go to the OpenGapps website. Select the x86_64 platform, Android 11, and the Pico variant. Click the big red button to download Gapps.
- While you wait for your browser to download Android Subsystem and Gapps, go to the Microsoft Store using this link and install Ubuntu. Skip this step if you have already installed Ubuntu on WSL2.
At this step, you have all the files required to combine GApps and WSA. Now, you need to unpack both packages and selectively combine their components.
Extract the files
- Now open the previously downloaded msixbundle file (the one with 1.2GB size) in any archiver you prefer. You can use 7Zip or other free alternatives.
- Inside the
msixbundlefile, locate theWsaPackage_1.7.32815.0_x64_Release-Nightly.msixfile. It weighs approximately 700MB.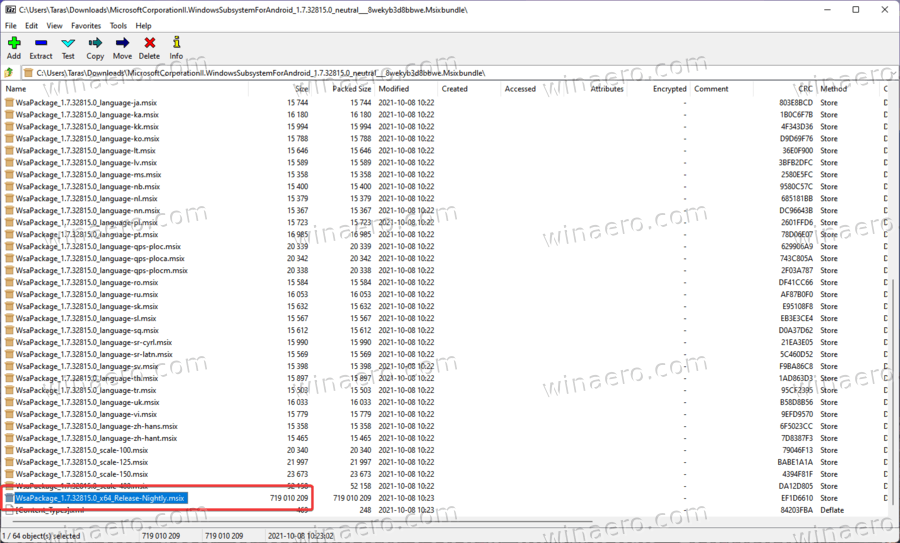
- Open File Explorer (Win + E) and go to the drive C:\. Create a new folder and rename it to WindowsSubsystemAndroid.
- Copy to the WindowsSubsystemAndroid folder all files from the open msix file.
- After pasting the files, delete the following: the AppxMetadata folder, AppxBlockMap.xml, AppxSignature.p7x, and [Content_Types].xml.
- In the root of the drive C:, create another folder and rename it to GAppsWSA.
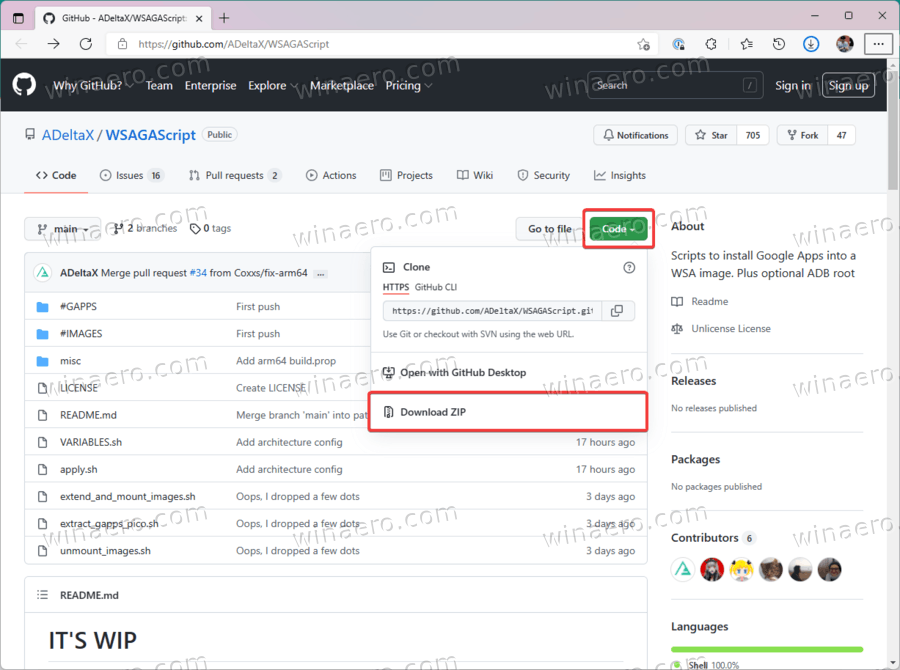
- Go to the WSAGAScript GitHub repository and click Code > Download ZIP.
- Open the downloaded archive, then open the folder inside it. Copy everything from that folder into the GAppsWSA folder.
- Copy the downloaded ZIP archive with Gapps and paste it into GAppsWSA > #GAPPS.
- Go to the WindowsSubsystemAndroid folder and copy the following files:
product.img,system.img,system_ext.img,vendor.img. - Paste those files into
C: \ GAppsWSA \ #IMAGES.
Now, in WSL/Ubuntu, you need to launch the downloaded script that will further process files and prepare the modified kernel. Here's how it works.
Create the custom WSA kernel
- Launch Ubuntu and type
sudo suto get root privileges. - Now change directory to GAppsWSA. Type
cd /mnt/c/GAppsWSA/and press Enter. - Now you need to install lzip and unzip. Use the following command:
apt install lzip unzip. Press Y to confirm the installation. - Install dos2unix. Use the following command:
apt install dos2unix. - Now run the following commands one after another:
-
dos2unix ./apply.sh, -
dos2unix ./extend_and_mount_images.sh, -
dos2unix ./extract_gapps_pico.sh, dos2unix ./unmount_images.sh-
dos2unix ./VARIABLES.sh.
-
- For more convenience, clear the console using the clear command.
- Enter the following command:
./extract_gapps_pico.sh. Press Enter and wait for the terminal to return the Gapps Folder Ready message. - Enter the
./extend_and_mount_images.shcommand. Press Enter and wait for the terminal to return the Images Mounted text. - Enter the
./apply.shcommand and press Enter. The terminal should return the Apply completed message. - Finally, enter the
./unmount_images.shcommand and press Enter.
Everything is done. You just built the custom kernel with GApps intergrated. Now, we are on the finish line. We can now install Google Play Store on Windows 11.
Step 4. Install Google Play Store on Windows 11 Subsystem for Android
- Go to the #IMAGES folder and copy these files:
product.img,system.img,syste_ext.img, andvendor.img. - Paste those files into the WindowsSubsystemAndroid folder.
- Go to C: \ GappsWSA \ misc and copy the
kernelfile. - Go to C: \ WindowsSubsystemAndroid \ Tools and rename the
kernelfile tokernel_bak. - Paste the previously copied
kernelfile. - Open Settings (Win + I) and go to Privacy and Security > For Developers.
- Turn on Developer Mode.
- Launch Windows Terminal as Administrator in the PowerShell profile.
- Paste into the Terminal window the following command:
Add-AppxPackage -Register C:\WindowsSubsystemAndroid\AppxManifest.xml. - Open the Start menu and launch Windows Subsystem for Android.
- In WSA settings, turn on Developer Mode.
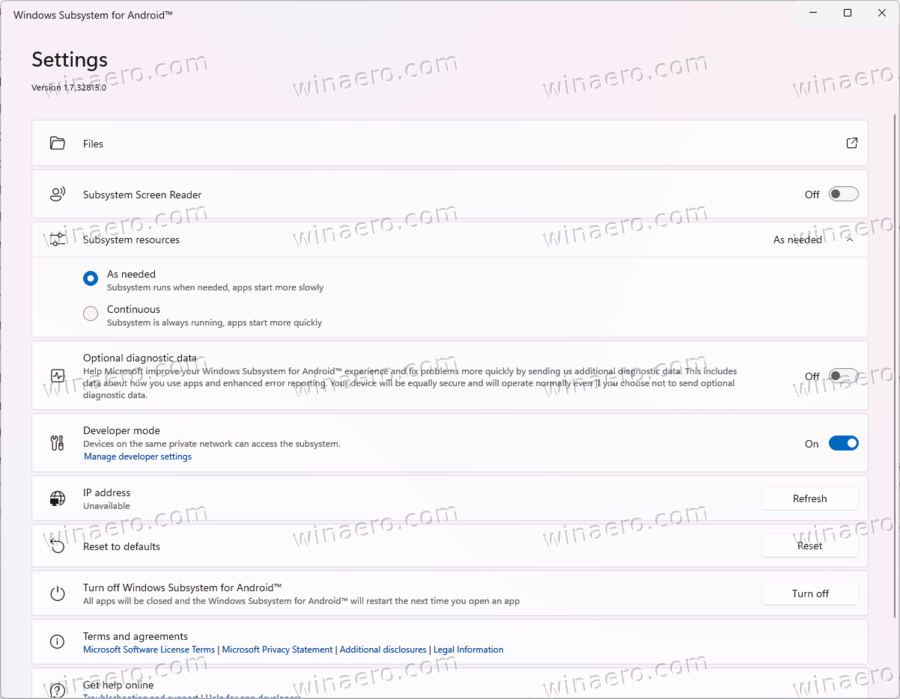
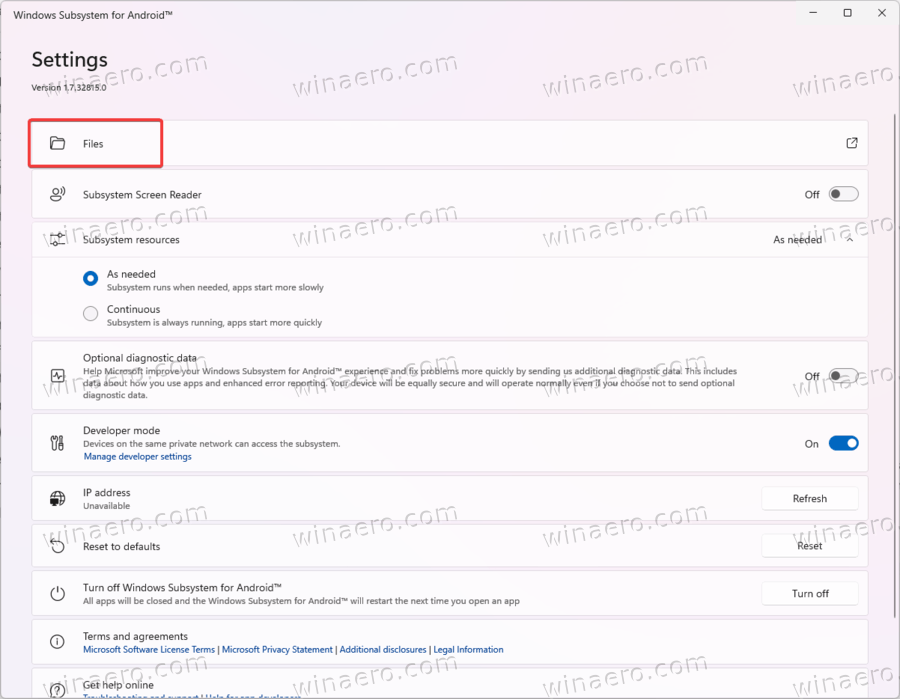
- Click Files to start WSA.
- Uncheck Share my diagnostic data.
- Close Files and wait a minute or two.
- Open the Start menu and search for Google Play Store.
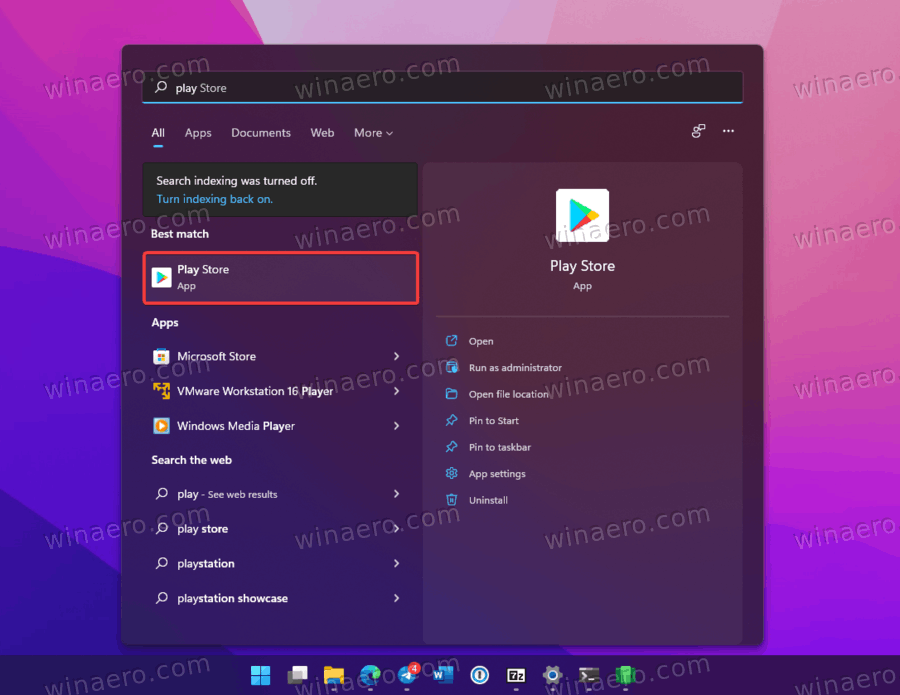
- Click Sign in and enter your Google Account information. After signing in with your Google Account, you will end up on the main page of the Google Play Store.
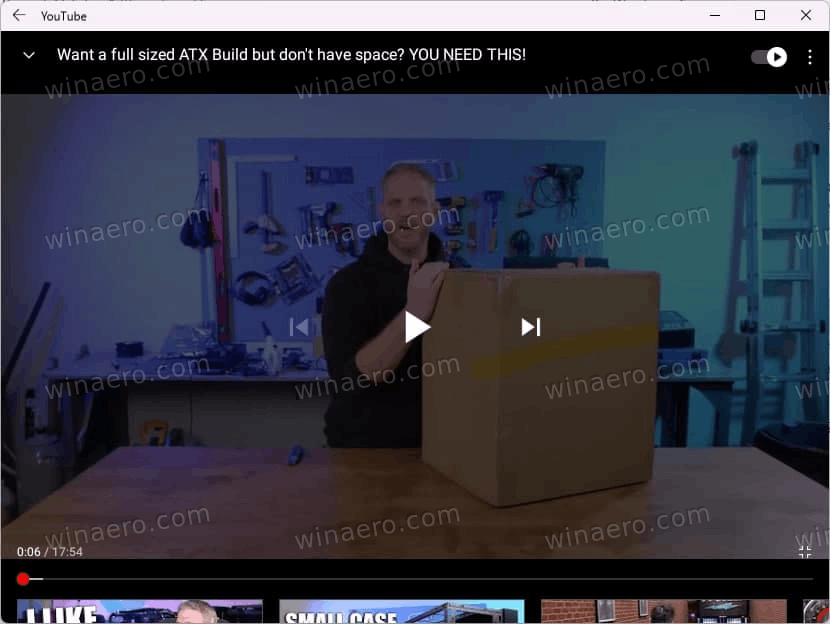
You are done! You just have installed Google Play Store and the minimal set of GApps in Windows Subsystem for Android. Now you are able to install Android apps from the Play Store on Windows 11.
Note: You may see the following error at the step 9 in PowerShell: Add-AppxPackage : Deployment failed with HRESULT: 0x80073CF3, Package failed updates, dependency or conflict validation. Windows cannot install package.
To fix it, double-click the earlier downloaded Microsoft.UI.Xaml.2.6_2.62112.3002.0_x64__8wekyb3d8bbwe.appx file, and then try again.
But we strongly recommend you need to restore the original WSA kernel.
Restore the original kernel for Windows Subsystem for Android
- Open Windows Subsystem for Android from the Start menu.
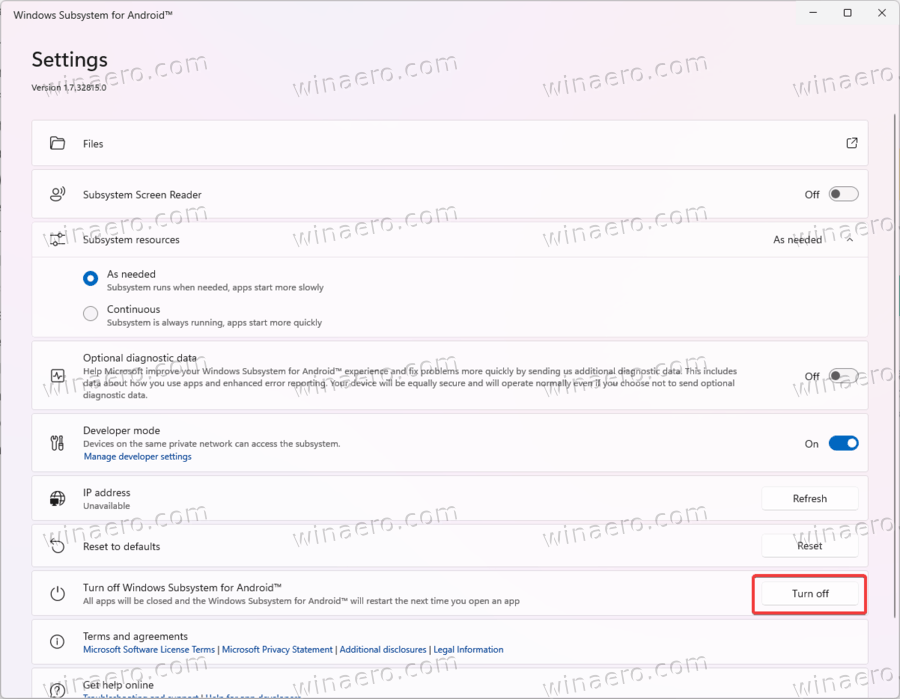
- Click Turn off. Wait for the animation next to the button to stop.
- Go to C:\WindowsSubsystemAndroid\Tools and rename kernel to kernel_root.
- Now, rename kernel_bak to kernel.
Done. Launch Windows Subsystem for Android and install apps you need.
Again, everything above is highly experimental and may fail under your specific conditions, including hardware and software.
That is how you install the Google Play Store on Windows 11.
Support us
Winaero greatly relies on your support. You can help the site keep bringing you interesting and useful content and software by using these options:

At the “3. Now you need to install lzip and unzip. Use the following command: apt install lzip unzip. Press Y to confirm the installation.” step, once inputting the apt install lzip unzip command, it gives me this error and I am unsure how to get around it:
root@PGS-AIO:/mnt/c/GappsWSA# apt install lzip unzip
Reading package lists… Done
Building dependency tree
Reading state information… Done
Package lzip is not available, but is referred to by another package.
This may mean that the package is missing, has been obsoleted, or
is only available from another source
However the following packages replace it:
xz-utils
E: Package ‘lzip’ has no installation candidate
In this case, run
apt xz-utils unzipTry using the “apt -update” command. You won’t be able to install any packages if you don’t.
just do
apt update
and
apt upgrade
and then apt install lzip unzip will work for you
Outstanding! Worked like a charm, though it is a lengthy process, finally worked for me, prior to which I failed several times following some other methods found on YouTube, thank you!
typo in command:
dos2unix ./appli.sh
should be:
dos2unix ./apply.sh
if you are dumb like me and you can’t find img files, first extract:
MicrosoftCorporationII.WindowsSubsystemForAndroid_1.7.32815.0_neutral_~_8wekyb3d8bbwe.Msixbundle
then extract again whats inside:
WsaPackage_1.7.32815.0_x64_Release-Nightly.msix
So I got to the point Add-AppxPackage -Register C:\WindowsSubsystemAndroid\AppxManifest.xml. However it came back at me with a long string in red Add-AppxPackage : Deployment failed with HRESULT: 0x80073CF3, Package failed updates, dependency or conflict
validation.
Windows cannot install package MicrosoftCorporationII.WindowsSubsystemForAndroid_1.7.32815.0_x64__8wekyb3d8bbwe
because this package depends on a framework that could not be found. Provide the framework “Microsoft.UI.Xaml.2.6”
published by “CN=Microsoft Corporation, O=Microsoft Corporation, L=Redmond, S=Washington, C=US”, with neutral or x64
processor architecture and minimum version 2.62108.18004.0, along with this package to install. The frameworks with
name “Microsoft.UI.Xaml.2.6” currently installed are
Windows cannot install package MicrosoftCorporationII.WindowsSubsystemForAndroid_1.7.32815.0_x64__8wekyb3d8bbwe
because this package depends on a framework that could not be found. Provide the framework “Microsoft.UI.Xaml.2.6”
published by “CN=Microsoft Corporation, O=Microsoft Corporation, L=Redmond, S=Washington, C=US”, with neutral or x64
processor architecture and minimum version 2.62108.18004.0, along with this package to install. The frameworks with
name “Microsoft.UI.Xaml.2.6” currently installed are: {}
NOTE: For additional information, look for [ActivityId] 4f233831-d063-0005-9f5f-244f63d0d701 in the Event Log or use
the command line Get-AppPackageLog -ActivityID 4f233831-d063-0005-9f5f-244f63d0d701
At line:1 char:1
+ Add-AppxPackage -Register C:\WindowsSubsystemAndroid\AppxManifest.xml
+ ~~~~~~~~~~~~~~~~~~~~~~~~~~~~~~~~~~~~~~~~~~~~~~~~~~~~~~~~~~~~~~~~~~~~~
+ CategoryInfo : WriteError: (C:\WindowsSubsy…ppxManifest.xml:String) [Add-AppxPackage], IOException
What do I have to do after that as I’m not good with terminal commands, and I tried looking for what it asked, but I have a feeling I have done it wrong. I’m using a clean install of windows 11 and managed to muddle through up to this point, but I’m a noob from this point forward.
+ FullyQualifiedErrorId : DeploymentError,Microsoft.Windows.Appx.PackageManager.Commands.AddAppxPackageCommand
WSA literally crashed after I installed with Google Apps.
All done succesful instruction, but dosent working.
The instructions in the original post failed, eg. E: Unable to locate package dos2unix, E: Package ‘lzip’ has no installation candidate, and failures for all commands with the common replies “Command ‘dos2unix’ not found, but can be installed with apt install dos2unix”.
After Following the post “9 thoughts on How to Install Google Play Store on Windows 11 WSA” and the guidelines in the comments, all the commands worked magically. But It is very disturbing that Google Play Store is nowhere there and I don’t know whether saved apk files could be installed manually or how the browsing could be done for non-google installations. I shall highly appreciate it if anyone could guide me, otherwise, all my happiness and anticipation for getting Android on my PC seems to be lost.
(I have desktop HP Pavilion, Intell 9th generation, Core i5, with 1.5 TB SSD)
You can always sideload apks to WSA thru ADB. I have a barebones Batch file created that actually allows me to install APK files by double clicking on them anywhere within Windows. Its was just a few lines utilizing ADB Sideload commands and creating the “.apk” File Association that points to my InstallAPKs.bat which I simply placed in \WINDOWS, but I’ll be damned if it doesn’t work lol! See below for the contents of installapks.bat. Copy to a New Text file and save as .bat. HTH —- John
[quote]
@echo off
set APK=%1
echo APK File Installation For Windows Sybsystem For Android (WSA)…
echo .
echo ..
echo …
echo ..
echo .
echo ….. Make sure ADB Starts …
adb.exe kill-server
adb.exe start-server
REM adb.exe wait-for-device
echo .
echo ..
echo …
echo ..
echo .
echo Connecting to WSA via ADB…
adb.exe connect localhost:58526
echo .
echo ..
echo …
echo ..
echo .
echo Installing ‘%APK%’ to Windows Sybsystem For Android (WSA)…
adb.exe install %APK%
REM adb.exe install -rsdgt %APK%
echo .
echo ..
echo …
echo ..
echo .
echo The APK File ‘%APK%’ has been installed. An App Shortcut has been pinned to your Windows Start Menu.
pause
exit
[/quote]
pero que complicado! con lo facil que es!!!
instalé google play en windows 11 sencillo y pocos pasos.
Compilé en modo “pico” este git: /LSPosed/MagiskOnWSA
y instalé el exe (64bit) y ya tenía el subsytem android con google play. listo.
there are 2 kernel files, one is called kernel-arm64 and the another one kernel-x86_64, which one should I copy?
Copy both
For anyone having trouble doing Add-AppxPackage -Register C:\WindowsSubsystemAndroid\AppxManifest.xml
Please download “Microsoft.UI.Xaml.2.6xxx.appx” also in step 4 in Step 3. Add GApps to Windows Subsystem for Android
Then install, then re-install AppxPackage -Register C:\WindowsSubsystemAndroid\AppxManifest.xml
I installed all, but not have Google Play Store. Windows Subsystem for Android open, but nothing of Play Store.
I am also not seeing Google Play Store.
—————————
Unable to start Windows Subsystem for Android™
—————————
The Windows Subsystem for Android™ can’t run because critical files are missing from the installation folder.
—————————
OK
—————————