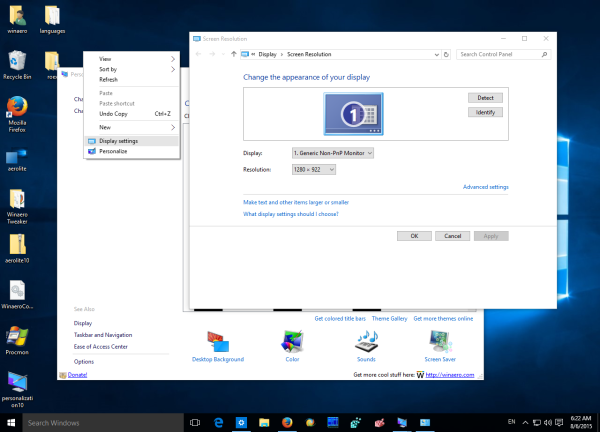
In Windows 10, the classic Display options context menu was replaced with the new Metro app called "Settings". The Settings app opens when you click the item "Display settings" in the Desktop context menu. It is possible to get the classic Display settings applet back in the Desktop context menu. If you like it more than the Settings app, follow the instructions in this article.
To add classic Display settings to Windows 10's desktop context menu, you have to do the following.
Use the Personalization Panel for Windows 10 freeware app.
- Download Personalization Panel for Windows 10. Since version 1.1.0.1, it supports adding the classic Display context menu item for the Desktop in Windows 10.
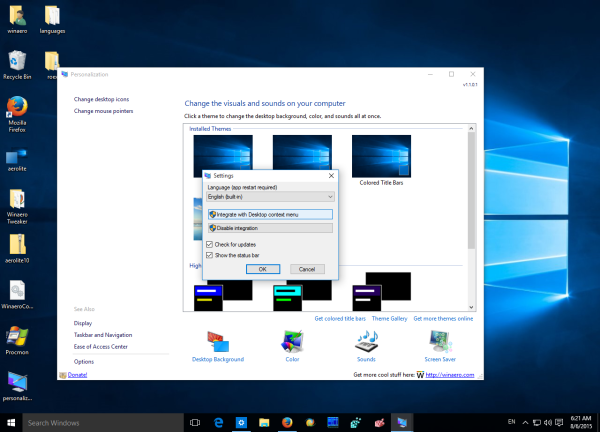
- Run the application and click the Options link.
- In application preferences, click the button "Integrate with Desktop context menu".

Confirm the UAC prompt.
That's it. Now, once you click the item "Display settings", the classic Display settings window will open.
 You will also get the classic Personalization window and the ability to get colored title bars in Windows 10.
Support us
Winaero greatly relies on your support. You can help the site keep bringing you interesting and useful content and software by using these options:

Thanks Sergey! Very useful tool indeed! Much appreciated!
you are welcome
THANK YOU! Exactly what I wanted! :)
Also I just noticed you can’t save themes? It’s called Unsaved theme and you can’t save it.
Click the “theme gallery” link and save from there.
Oh thanks that did the trick!
You are welcome.
Thanks for your suggestion.
How about adding the classic display settings? It is gone since Windows 10 1607.
Yes! Please add this!! The old resolution settings panel has disappeared and nobody knows how to get it back. Registry hacks won’t even switch over to it because it’s just GONE.