You can now enable Desktop stickers in Windows 11, which are available starting in build 22621 in form of a hidden feature. Perhaps, you have already heard about stickers, which appear in the Dev channel since February.
Advertisеment
Once you activate the feature, it will allow you place stickers on your desktop wallpaper. They will remain in place when you change the background image.
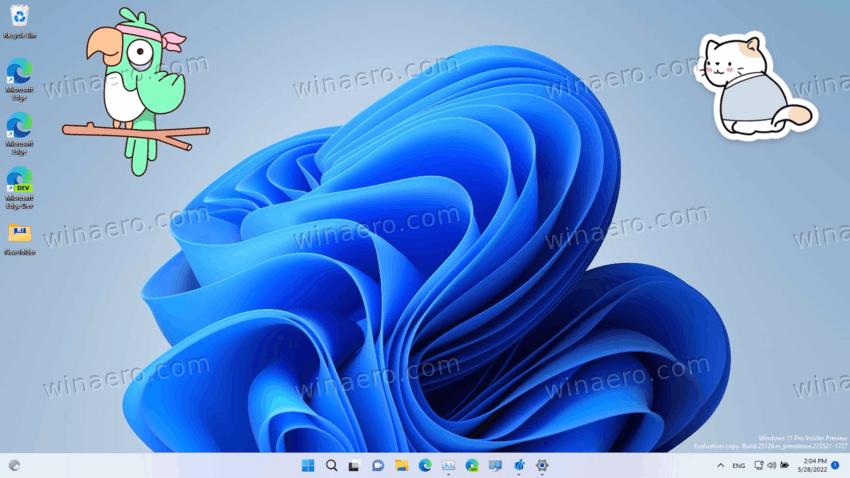
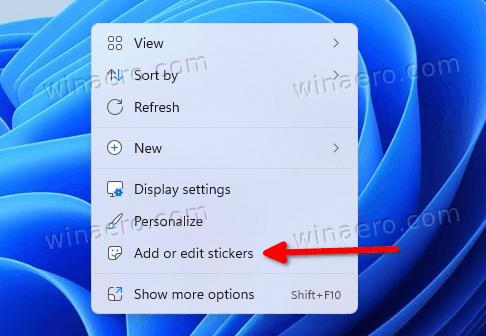
When stickers are enabled, they add a top-level item to the desktop right-click menu called "Add or edit stickers". Clicking it will open an image chooser dialog with several stickers and a search box.
Once you pick a sticker you like, you can change its screen location and size. You can also place more than just one sticker. You can even put several same stickers at various places on the destkop. Deleting a sticker is also very easy, as it comes with a Recycle bin icon that removes it from the desktop.
👉 Currently, desktop stickers are still a hidden experimental option, so you have to enable it manually. Stickers don't work in the initial release of Windows 11, build 22000. As of this writing, the feature only exists in both Dev Channel build 25162 and the 22H2 RTM build 22621.
To make stickers appear, you have edit the Registry. However, this may soon change. Microsoft may enable it by default, or entirely remove stickers from the OS if they find it not ready for production. I will update this post if that happens.
Now, let's see how to enable stickers in Windows 11 version 22H2, build 22621 and above.
Enable Stickers in Windows 11
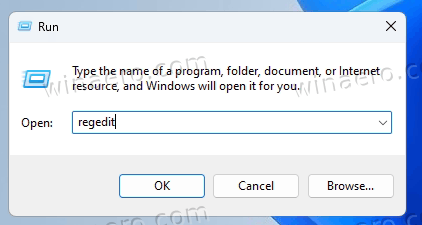
- Press Win + R and enter regedit into the Run box, then click Enter.
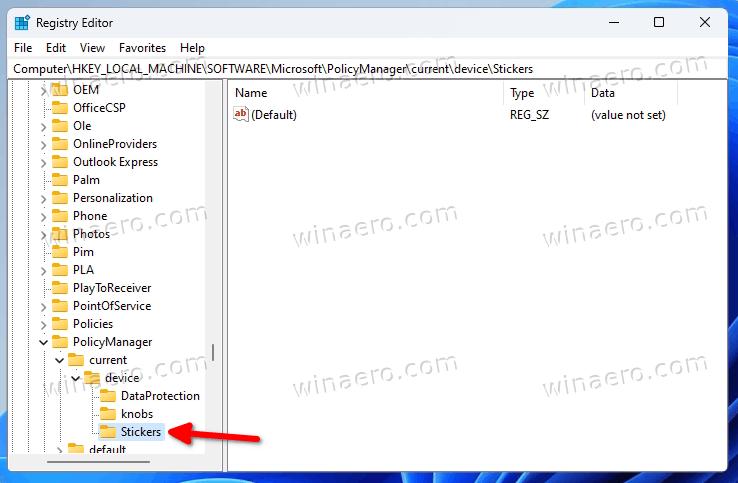
- Navigate to the following key:
HKEY_LOCAL_MACHINE\SOFTWARE\Microsoft\PolicyManager\current\device.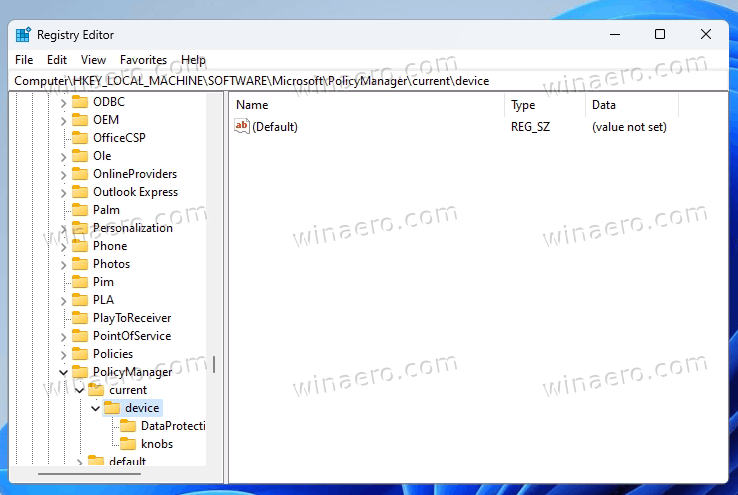
- Right-click the device key and select New > Key from the menu.
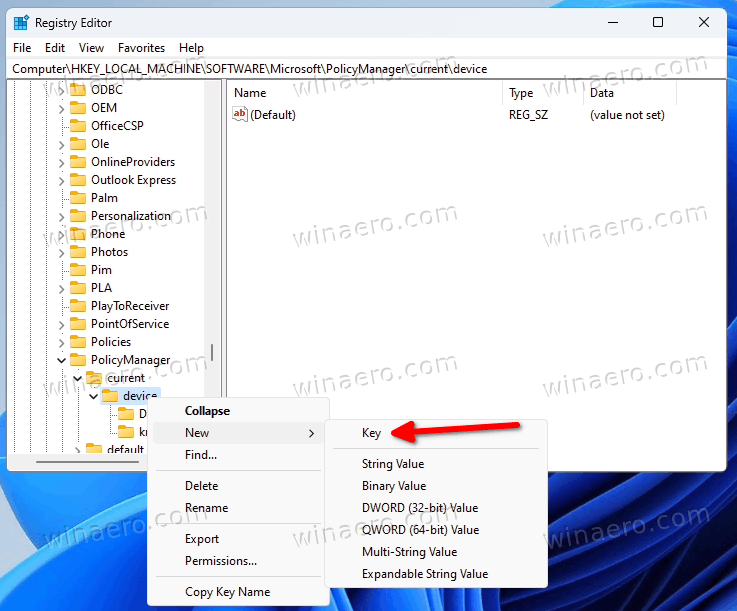
- Name the new subkey as Stickers.
- Now, right-click the Stickers key and select New > DWORD (32-bit) Value.
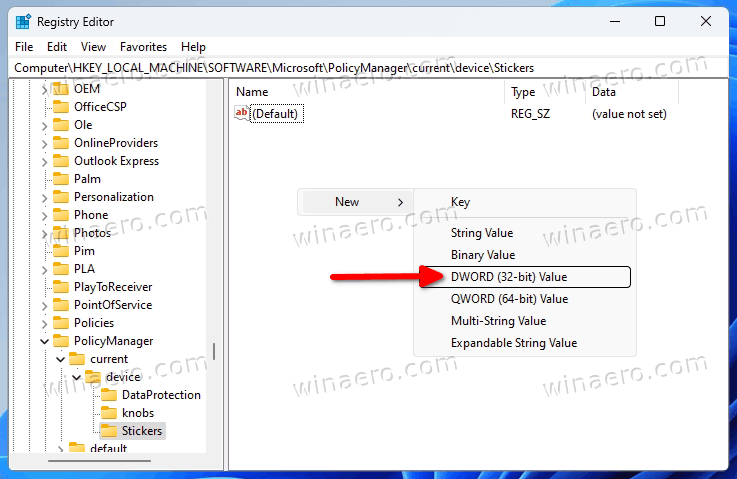
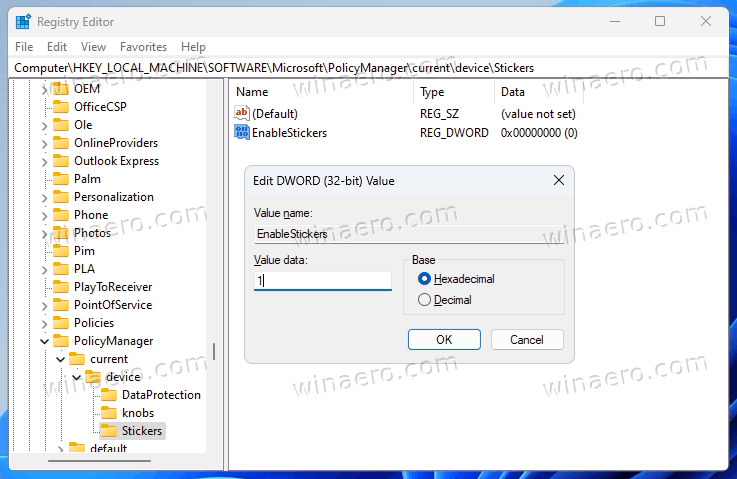
- Name the new value EnableStickers and double-click it to change its data.
- Now, set EnableStickers to 1.
- Restart Explorer or entire Windows 11 to apply the changes you made.
Done! You should now have the desktop feature stickers enabled in Windows 11.
Now, let's see how to manage the stickers.
Manage desktop stickers in Windows 11
You can add as many stickers as you want. As I already mentioned, it is also very easy to delete the specific sticker. Finally, you can 'edit' any of the added stickers by resizing it or moving to a different location on the screen.
Note: As of this writing, stickers don't support wallpaper slideshow and static colors. You must change you desktop background to either a static background image or Windows Spotlight to make them work. Again, this may change in the future.
Here's how you add stickers.
Add stickers to the desktop wallpaper
- Right-click the desktop and select Add or edit stickers from the menu.
- Alternatively, press Win + I to the Settings app.
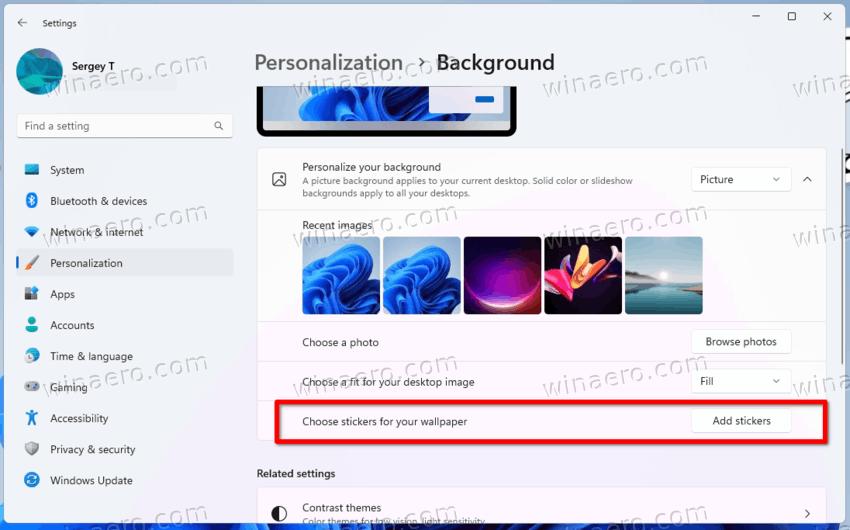
- Here, navigate to Personalization > Background.
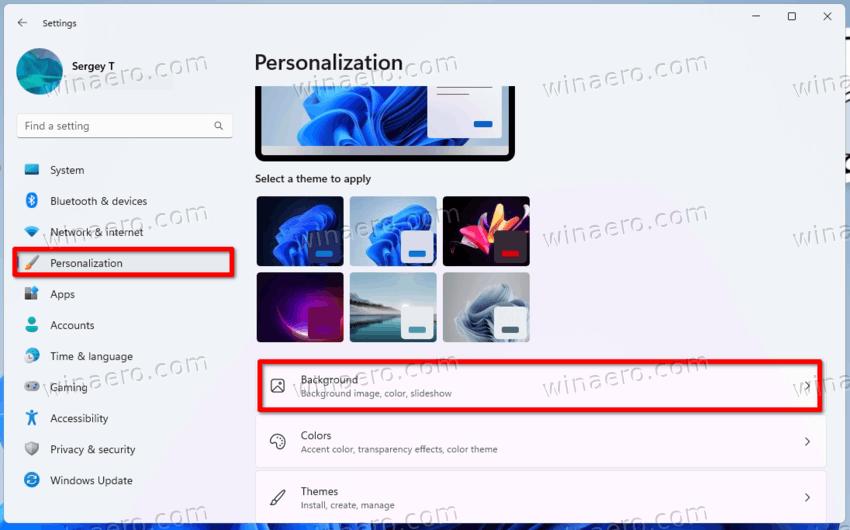
- On the right, click the Add Stickers option.
- Here, navigate to Personalization > Background.
- Now you will see the stickers editor with the desktop icons and the taskbar hidden. Scroll down the dozens of available sticker to pick the one you like, or use search.
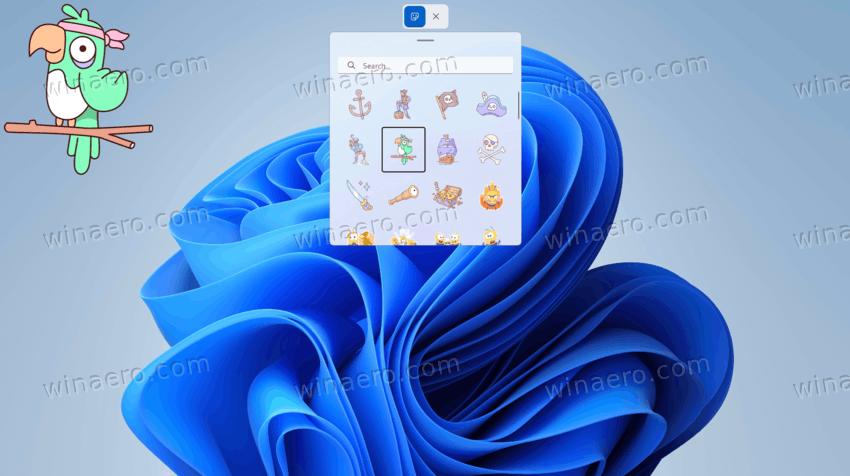
- Clicking a sticker will add it to the desktop.
- Repeat the steps 1-4 to add more stickers.
- You can now click the black X button above the sticker to exit the sticker editor.
Resize or move a sticker
- Right-click anywhere on the desktop wallpaper and select Add or edit stickers. Or use the corresponding option in Settings.
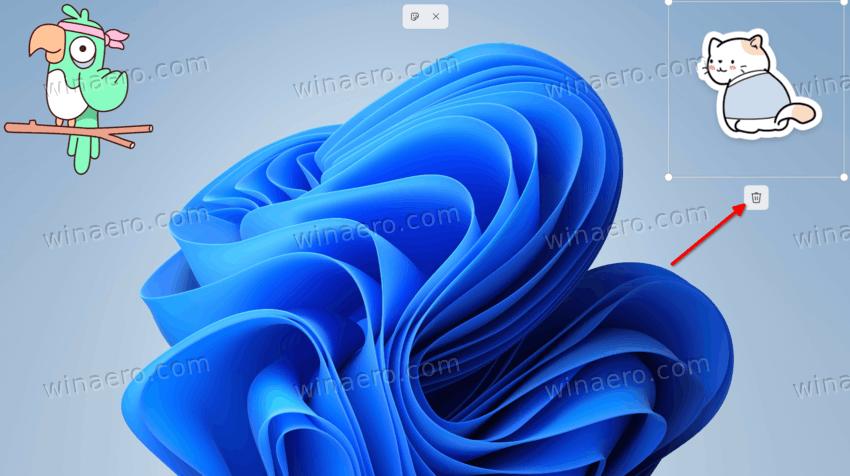
- Once the sticker editor opens, click an existing sticker on your desktop.

- Resize the selected sticker to the desired size.
- While it is selected, you can also move to some other location on the screen.
- Once you finished with the sticker, click the X 'close' button to leave the sticker editor.
Delete stickers from the desktop
- Right-click anywhere on the desktop background image, and click Add or edit stickers in the context menu.
- Now, click on the sticker you want to delete to select it.
- Click on the small Recycle bin icon next to the sticker to delete it.
- Repeat the steps 2-3 for other stickers you want to remove.
- Finally, click the X 'close' button to exit the sticker editor.
Done!
If you tried the stickers feature and found it half backed or even useless in the current implementation, you may want to make it hidden again. For that case, you can easily disable it by reverting the Registry change you made in the beginning of this tutorial. Do the following.
Disable Desktop Stickers in Windows 11
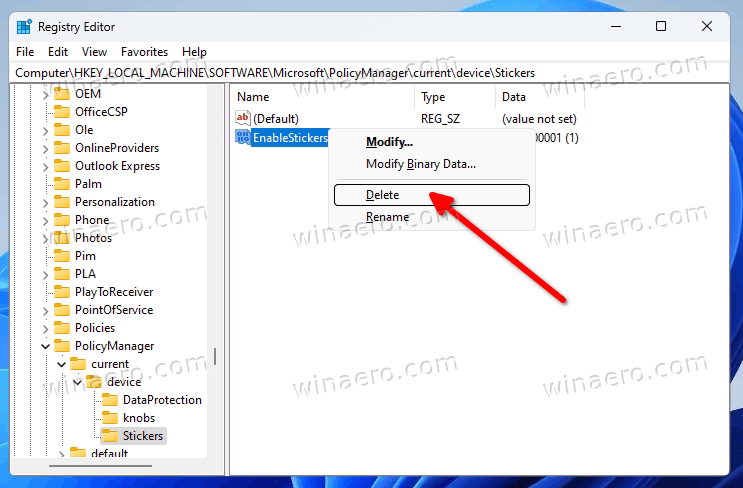
- Firstly, remove all the stickers from the desktop if you have any. Right-click the desktop, select Add or Remove stickers, and click the recycle bin icon for each sticker.
- Now, press Win + R and type the
regeditcommand in the Run dialog. - Browse the left area to the
HKEY_LOCAL_MACHINE\SOFTWARE\Microsoft\PolicyManager\current\device\Stickerskey. - To the right of the Stickers key, set the EnableStickers 32-bit DWORD to 0, or simply delete it.
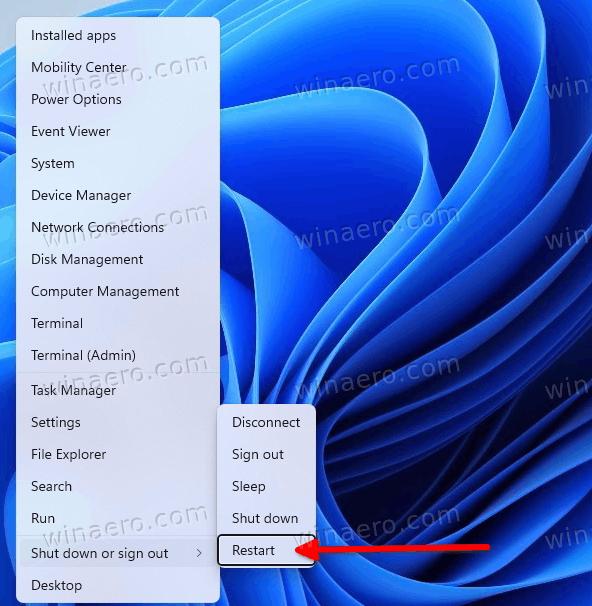
- Restart the operating system by pressing Win + X and selecting Shutdown or sign out > Restart from the menu.
Once you restart Windows 11, the stickers menu item will disappear from Settings and desktop context menu.
Ready-to-use REG files
If you are not happy with the manual Registry editing, you can download two REG files to quickly enable or disable the stickers feature.
Download the files in a ZIP archive from this link. Extract the archive to any convenient location.
To enable the stickers, open the enable-stickers.reg file and confirm the User Account Control prompt by clicking the Yes button.
To disable stickers, open the second file, disable-stickers.reg.
Interestingly, the stickers feature is available in the RTM build of Windows 11 22H2 (Build 22621), so there's a high chance for it to be introduced in the release version of 22H2.
That's it.
Support us
Winaero greatly relies on your support. You can help the site keep bringing you interesting and useful content and software by using these options:

thanks master
hi dear
after last windows insider update to ver 25290 the add stickers and edit cant open how can fix it
thanks