Since Windows Vista, Microsoft added a new security feature called User Account Control (UAC). It tries to prevent malicious apps from doing potentially harmful things on your PC. Before the administrator-level (elevated) action is allowed, UAC asks permission from the user to go ahead with it, or cancel the request. UAC has some settings which can affect its behavior. In this article we will look how to change those settings in Windows 10.
Advertisеment
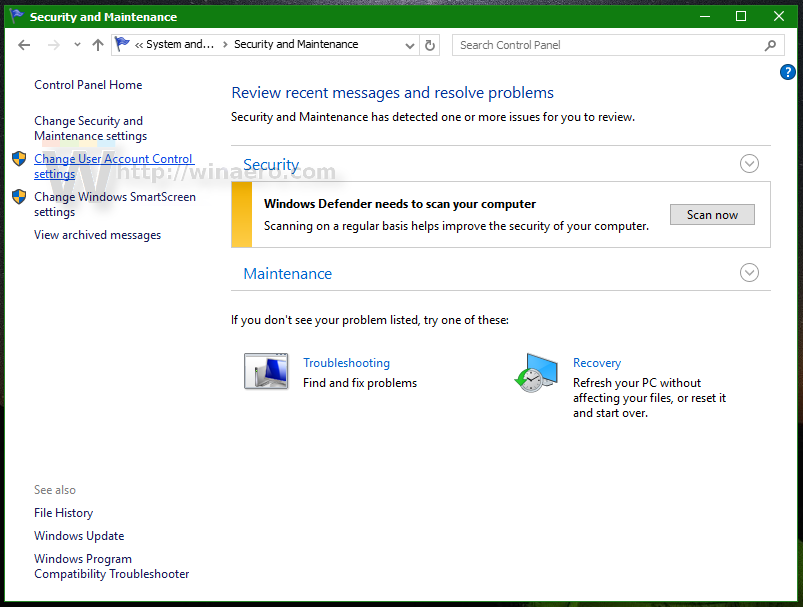
UAC settings are located in the 'classic' Control panel in Windows 10. Open the Control panel and go to the category:
Control Panel\System and Security\Security and Maintenance
Click the Change User Account Control settings link on the left:
 The User Account Control Settings window will appear on the screen:
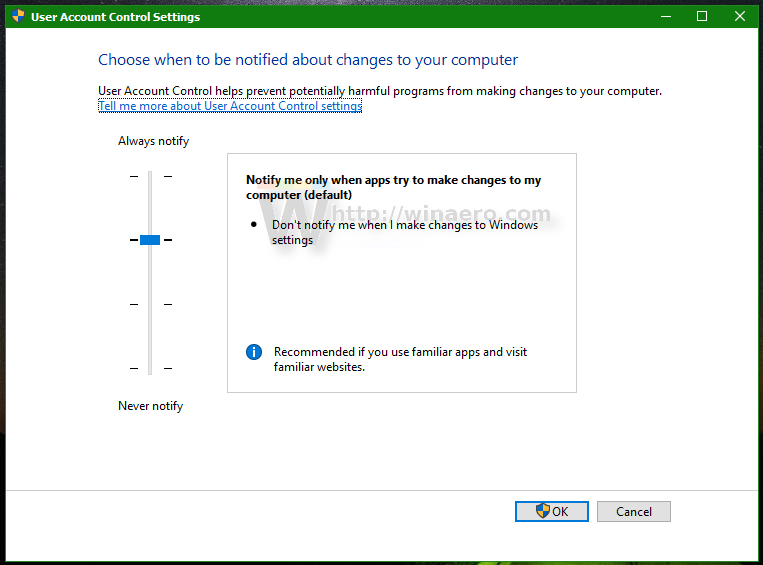 On the left, you will see a vertical slider, which controls UAC settings. It has four predefined positions:
- Never Notify
- Notify me only when apps try to make changes to my computer (don't dim my desktop)
- Notify me only when apps try to make changes to my computer (default)
- Always notify me
These settings change the UAC behavior in different ways.
Never Notify (disables UAC)
The 'Never notify' option disables UAC and turns off security warnings. UAC will not track apps. I do not recommend you to use this UAC level unless you understand perfectly why you need to disable UAC. It is the most insecure option. Please read the following article: How to turn off and disable UAC in Windows 10.
Notify me only when apps try to make changes to my computer (don't dim my desktop)
This setting is almost like the default one. When some app requests system-level changes, you will see the appropriate security warning, however, the screen will not turn dark behind the warning dialog. Because the screen is not dimmed, malicious apps can interact with the UAC security dialog and try to automatically click Yes to continue the action. So turning off the Secure Desktop is a potential security hole, as some app may confirm the request for you and damage your OS and data.
If you are working in limited/standard user account and using this UAC level, then you might need to provide administrator account credentials (user name and password) to elevate.
Notify me only when apps try to make changes to my computer (default)
This setting is set by default in Windows 8.1. When some app requests permission to complete a potentially harmful action, you will see the appropriate security warning and the entire screen will be dimmed behind the UAC confirmation dialog. When the screen is dimmed, no other apps can access that dialog, so only the user can interact with it to confirm or deny the request.
Always notify me
This setting is the most secure (and most annoying). When it is enabled, UAC shows notifications every time some app tries to make system-wide changes to OS settings, or even when the user tries to configure Windows settings which require administrator permissions. Besides the UAC prompt, the whole screen will be dimmed. If you are working in a limited user account, you might need to provide administrative account credentials.
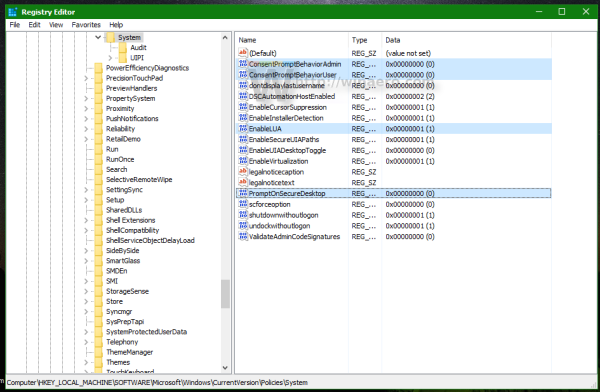
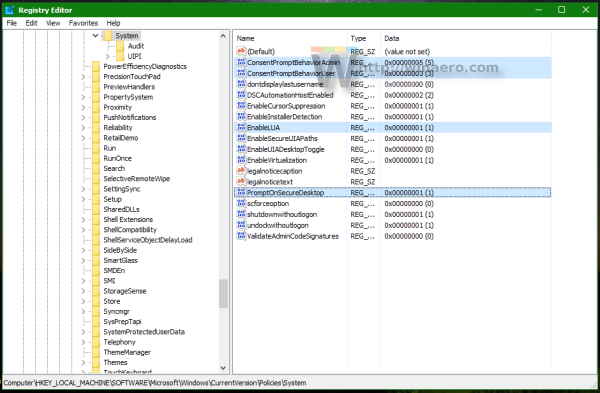
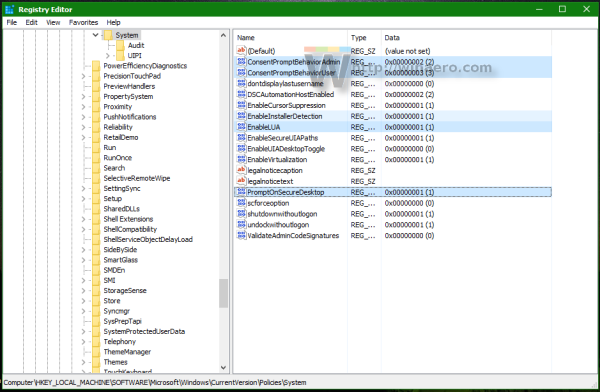
How to tweak UAC settings via Registry
UAC settings are stored in the following registry key:
HKEY_LOCAL_MACHINE\SOFTWARE\Microsoft\Windows\CurrentVersion\Policies\System
There you need to adjust the following four DWORD values:
- ConsentPromptBehaviorAdmin
- ConsentPromptBehaviorUser
- EnableLUA
- PromptOnSecureDesktop
For 'Never Notify' setting, set them as follows:
- ConsentPromptBehaviorAdmin=0
- ConsentPromptBehaviorUser=0
- EnableLUA=1
- PromptOnSecureDesktop=0

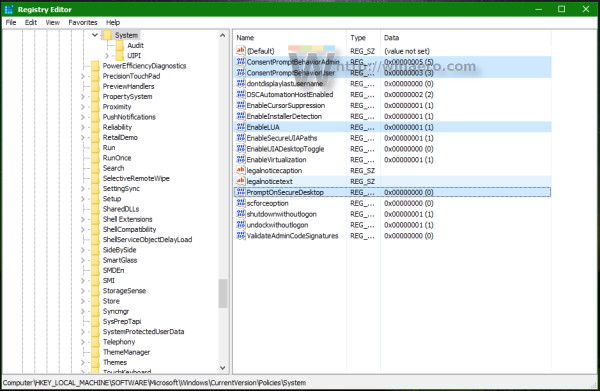
For 'Notify me ...' without screen dimming, the values should be as follows:
- ConsentPromptBehaviorAdmin=5
- ConsentPromptBehaviorUser=3
- EnableLUA=1
- PromptOnSecureDesktop=0

For 'Notify me ...' with screen dimming, the values should be as follows:
- ConsentPromptBehaviorAdmin=5
- ConsentPromptBehaviorUser=3
- EnableLUA=1
- PromptOnSecureDesktop=1

For 'Always notify me', set the following values:
- ConsentPromptBehaviorAdmin=2
- ConsentPromptBehaviorUser=3
- EnableLUA=1
- PromptOnSecureDesktop=1

After you change these values, you must restart Windows for the changes to take the effect. That's it. This tutorial is also applicable to Windows 8 and Windows 8.1.
Support us
Winaero greatly relies on your support. You can help the site keep bringing you interesting and useful content and software by using these options:

If I remember correctly, “Never notify” does NOT fully disable UAC in Windows 8/10. Only in Windows 7 “Never notify” actually disables UAC (Enable LUA = 0).