In Windows, you can add any item you want to the Control Panel's icon-based views such as Large Icons or Small icons, as well as Category view. For icon-based views, it requires only some registry tweaking, whereas for adding to Category view, you require an XML file. Let us see how you can add anything you want to Control Panel's icon views.
Advertisеment
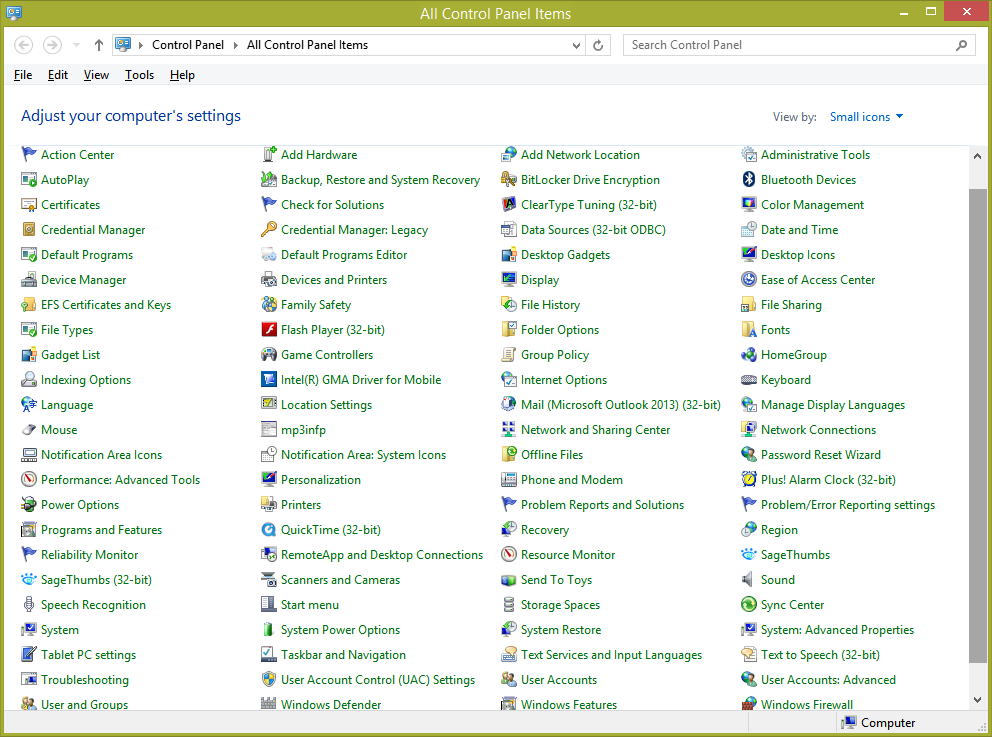
In the following image, you will see dozens of custom items added to the Control Panel which are not normally present.
Control Panel items in the past used to be *.CPL files. If they were placed in the Windows system directory, they showed up automatically in the Control Panel. However, in newer releases of Windows, while CPL files still exist, some Control Panel items are not CPL files but regular EXE files.
Adding an icon to Control Panel manually using Registry Editor
For example, let us add the Advanced User Accounts applet, which is not there by default. You can open Advanced User Accounts by typing: netplwiz or control userpasswords2 in the Run dialog or the Start Menu search box. Instead, if you add it to Control Panel, you won't need to remember the command any more, you can search for it or browse for it.
- To add any item to Control Panel, you need to know the full command line/path of the command you are adding.
- For every item you add to Control Panel, you need a unique GUID/CLSID. Class IDs for hundreds of ActiveX objects are stored in the Windows Registry at HKEY_CLASSES_ROOT\CLSID\ key. If the EXE or command you want to add does not have a GUID, then we can generate it. Download Microsoft's free GUID Generator tool from this page.
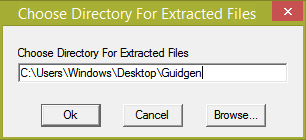
- Download the EXE file and run it. It is a self-extracting, compressed EXE. Extract it to any path such as a folder on the Desktop and click OK to continue.
- Open the folder where you extracted it and run GUIDGEN.exe.
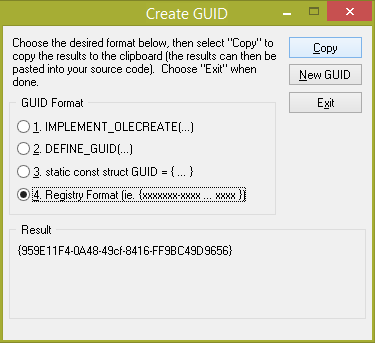
- Select 'Registry Format' and click Copy, so it will be copied to the clipboard. Now you can close the tool. In my case, after running GUIDGen, the GUID generated was {959E11F4-0A48-49cf-8416-FF9BC49D9656}. I will use it to add the Advanced User Accounts Control Panel.
- Now open Registry Editor (learn the fundamentals of Registry Editor if you don't know) and go to this key:
HKEY_CLASSES_ROOT\CLSID
Tip: You can access the desired Registry key with one click.
- Right click the CLSID key -> New -> Key and paste the name of the key you copied in step 5 here by pressing Ctrl+V. So the resulting key should be:
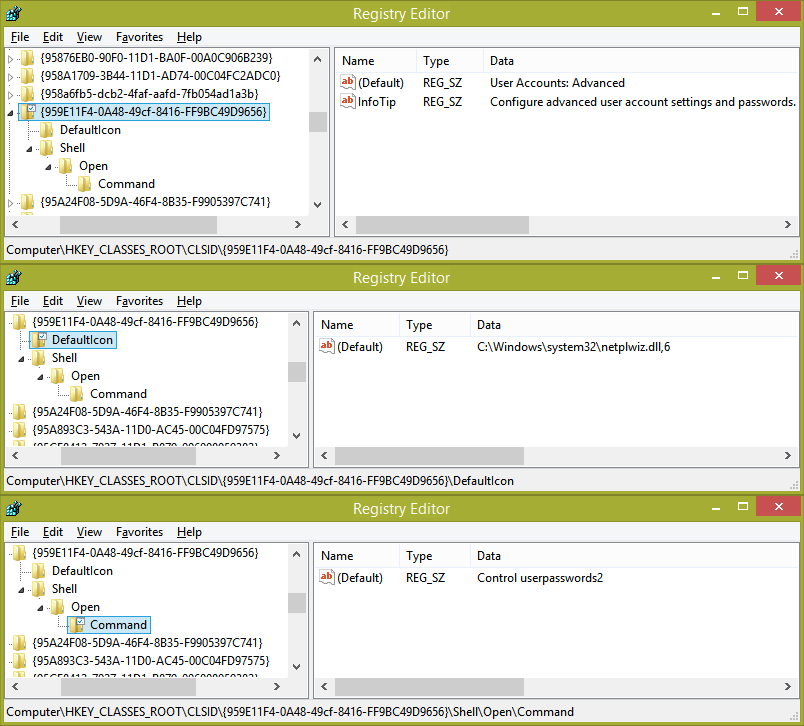
HKEY_CLASSES_ROOT\CLSID\{959E11F4-0A48-49cf-8416-FF9BC49D9656} - Now with the key you created ({959E11F4-0A48-49cf-8416-FF9BC49D9656}) selected in the left pane, double click the (Default) value in the right pane. Type the name of the item as you want it to appear in Control Panel. In our example, there is already a built-in item in Windows called User Accounts inside the Control Panel, so we use the name: User Accounts (Advanced).
- Create another string value in the right pane and give it the name "InfoTip". Type the description you want to see as the tooltip when you hover over that item. For example, in this case, an appropriate description is: Configure advanced user account settings and passwords.
- Now right click the {959E11F4-0A48-49cf-8416-FF9BC49D9656} key in the left pane and create another key called DefaultIcon. In the (Default) value of DefaultIcon key, enter the path to the icon you wish to use for the Control Panel item you are adding. In this example, we want to add the 6th icon from C:\Windows\System32\netplwiz.dll so enter: C:\Windows\system32\netplwiz.dll,6
- Right click the {959E11F4-0A48-49cf-8416-FF9BC49D9656} key in the left pane again and create another new key called Shell. Right click the Shell key and create a new subkey called Open. Finally, right click the Open key and create a key called Command.
- With the Command key selected, type the path to the Control Panel item that you wish to add. In this example, let's use: Control userpasswords2.Since so many new keys and values are required, let me show you with a screenshot of how it must look like:
- Finally go to the Registry key where we must add this GUID so Windows knows that it must show in the Control Panel. That key is:
HKEY_LOCAL_MACHINE\SOFTWARE\Microsoft\Windows\CurrentVersion\Explorer\ControlPanel\NameSpace\
- Right click the Namespace key -> New -> Key. Enter or copy-paste the GUID as this key's name. In this example, the key created will be:
HKLM\SOFTWARE\Microsoft\Windows\CurrentVersion\Explorer\ControlPanel\NameSpace\{959E11F4-0A48-49cf-8416-FF9BC49D9656}
That's it! Now try opening Control Panel using any of these ways. You will see that the Advanced User Accounts item is added next to the regular User Accounts item.
It will show up in Start menu search results too.
Adding an icon to Control Panel by merging a sample REG file
If you find the above steps are too many, you can copy-paste the steps we did manually into Notepad, save it as a .REG file and double click the .REG file to merge it into the Registry.
- Open Notepad and copy-paste the following text directly into it, which includes all of the changes we did above:
Windows Registry Editor Version 5.00 [HKEY_CLASSES_ROOT\CLSID\{959E11F4-0A48-49cf-8416-FF9BC49D9656}] @="User Accounts: Advanced" "InfoTip"="Configure advanced user account settings and passwords." [HKEY_CLASSES_ROOT\CLSID\{959E11F4-0A48-49cf-8416-FF9BC49D9656}\DefaultIcon] @="C:\\Windows\\System32\\netplwiz.dll,6" [HKEY_CLASSES_ROOT\CLSID\{959E11F4-0A48-49cf-8416-FF9BC49D9656}\Shell\Open\Command] @="Control userpasswords2" [HKEY_LOCAL_MACHINE\SOFTWARE\Microsoft\Windows\CurrentVersion\Explorer\ControlPanel\NameSpace\{959E11F4-0A48-49cf-8416-FF9BC49D9656}] - From the File menu of Notepad, save this file as a .REG file. For example, give it the name: "Add Advanced User Accounts to Control Panel.reg". You must use double quotes in the file name field of the Windows save dialog to save that file with that specific extension. If you don't use double quotes, then the .txt extension will be appended to it, i.e. filename.reg.txt.
- Now double click this saved .REG file to merge it into the Windows Registry.
To add another item, you just need to run GUIDGEN again and generate a new GUID in Registry format. Then either create the registry keys and values manually using Registry Editor or just create a copy of the .REG file you created earlier and modify the copy by opening it in Notepad.
For example, let us add another item to Control Panel: Group Policy Editor.
After running GUIDGen, the GUID I generated was {399E23A8-0D86-41fd-A1D3-025A500A8146}. This is the .REG file to add "Group Policy Editor" to Control Panel.
Windows Registry Editor Version 5.00

[HKEY_CLASSES_ROOT\CLSID\{399E23A8-0D86-41fd-A1D3-025A500A8146}]
@="Group Policy"
"InfoTip"="Configure Group Policy settings."

[HKEY_CLASSES_ROOT\CLSID\{399E23A8-0D86-41fd-A1D3-025A500A8146}\DefaultIcon]
@="gpedit.dll,0"

[HKEY_CLASSES_ROOT\CLSID\{399E23A8-0D86-41fd-A1D3-025A500A8146}\Shell\Open\Command]
@="mmc.exe gpedit.msc"

[HKEY_LOCAL_MACHINE\SOFTWARE\Microsoft\Windows\CurrentVersion\Explorer\ControlPanel\NameSpace\{399E23A8-0D86-41fd-A1D3-025A500A8146}]
You get the idea. The format of this file isn't hard to understand. The key after HKEY_CLASSES_ROOT\CLSID\ is the GUID you generated, followed by the name by which you want it to be shown in Control Panel. The Infotip value is the tooltip which appears when you hover over the item. Next is the DefaultIcon key and its value. Following that is the command which it will run and the last is the key where the GUID must be added for it to show up in Control Panel.
If you are editing the .REG file directly, please be careful to use double backslashes \\ in the paths. That is required. If you are modifying a registry value directly, you only need to enter the path as C:\XYZ but if you are entering a path in a .REG file, the path must be C:\\XYZ
Using this method, you can add any command, any tool you want to the Control Panel.
Support us
Winaero greatly relies on your support. You can help the site keep bringing you interesting and useful content and software by using these options:

Thanks so much!
you are welcome
What a fantastic tutorial! I had been searching the Internet for two days trying to find an answer to this question and you nailed it big time. I carefully followed your steps and everything now works great. Thank you very much for taking the time to post this information.
you are welcome
The GUID generator isn’t available from Microsoft’s website anymore.
Yeah that killed all the useful downloads to force more crappy Store apps on you. Use https://www.guidgen.com/ instead. Or you can find Microsoft’s tool somewhere on other download sites.
There’s no need to install anything, all one has to do is to type New-Guid (or [guid]::NewGuid() ) into Powershell.
Great…. nice article
thank you….
Cant help but think its a incomplete article, it would have been nicely rounded off with a reg file to download that adds all those applets, its great I now know how to do this manually, but adding all those applets manually by searching got the ways to even launch them, then creating the GUID’s etc. is time consuming. Whilst these are already added to the system hence the screenshot, could have exported the reg file for us to import.
Also the dangers of linking to a vendors file, you never know when they decide to obsolete something and oh boy microsoft have become the kings of obsoleting stuff, next time host the exe directly so people clicking the link dont get a 404.
Thanks anyway.
Can you add any program to it as well? Like an exe?
Yep.
This is about to get more popular as Microsoft continues to destroy Windows by adding their Windows Mobile failures to the desktop. I would like to add my own program to the control panel. For example, Replace Programs and Features with Uninstall Tool 3.4. I hope its possible.
thank you! you helped me restore the classic notification area icons setting that was removed in windows 10 in favor of the settings app.
Btw how to make the items I added to be visible in the category view of the control panel?
Under the {GUID} key of your item, create a new dword value called System.ControlPanel.Category.
For example
[HKEY_CLASSES_ROOT\CLSID\{959E11F4-0A48-49cf-8416-FF9BC49D9656}]
“System.ControlPanel.Category”=dword:00000001
“InfoTip”=”My Control Panel item”
The item will appear in the “Personalization” category. Play with the value to move your item between the available categories.
Btw can you add this to your Winaero tweaker? That would be more useful.
I can add.
I am trying to figure out how to add classic Devices and Printers to Control Panel in Windows 11, however, in ControlPanel\NameSpace\, there is no “Devices and Printers”.
It’s also doesn’t seem to be a program, as you can use the following URL in Control Panel to get there
Control Panel\All Control Panel Items\Devices and Printers
You can use Winaero Tweaker to create a Shell Folder shortcut for Devices and Printers, and take the GUID from the shortcut.