If you are facing the problem of blurry fonts in Windows 10, it can be really annoying and you may not be aware of what changes Microsoft made to their OS to understand why you are seeing blurry fonts. Since Windows 8.1, Microsoft changed the behavior of DPI scaling. If you are not satisfied with the result of your current DPI scaling in Windows 10, you should try solutions mentioned in the article.
Advertisеment
In Windows 8.1, the "Use XP style scaling" global option was removed. XP style scaling can still be used but you need to enable it on a per-app basis. Instead, when the DPI is scaled up, now, the newer DPI virtualization method introduced in Vista is enabled by default for all apps! However for apps that don't scale correctly, the fonts get blurred.
Fix blurry fonts in Windows 10 on a per app basis
If you are facing blurry text issues in only a single app or just a few apps, follow these steps:
- Right click the shortcut of those apps where you see blurry fonts and click Properties.
- Go to the Compatibility tab.
- Check the option 'Disable display scaling on high DPI settings'.
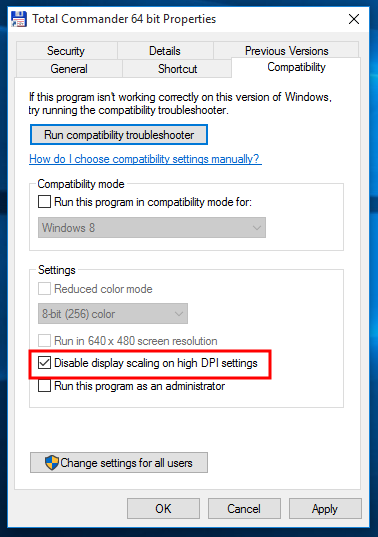
- Click OK and now try running the app to see if the blurry text issue is gone.
How to fix blurry fonts in Windows 10
Another thing you can try is reduce your DPI settings to 100%. Here is how:
- Open the Settings app.
- Go to System - Display.
- Set the trackbar for "Change the size of text, apps and other items:" to the left position. The value should be "100%", as shown below:
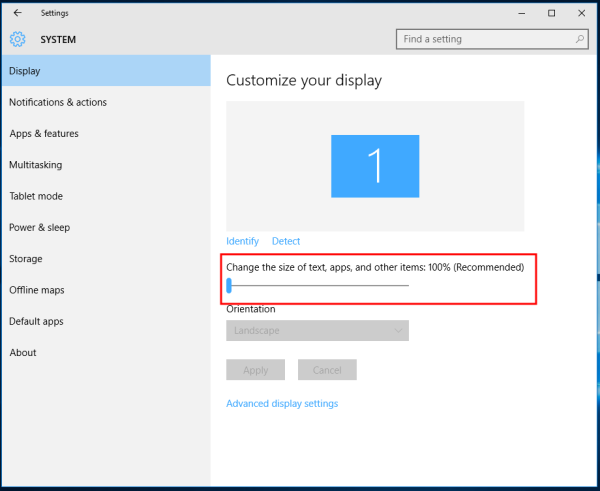
- Sign out from your Windows session and sign in back.

If the result is still not what you wanted, try the next solution.
Fix blurry fonts in Windows 10 by changing the scaling method.
It is possible to revert the scaling method Windows 10 uses to an older one, used in Windows 8 RTM and in Windows 7. For many users, it provides much better results than the default one.
To activate the old scaling method, do the following:
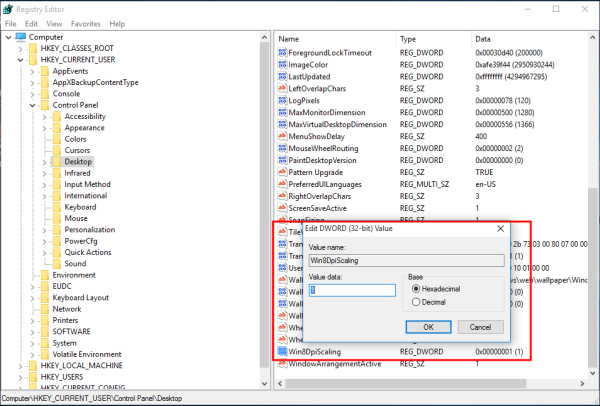
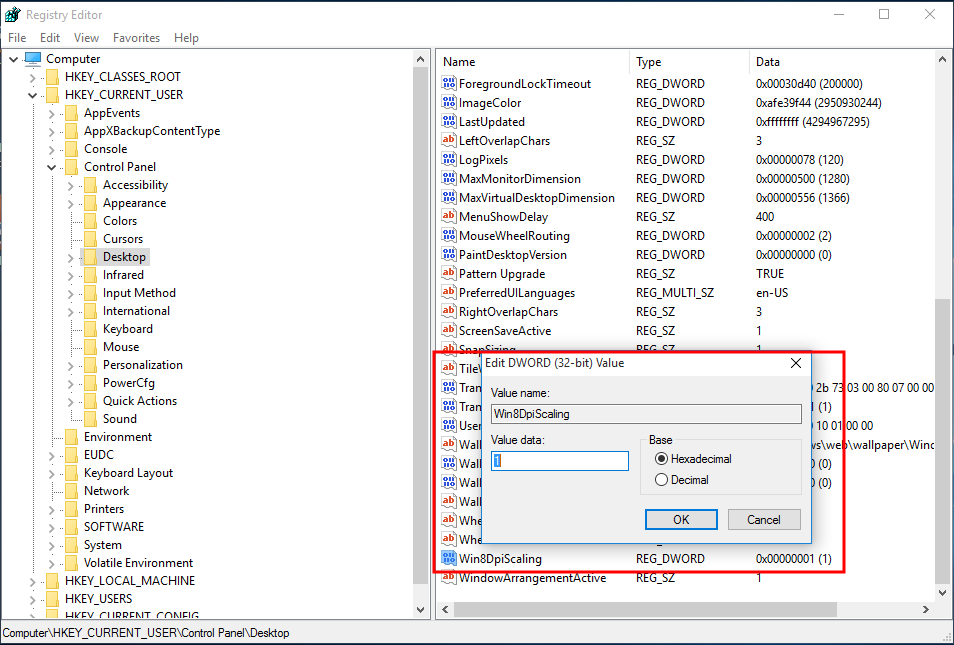
- Open Registry Editor.
- Go to the following Registry key:
HKEY_CURRENT_USER\Control Panel\Desktop
Tip: You can access any desired Registry key with one click.
- Set the DpiScalingVer parameter to 0x00001018 as shown below:

- Set the Win8DpiScaling parameter to 1:
- Create a new 32-bit DWORD value named LogPixels and set it to 0x00000078:
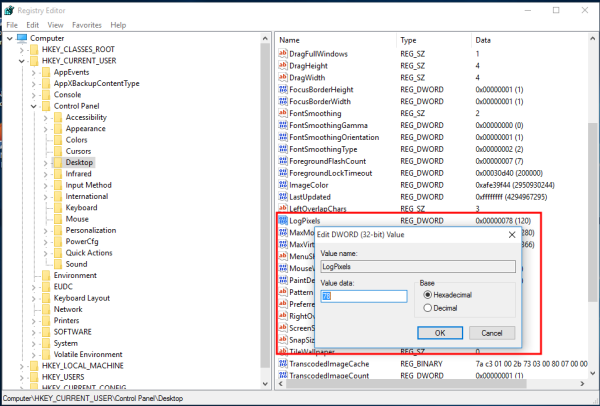
- Now, restart Windows 10.

After restarting, you should not be affected by blurry fonts any more.
I prepared ready-to-use Registry tweaking files so you can switch between scaling methods with one click.
Merge the "Windows 8 DPI method.reg" file by double clicking it to activate the legacy scaling. To undo the changes, click the file Default DPI method.reg. Don't forget to restart your PC.
Support us
Winaero greatly relies on your support. You can help the site keep bringing you interesting and useful content and software by using these options:

DpiScalingVer is always reset back to 1000 when you logoff. 10018 does not stick and you will still see blur for fonts such as event viewer. You have to set 1018 every time early in the logon stage. This is
what I have experienced using the RTM build.
I used that fix for not reseting each time.
“After updating to Windows 10, I found that text is blurry in many apps if I set 125% DPI. In Windows 8.1 there was a setting called “Let me choose one scaling level for all my displays” which made non high DPI aware apps to ignore higher scaling and display in 100% scaling mode. In Windows 10 that option is gone an instead you get a blurry text if you set the slider to 125%.
I’ve found a solution :
Make a .cmd file with the following contents:
REG ADD “HKCU\Control Panel\Desktop” /v DpiScalingVer /t REG_DWORD /d 0x00001018 /f
REG ADD “HKCU\Control Panel\Desktop” /v Win8DpiScaling /t REG_DWORD /d 0x00000001 /f
REG ADD “HKCU\Control Panel\Desktop” /v LogPixels /t REG_DWORD /d 0x00000078 /f
Then just drop it in Autostart or create a Task which starts at each logon, because it reverts back after restart.”
I need to undo this process as it messed up my design program. Please advise.