USB selective suspend is a very useful power management feature available in the Windows OS. It allows you to reduce the computer's power consumption by suspending unused (inactive) USB ports. This will save battery life, so it is a good idea to ensure that you have it enabled.
Advertisеment
When a device connected to a USB port becomes inactive, the USB selective suspend feature allows the USB hub to suspend such a port. While it saves power, there is a downside to suspending the USB port as well. In modern devices like tablets and laptops, a lot of integrated peripherals are connected via the USB bus. Different sensors, card reader are just a few examples. You don't need to have your card reader enabled all the time. You only need it when you are reading an SD card, and you only need your fingerprint sensor when you are logging in to your user account.
To optimize a device's power consumption, ensure that you have USB Selective Suspend enabled in Windows 10. Here is how.
To Enable USB Selective Suspend in Windows 10, do the following.
- Open Control Panel.
- Go to Control Panel\Hardware and Sound\Power Options.

- On the right, click the link Change plan settings.

- On the next page, click the link "Change advanced power settings". Tip: You can open advanced settings of a power plan directly in Windows 10.

- In the next window, expand USB Settings -> USB Selective suspend. Ensure that it is set to "Enabled".
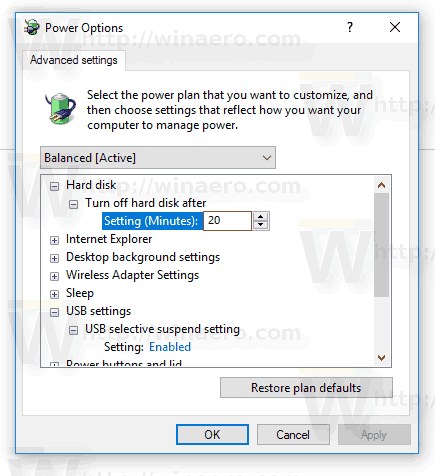 If not, enable the option and you are done.
Note: You can access advanced power settings from Settings. Here is how.
- Open Settings.
- Go to System - Power & sleep.
- On the right, click on the link Additional power settings.

- This will open the classic Power Options applet you are already familiar with.

Enable USB Selective Suspend using Powercfg
There is a built-in tool in Windows 10, powercfg. This console utility can adjust many parameters related to power management. For example, powercfg can be used:
- To sleep Windows 10 from the command line
- To change the power plan from the command line or with a shortcut
- To disable or enable the Hibernate mode.
Powercfg can be used to set the desired action for the hardware power button. Here is how.
- Open a command prompt.
- Type or copy-paste the following command:
powercfg /SETDCVALUEINDEX SCHEME_CURRENT 2a737441-1930-4402-8d77-b2bebba308a3 48e6b7a6-50f5-4782-a5d4-53bb8f07e226 1
This will enable USB Selective Suspend when on battery.
- To enable USB Selective Suspend when plugged in, execute the following command:
powercfg /SETACVALUEINDEX SCHEME_CURRENT 2a737441-1930-4402-8d77-b2bebba308a3 48e6b7a6-50f5-4782-a5d4-53bb8f07e226 1

- To disable USB Selective Suspend when on battery, use the command:
powercfg /SETDCVALUEINDEX SCHEME_CURRENT 2a737441-1930-4402-8d77-b2bebba308a3 48e6b7a6-50f5-4782-a5d4-53bb8f07e226 0
- To disable USB Selective Suspend when plugged in, use the following command:
powercfg /SETACVALUEINDEX SCHEME_CURRENT 2a737441-1930-4402-8d77-b2bebba308a3 48e6b7a6-50f5-4782-a5d4-53bb8f07e226 0
That's it.
Support us
Winaero greatly relies on your support. You can help the site keep bringing you interesting and useful content and software by using these options:

Too bad that it doesn’t work for the mouse. I suppose that a mouse can never be counted as inactive?