You can enable the classic Classic Alt+Tab dialog in Windows 11, which doesn't show window thumbnails but only shows app icons. It is less distractive than the default one, and more compact. Hence it has a lot of fans, despite its age.
Advertisеment
Currently, Windows 11 includes a modern Alt+Tab window switcher that occupies the whole screen. It renders window thumbnails in the middle of the screen, filling the rest area with a background blur effect.
Microsoft is also working on a new version of the Alt + Tab appearance for Windows 11, which resembles the style of Windows 7. It is a windowed dialog without blur. As of this writing, you can manually enable it on recent Insider builds.
The classic Alt+Tab dialog is actually the third and the oldest window swticher available to you in Windows 11. It was first introduced in Windows 95, and was used until Windows XP without major changes. Still, it remains accessible in all modern Windows versions. Here's how you can turn it on.
How to enable the Classic Alt+Tab Dialog
To enable the Classic Alt+Tab Dialog in Windows 11, do the following.
- Press Win + R, type
regeditinto the Run box, and hit Enter to launch the Registry Editor. - Go to the following key:
HKEY_CURRENT_USER\Software\Microsoft\Windows\CurrentVersion\Explorer. You can simply copy and paste this path into the address bar of regedit. - Right-click anywhere in the right pane and select New > 32-bit DWORD from the menu.
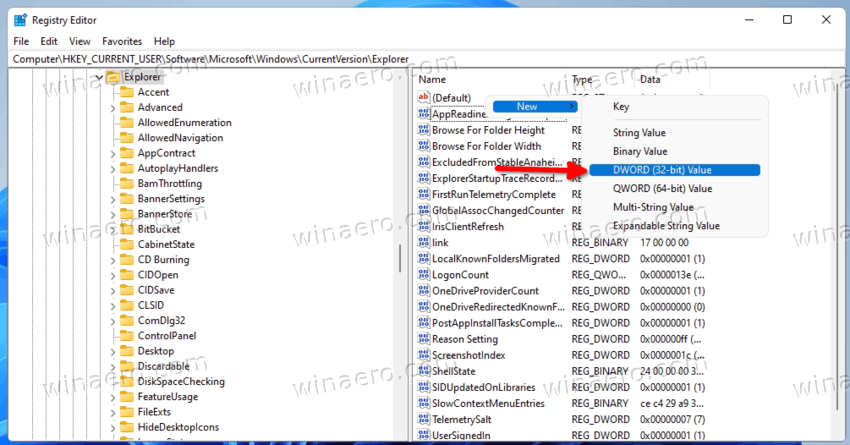
- Rename the new value to
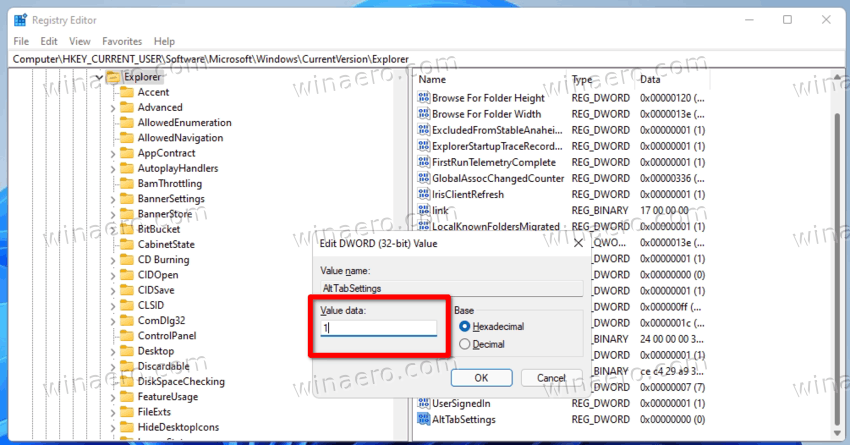
AltTabSettings. - Now, double-click itand change its value data to 1.
- Finally, right-click the Start button and select Shut down or sign out > Sign out.
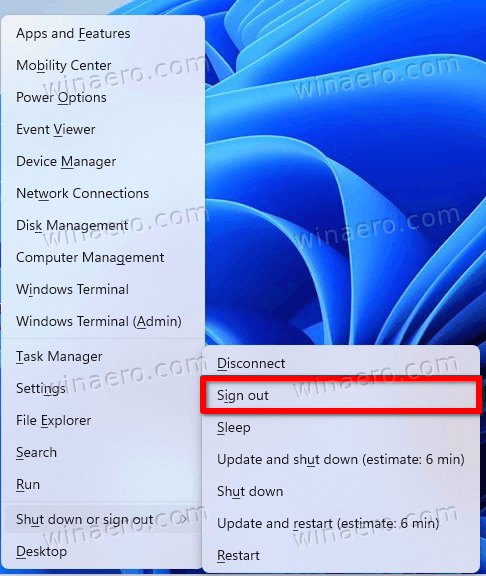
You are done! Once you sign in back to Windows 11, you will see this Alt+Tab dialog.
If you decide to restore the newer Alt+Tab in Windows 11, all you need to do is to remove the AltTabSettings value you have created. Again, to make the change take effect, you need to sign out from Windows 11 and sign in back. By the way, restarting the Explorer shell will also do the trick.
Alternatively, you can enable the older window switcher with Winaero Tweaker.
Enable Classic Alt+Tab in Windows 11 with Winaero Tweaker
- Download Winaero Tweaker from here, then install and launch it.
- In the navigation tree on the left, select Appearance > Alt + Tab appearance.
- On the right, enable the check box "Enable classic Alt + Tab dialog".
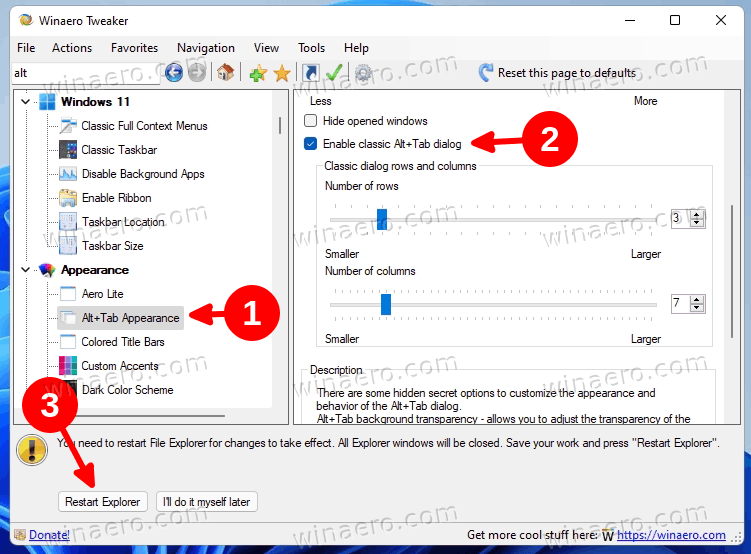
- Restart the Explorer shell when prompted.
As you can see in the screenshot above, you can also customize the classic window switcher by changing its number of rows and columns.
While you can easily adjust them with Winaero Tweaker, you may be interested in changing them manually via the Registry. Let's learn more about these options.
Customize the classic Alt+Tab window switcher
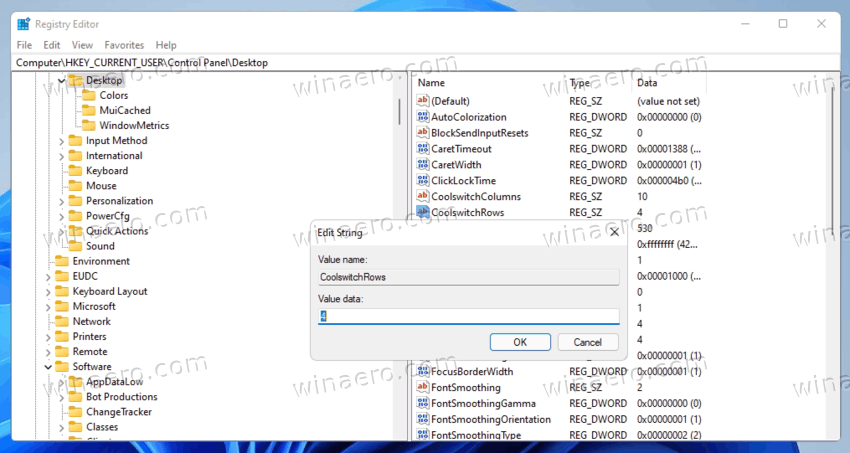
- Launch the Registry Editor; press Win + R and type
regeditin the Run box. - Go to the
HKEY_CURRENT_USER\Control Panel\Desktopkey in the left pane. - On the right, modify or create a new STRING (REG_SZ) value CoolSwitchRows.
- Set its value data to the number of rows for the classic dialog. The default is 3, and the supported range is from 1 to 20.
- Now, modify or create a new STRING (REG_SZ) value CoolSwitchColumns.
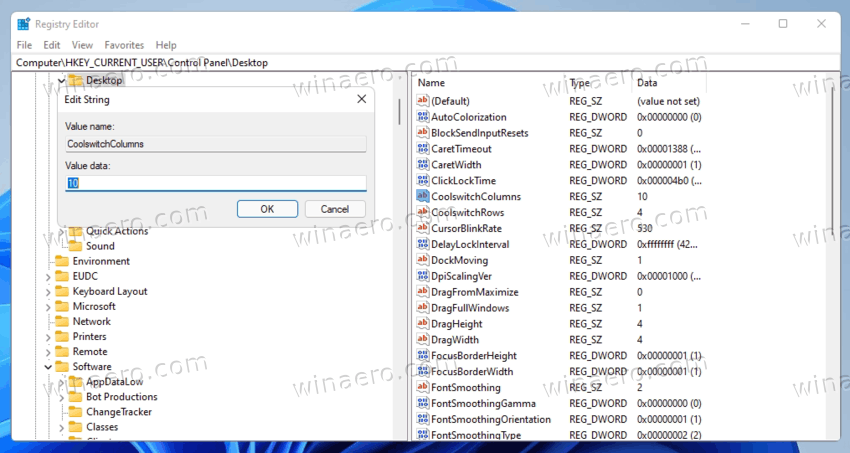
- Set it to the desired number of columns for the classic dialog. The default value is
7, and you can specify it in range of 1 - 43.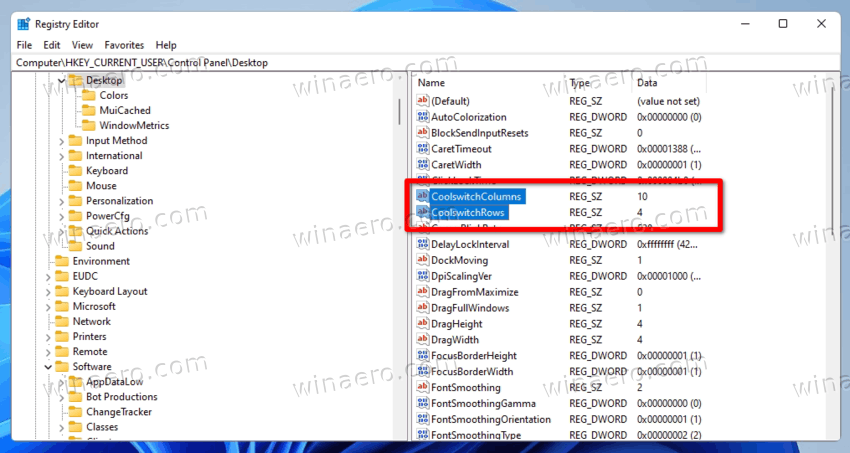
- Sign out and sign in to Windows 11 to apply the change.
Done!
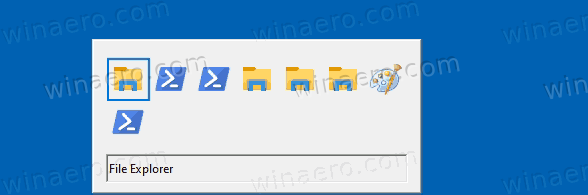
This is the default look of the classic Alt+Tab.
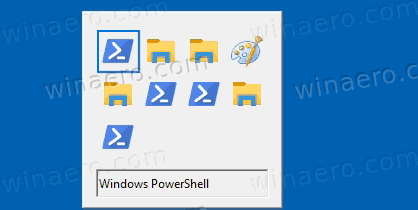
But you can get something like this.
Finally, I would like to show you how to temporarily enable the classic Alt +Tab. The above reviewed methods will enable the older window switcher permanently with a Registry tweak. But you can make it appear without changing the Registry. There is a hidden secret keyboard shortcut for that.
Termporarily open the classic Alt+Tab in Windows 11
- Press the left Alt key and do not release it.
- Press and then release the right Alt key. Do not hold down the right alt key.
- Finally, press and hold the Tab key.
Done! That will show you the classic Alt+Tab dialog without using any additional software or Registry tweaks. But the next time you press the regular Alt + Tab key sequence, it will open the default (newer) window switcher.
So, every time you want to see the classic app switching UI, carefully press the keys from the above intruction. This is pretty enough for users who only occasionally need to use the classic Alt+Tab.
That's it.
Support us
Winaero greatly relies on your support. You can help the site keep bringing you interesting and useful content and software by using these options:

In recent Copper builds (At least on 25136), Classic Alt tab no longer works as expected with dialog being missing but it still works to switch apps. In 22621 and below, it did.
This is brilliant. As well as using the more compact Alt-Tab dialog it also stops the REALLY annoying way Windows 11 orders open windows, and reverts to the much better Windows 7 behaviour where a single Alt-Tab switches between the two most recently viewed windows.
I don’t see the “Alt + Tab Appearance”. Running v1.62.1.0.
Same here, is this Alt + Tab Appearance taken away ?
You need to use Win Aero Tweaker 1.33 or lower to retain the Alt+Tab Appearance option. As far as I am best aware, it was removed in versions newer than 1.33.
This does not work… It worked, but it stopped to work recently.