Windows 10 Creators Update introduced a number of changes to the user interface, so disabling Smart Screen can be a bit confusing. In this article, we'll see how to properly disable SmartScreen in it.
Advertisеment
The SmartScreen filter is a technology which was initially designed for Internet Explorer to protect users from malicious websites and web applications. It was integrated with IE8 and IE9 (as the successor to IE7's Phishing filter). Starting with Windows 8, Microsoft implemented Internet Explorer's SmartScreen feature directly into the operating system so files are screened for being potentially harmful. SmartScreen is also integrated for Windows Store apps.
If enabled, the Windows SmartScreen filter sends information about every application you download and run to Microsoft’s servers, where that information will be analyzed and compared with their malicious apps database. If Windows gets a negative feedback about the app from the server, it will prevent you from running the app. Over time, the reputation of apps builds up in their database.
In Windows 10 Creators Update, SmartScreen is enabled for classic Desktop apps, for Edge and for apps from the Store.
To disable SmartScreen in Windows 10 Creators Update, do the following.
Open Windows Defender Security Center. It's a new feature of Windows 10 Creators Update, which we described in detail in one of our previous articles. It has an icon in the system tray which can be used to open the app. Alternatively, you can create a special shortcut to open it quickly.
Its user interface looks as follows:
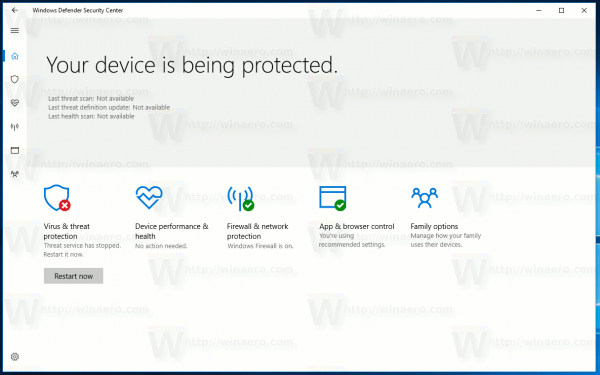
Click the icon "App & browser control".
![]()
The following page will be opened:
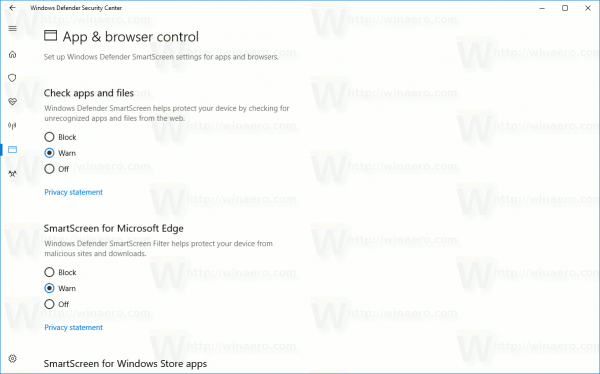
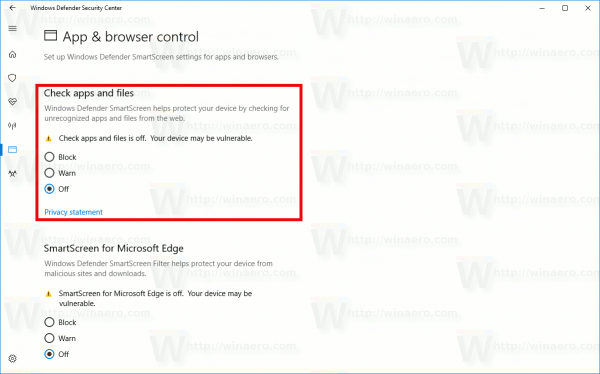
To disable SmartScreen for Desktop apps, select the Off option under Check apps and files.
To disable SmartScreen for Microsoft Edge, select the Off option under SmartScreen for Microsoft Edge.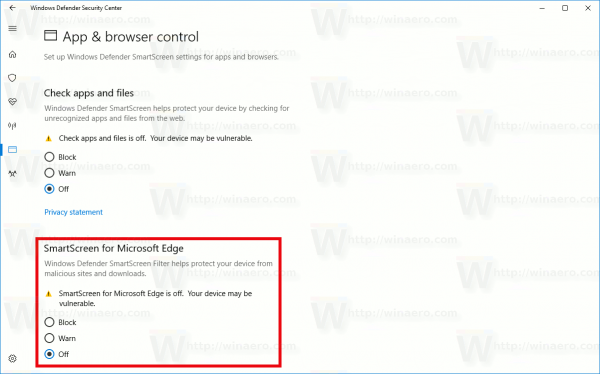
To disable SmartScreen for Windows Store apps, select the Off option under SmartScreen for Windows Store apps.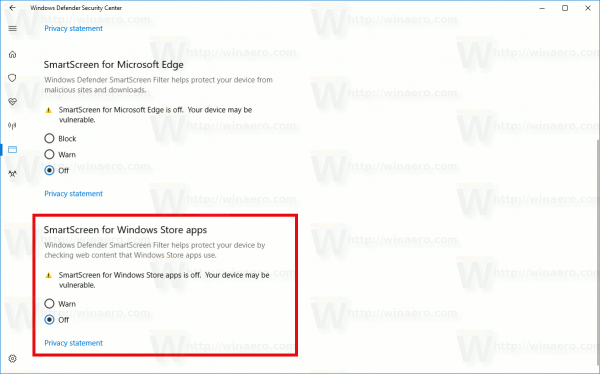
Once you disable all three options, the SmartScreen feature will be completely disabled in Windows 10 Creators Update.
To save your time, I prepared ready-to-use Registry files. You can just import the following *.REG file to disable all SmartScreen features at once:
Windows Registry Editor Version 5.00

[HKEY_LOCAL_MACHINE\SOFTWARE\Microsoft\Windows\CurrentVersion\Explorer]
"SmartScreenEnabled"="Off"

[HKEY_CURRENT_USER\Software\Classes\Local Settings\Software\Microsoft\Windows\CurrentVersion\AppContainer\Storage\microsoft.microsoftedge_8wekyb3d8bbwe\MicrosoftEdge\PhishingFilter]
"EnabledV9"=dword:00000000

[HKEY_CURRENT_USER\Software\Microsoft\Windows\CurrentVersion\AppHost]
"EnableWebContentEvaluation"=dword:00000000
Unzip it and double-click it to import the settings. After that, restart Windows 10. The SmartScreen feature will be disabled. The undo file is included.
Support us
Winaero greatly relies on your support. You can help the site keep bringing you interesting and useful content and software by using these options:

is there way to also disable yellow exclamation mark as well?
this
I know how to turn it off I’m trying to get rid of the stupid warning that it is off!! I know it is off stop warning me. So when a real threat present I won’t even know because of that stupid exclamation point.
This is exactly what i’m looking for.
Anyone have any ideas?
The same applies for the automatic sample submission…
You can disable the windows defender indicator in the task-manager on the startup section. By your next restart you cannot see the symbol of the windows defender security center any more. For real issues there should be notifications in the action center.
This is probably not that easy. But there is a very simple way to hide the complete shield symbol:
For this got to the Task-Manager (Ctrl+Shift+Esc), click on “More details” (if not already).
Then go to the startup section. There should be an entry called “Windows Defender notification icon”. Select this entry and then click on “Disable”.
Resart your PC and wholla: This nasty symol is no longer there :-)
For real problems you’re still informed by the notification center. Therefore disabeling the symbol is no security issue.
Thank god for that, it was doing my head in, Microsoft trying to take over the world.
Thanks a lot!
Smartscreen (the exe) still runs for me sometimes. Man I’m starting to hate Windows 10. It used to be pretty good, not so much anymore.
Microsoft seems to be again misbehaving, not allowing users to make their own determinations on what services to use. Disabling any of the smartscreen options causes a permanent warning which cannot be removed. This tricks the average user that there is an actual and real problem. Thus Microsoft can track everything you do on the Internet and your computer under the guise of security.
I don’t trust them. When I disabled my internet connection and execute an update pack for manual updating of my PC, Windows claimed that the SmartScreen filter weren’t able to reach the server and therefore cannot verify the program – even though I disabled the whole SmartScreen filter (as described here).
The SmartScreen may also be applied by an Active Directory Global Group Policy. If that’s the case, you can bypass this by setting EnableSmartScreen to 0 in the registry. For security’s sake, you may want to re-enable this, after you install your cyber-approved software.
[HKEY_LOCAL_MACHINE\SOFTWARE\Policies\Microsoft\Windows\System]
“EnableSmartScreen”=dword:00000000
Note: You may need a user account with local Admin permissions to make this change.
Thanks for this.
Thanks alot team, it works on W10 Pro 64bit too ; >) V1903 Absolutely loving the stepup from W7 Ultimate. Laptop seems to be alot faster as well. Glad I waited til now after the very first W10 iso…what a mess that was! Cheers All!