In our previous article, we saw how to use the built-in feature of Windows 10 which allows enabling case sensitive mode for folders. To save your time, you might want to add a special context menu to your folders in order to enable or disable case sensitivity directly without opening a new command prompt window. This is really useful, especially for WSL users.
Advertisеment
As you may already know, the Windows file system, NTFS, treats file and folder names as case insensitive. For example, for the OS and apps, MyFile.txt and myfile.txt are the same file. However, things are different in Linux. For this OS, these are two different files. This difference in behavior may create issues for WSL users.
Starting with Windows insider build 17093, there is a new way to handle case sensitive files in Windows: per-directory case sensitivity. This ability has been added to give the user better interoperability when using case sensitive files. Also, you can use it with regular Windows applications. Starting in Windows 10 Build 17110, this behavior is the default.
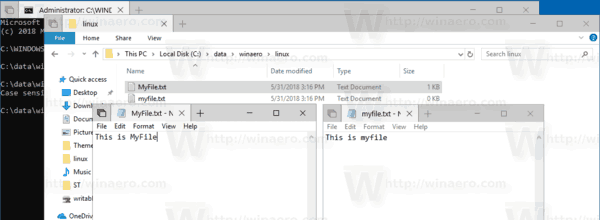
Microsoft has added a new case sensitive flag that can be applied to directories. For directories that have this flag set, all operations on files in that directory are case sensitive, regardless of whether FILE_FLAG_POSIX_SEMANTICS was specified. This means that if you have two files that differ only by case in a directory marked as case sensitive, all applications will be able to access them.
To enable or disable this feature, you should use the built-in fsutil.exe app. For details, refer to the article
Enable Case Sensitive Mode for Folders in Windows 10
To save your time, you can add the Case Sensitivity context menu to folders. Here' is how.
To add the Case Sensitivity context menu in Windows 10, do the following.
- Download the following Registry files: Download Registry Files.
- Extract them to any folder you want, e.g. to your Desktop folder.
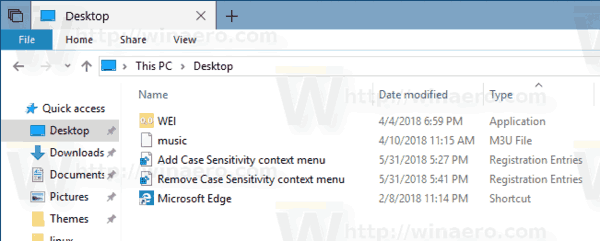
- Double-click on the file Add Case Sensitivity context menu.reg
- Confirm the UAC prompt.

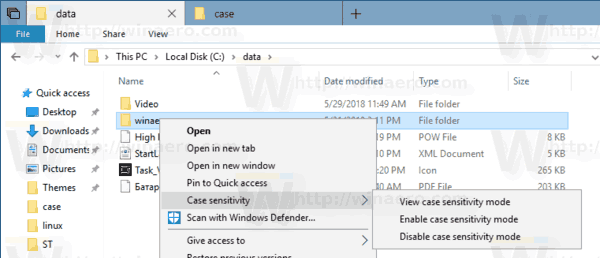
You are done. Right-click on any folder to see the menu. See the following screenshot.
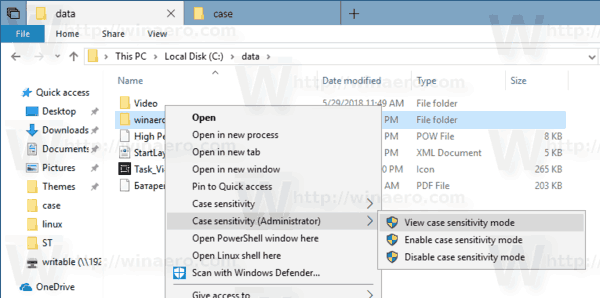
Now, press and hold the Shift key on the keyboard, then right-click on a folder to see the extended context menu. There, you will see extra commands for folders which require administrative privileges to access them.
How it works
The Registry files above add the following commands to the context menu
- To see current case sensitivity mode:
fsutil.exe file queryCaseSensitiveInfo "path to a folder" - To enable case sensitivity mode:
fsutil.exe file setCaseSensitiveInfo "path to a folder" enable - To disable case sensitivity mode:
fsutil.exe file setCaseSensitiveInfo "path to a folder" disable
The following entries will be created once you import the files.
[HKEY_CLASSES_ROOT\Directory\shell\CaseSensitivityMenu]

[HKEY_CLASSES_ROOT\Directory\Background\shell\CaseSensitivityMenu]

[HKEY_CLASSES_ROOT\Drive\shell\CaseSensitivityMenu]

[HKEY_CLASSES_ROOT\Directory\shell\CaseSensitivityMenuAdmin]

[HKEY_CLASSES_ROOT\Directory\Background\shell\CaseSensitivityMenuAdmin]

[HKEY_CLASSES_ROOT\Drive\shell\CaseSensitivityMenuAdmin]
See how to go to a Registry key with one click. Also, see our excellent Windows Registry Editor reference here: Registry Editor app.
That's it.
Support us
Winaero greatly relies on your support. You can help the site keep bringing you interesting and useful content and software by using these options:

Where is the reg file for this tipp ?
Sorry, forgot to post it. Now it is in the article.
Thank you
When enabling gives error
Ошибка: Такой запрос не поддерживается.
C:\Temp>